How to Open Wood Grain to Accept Stain
Applying stain to wood can enhance the beauty of the grain, but sometimes the wood’s pores are closed and won’t accept the stain. In order to open up the pores so that the stain can be absorbed, you’ll need to use a pre-stain conditioner. Pre-stain conditioners penetrate the surface of the wood and deposit molecules that will act as bridges between the fibers and the stain.
Follow these steps to open up wood grain to accept stain.
- Start by sanding the wood with a medium-grit sandpaper to smooth out the surface and open up the grain
- Continue sanding with progressively finer grits of sandpaper until you’ve reached a very fine grit
- Wipe away any dust created by sanding with a clean, dry cloth
- Apply a pre-stain conditioner to the wood according to the manufacturer’s instructions
- This will help ensure an even finish when staining
- Allow the pre-stain conditioner to dry completely before proceeding to stain
Wood Won’T Take Stain in Spots
If you’ve ever tried to stain wood and found that the stain won’t take in spots, you’re not alone. It’s a common problem that can be caused by a number of things.
One reason the stain may not be taking is because the wood is too dry.
When wood is too dry, it doesn’t absorb stain as well. You can solve this problem by using a pre-stain conditioner on the wood before you stain it. This will help to open up the pores of the wood so that the stain can better penetrate it.
Another reason for blotchy stains is when the grain of the wood raises during staining. This can happen if you use too much pressure when applying the stain or if you don’t wipe off excess stain quickly enough. To fix this, sand down any raised areas of grain after staining and then reapply the Stain evenly across the surface.
Finally, make sure you are using a quality Stain that is designed for outdoor use. If you are using a water-based Stain, it’s important to note that these typically don’t work as well on weathered or damaged wood surfaces. For these types of surfaces, an oil-based Stain will usually give better results.
Stain Only Part of Wood
When it comes to staining wood, you don’t have to go all in – you can easily stain only part of the wood for a more unique look. This technique is often used on furniture, where the top of the piece is stained while the rest is left natural. It’s a great way to add some contrast and interest to your woodwork.
To get started, you’ll need two different colors of stain (one for each color that you want to use), a paintbrush, and some painters’ tape. First, decide which area of the wood you want to stain. Then, use the painters’ tape to block off that section from the rest of the piece.
Make sure that your lines are straight and clean so that your final product has nice, sharp edges.
Once your section is taped off, it’s time to start staining! Begin by brushing on a thin layer of one color of stain.
Let it sit for a few minutes so that it can soak in, then wipe away any excess with a clean cloth. Repeat with the other color of stain until you’re happy with the results. Allow your work to dry completely before removing the painters’ tape – and enjoy your newly-stained woodwork!
How to Stain Sealed Wood
If you’re looking to add a touch of color to your sealed wood surfaces, staining is a great option. While it’s true that sealed wood is more resistant to stains than unsealed wood, there are still a few things you need to do in order to ensure that the job turns out well. Here are four tips for staining sealed wood:
1. Choose the right type of stain. There are two main types of stains: water-based and oil-based. Water-based stains are easier to apply and cleanup, but they can sometimes raise the grain of the wood.
Oil-based stains penetrate deeper into the surface and don’t raise the grain, but they can be more difficult to work with.
2. Prepare the surface.
Soaking Wood in Stain
Whether you are staining a new piece of wood or reviving an old one, the process is the same. Soaking the wood in stain will help ensure that the color is evenly distributed and that it penetrates deep into the grain. This method is especially effective on hardwoods like oak and maple.
To start, choose the right type of stain for your project. Water-based stains are easier to work with and clean up, but they don’t penetrate as deeply into the wood. Oil-based stains will give you a deeper color, but they can be more difficult to apply and clean up.
Once you have your stain ready, apply it to the wood using a brush or rag. Work in small sections so that you don’t miss any spots. Once the entire piece is covered, let it sit for about 15 minutes so that the stain can soak in.
After 15 minutes have passed, wipe off any excess stain with a clean cloth. You want to remove any excess before it dries, otherwise it will be very difficult to remove later. Let the stained piece dry completely before applying a topcoat or finishing sealer.
How to Blend Stain Overlap
If you have ever had the misfortune of trying to fix a stain overlap, you know how frustrating it can be. It’s like trying to paint over a wet spot on your wall – the new color just won’t stick. But don’t despair!
There is a way to blend those pesky overlapping stains and achieve a smooth, even finish. Here’s what you need to do:
1. Begin by sanding down the area around the overlap with fine-grit sandpaper.
This will help create a smooth surface for the new stain to adhere to.
2. Next, apply a fresh layer of stain to the entire area, including the areas that don’t have any overlap issues. Use a brush or rag to evenly distribute the color.
3. Allow the new stain to dry completely before proceeding to step 4.
4. Now it’s time to address the actual overlap itself. Using a small brush or cotton swab, carefully apply some of the darker stain onto the lighter area in order to blend them together seamlessly.
Work slowly and be sure not to use too much pressure, or you’ll end up with an uneven finish.
5 . Once you’re happy with how the colors look, allow everything to dry completely before applying a clear sealer or topcoat .
And that’s it! You’ve successfully blended two stains together without any telltale signs of an unsightly overlap .

Credit: www.amazon.com
How Do You Open Wood Pores to Stain?
When it comes to staining wood, one of the most important steps is preparing the wood surface by opening the pores. This allows the stain to better penetrate the wood, resulting in a more even and consistent finish. There are a few different ways that you can open the pores of your wood before staining, and we’ll go over a few of them here.
One popular method for opening wood pores is to use a pre-stain conditioner. These products are designed specifically for this purpose and usually come in aerosol or gel form. To use a pre-stain conditioner, simply apply it evenly to the surface of your wood using a clean cloth or brush and let it sit for about 15 minutes before wiping off any excess and proceeding with your stain application.
Another way to open up wood pores is by using boiled linseed oil. This method is particularly effective on hardwoods like oak or maple. To use boiled linseed oil, simply apply it generously to your wood surface with a clean cloth and let it soak in for at least 30 minutes before wiping off any excess and proceeding with your stain application.
Finally, you can also use denatured alcohol as a pore opener for your wood surfaces. Denatured alcohol will evaporate quickly so be sure to work in small sections when using this method. Apply the denatured alcohol liberally to your wood surface with a clean cloth and then immediately wipe off any excess with another clean cloth before proceeding with your stain application.
Whichever method you choose, just be sure to give yourself plenty of time to work so that you don’t rush through the process and end up with an uneven finish.
How Do You Pop Wood Grain before Staining?
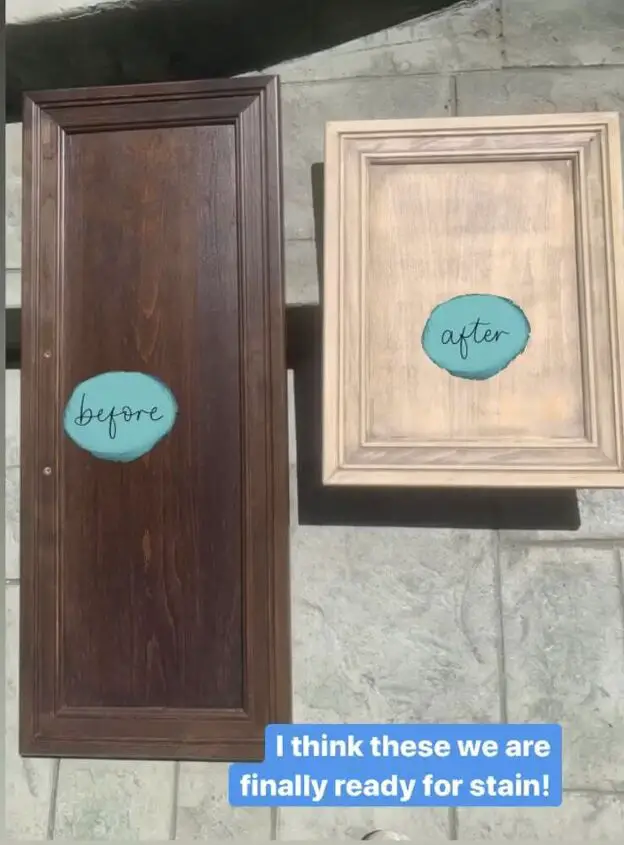
If you’re planning to stain your woodworking project, you’ll need to raise the grain first. Otherwise, the stain will be absorbed unevenly and can result in a blotchy finish.
There are a few different ways to do this, but we’ll show you the easiest method using distilled water.
Start by sanding your wood with a medium-grit sandpaper until it feels smooth. Then, wipe away any dust with a clean cloth.
Next, dampen a rag with distilled water and lightly rub it over the surface of the wood.
You don’t need to soak the wood, just make it slightly damp.
Let the wood dry for about 30 minutes, then sand it again with fine-grit sandpaper. This will remove any raised grain and leave you with a smooth surface that’s ready to be stained.
Why is the Wood Not Taking the Stain?
When staining wood, it is important to ensure that the wood is properly prepared before beginning. If the wood is not prepared properly, the stain will not be able to penetrate the surface and will not adhere correctly. There are a few things that can cause this issue:
1. The wood was not sanded properly – If the wood was not sanded properly before staining, the surface will be too smooth and the stain will not be able to penetrate. Sanding provides a rough surface for the stain to adhere to.
2. The wrong type of sandpaper was used – If you use a type of sandpaper that is too fine, it will create a smooth surface instead of a rough one.
This will again prevent the stain from adhering correctly. Use coarse sandpaper (60-80 grit) for best results.
3..
The grain was raised when sanding – When sanding, you should always go with the grain of the wood. If you go against the grain, it will raise the grain and create a rough surface. However, if you go with the grain, it will create a smooth surface which won’t allow stains to penetrate as easily.
.
4. The wood wasn’t cleaned before staining – It’s important to clean your wood before applying any sort of finish or topcoat, including stains. Any dirt or debris on the surface of the wood will prevent stains from adhering correctly.
.
How Do You Pop Wood Grain After Staining?
When staining wood, it’s important to ensure that the grain is evenly distributed. One way to do this is to pop the grain before applying the stain. This can be done with a variety of tools, but one of the most effective is a palm sander.
To start, you’ll need to sand the wood with medium-grit sandpaper until the surface is smooth. Once that’s done, you can attach your palm sander to a vacuum cleaner and turn it on. Hold the sander against the wood and move it in small circles until you see the grain start to raise.
Once all of the grain has been raised, you can proceed with staining as usual.
Biggest wood staining mistakes and misconceptions | Wood staining BASICS
Conclusion
Have you ever looked at a piece of wood furniture and wondered how the stain was applied so evenly? If so, then this blog post is for you! In it, we’ll show you how to open up the wood grain to accept stain evenly, without any blotches or streaks.
We’ll also give you a few tips on what type of wood is best for staining. So whether you’re looking to refinish an old piece of furniture or add some color to your DIY project, follow along and we’ll show you how it’s done!