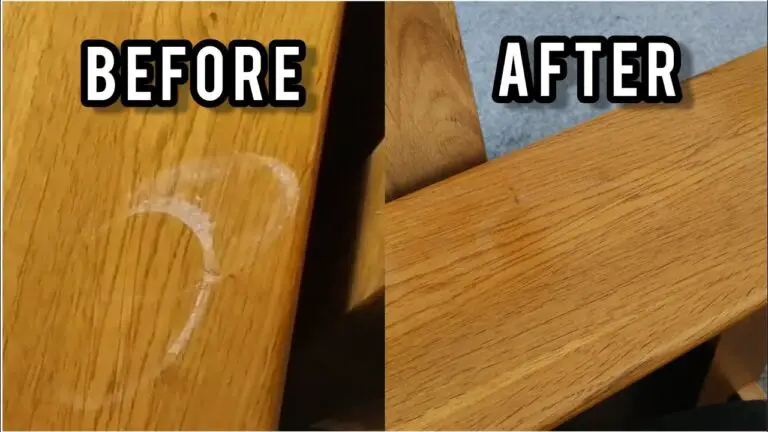
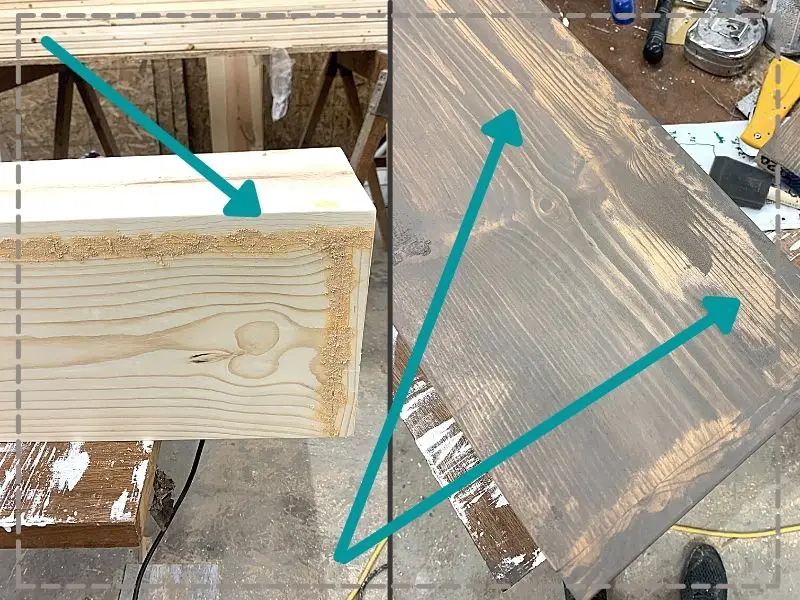
Staining Over Wood Filler Gives Blotchy Results
When you’re trying to achieve a uniform look on your woodworking project, staining over wood filler can give you blotchy results. The best way to avoid this is by using a pre-stain conditioner before you apply your stain. This will help the stain to evenly penetrate the wood, giving you a more consistent color.
If you’re planning to stain your woodworking project, beware of using wood filler – it can give you blotchy results! Wood filler is often used to fill in nail holes or other small imperfections before painting or staining, but it’s important to remember that it doesn’t take stain the same way that wood does. As a result, you may end up with an uneven finish if you use wood filler and then try to stain over it.
One way to avoid this problem is to use a different type of filling material that is compatible with stain, such as putty or cork. Or, you can sand down the area filled with wood filler until it is even with the rest of the surface before applying your stain. Either way, taking this extra step will help ensure a smooth, professional-looking finish on your project.
How to Hide Wood Filler After Staining
If you’ve ever stained wood, you know that sometimes the filler doesn’t take the stain evenly. This can leave an unsightly finish and is especially frustrating if you’re trying to achieve a natural look. Luckily, there are a few tricks you can use to help hide wood filler after staining.
One method is to mix your own custom color of filler. This way you can get a closer match to the surrounding wood and make any imperfections less noticeable. Another option is to use a dark stain on the filler itself.
This will help blend it in with the rest of the piece and make it less visible.
Finally, remember that sanding is your friend! A good sanding job will help even out the finish and give you a smooth surface to work with.
So don’t be afraid to go over any areas that seem rough or patchy – a little extra effort now will pay off in the end!
How to Make Wood Filler Look Like Wood
Wood filler is a great way to repair small cracks and holes in wood surfaces. It can also be used to fill in gaps between boards or to level out a surface. Wood filler comes in a variety of colors, but sometimes it can be difficult to get an exact match for your project.
Luckily, there are a few tricks you can use to make wood filler look like wood.
One way to make wood filler look like wood is to add some sawdust to the mix. Simply collect some sawdust from sanding or using a power tool, and then add it to the wood filler until you achieve the desired color and consistency.
Another way to get a similar effect is by adding pigment or paint to the wood filler. This method may take some trial and error to get the right color, but it’s worth it for a perfect match.
Once you’ve mixed up your custom wood filler, simply apply it as you would any other type of filling compound.
Use a putty knife or another flat tool to push the mixture into cracks and crevices, then smooth it out so that it’s level with the surrounding surface. Allow the filler to dry completely before sanding or painting over it. With these tips, anyone can make their own custom-colored wood filler that looks just like real wood!
Applying Stain Over Wood Filler
If you’re working with wood filler for the first time, or if you’re trying a new type of wood filler, it’s important to know how to apply stain over the filler so that the finished product looks natural. Here are some tips for applying stain over wood filler:
1. Choose the right color of stain.
The color of your stain should match the color of the surrounding wood. If you’re not sure what color to use, test the stain on a scrap piece of wood before applying it to your project.
2. Apply a thin layer of stain.
Once you’ve selected the right color of stain, apply a thin layer to the area where you’ll be using wood filler. It’s important to work in small sections so that the stain doesn’t dry before you have a chance to wipe it off.
3. Wipe off excess Stain .
After you’ve applied a thin layer of stain, use a clean cloth to wipe off any excess before it has a chance to dry. This will help ensure that only the desired amount of color is absorbed by the wood filler.
4 Let it dry completely .
Once you’ve applied and wiped away any excess stain, let your project dry completely before moving on to the next step in your project.
Wood Filler Not Taking Stain
When you’re trying to achieve a certain look with your woodworking project, the last thing you want is for your wood filler not to take stain. Unfortunately, this can be a common problem that leaves many woodworkers scratching their heads in frustration.
There are a few things that could be causing your wood filler not to take stain.
First, it’s important to make sure that you’re using the right type of wood filler. There are two main types of wood filler – oil-based and water-based. Oil-based fillers are typically much better at taking stain than water-based fillers.
Another possibility is that the surface of your wood isn’t properly prepared for staining. If there is any wax or grease on the surface, it can create a barrier that prevents the stain from penetrate into the wood filler. Always sand your project thoroughly before applying any type of finish, including stain.
Finally, it’s possible that you simply didn’t apply enough stain to the area where you used the filler. Wood fillers are designed to absorb stain, so if you don’t use enough it won’t be effective. Be sure to apply a generous amount of stain and work it into the filler with a brush or rag until it’s fully saturated.
With these tips in mind, you should be able to get your wood filler taking Stain like a pro!
Varnish Over Wood Filler
Wood filler is a popular choice for many woodworking projects. It’s easy to use and can create a smooth, professional finish. However, some woodworkers prefer to use varnish over wood filler for certain projects.
There are several reasons why you might choose to use varnish over wood filler. First, varnish will protect the wood from moisture and humidity better than wood filler will. This is especially important if the project will be exposed to elements like sunlight or water.
Second, varnish can help give the project a more finished look by creating a uniform surface. And third, varnish is generally easier to sand down than wood filler, so it’s less likely to leave behind any rough edges.
Of course, there are also some drawbacks to using varnish over wood filler.
Varnish is more expensive than wood filler, so it might not be the best choice for large projects or budget-minded DIYers. Additionally, it can be tricky to apply evenly and get good results with varnish (especially if you’re not experienced with using it). For these reasons, some people prefer to stick with using wood filler instead of varnish.
Ultimately, whether you choose to use varnish or wood filler (or both) is up to you and what you think will work best for your particular project. If you’re unsure which product to use, ask an experienced friend or family member for their opinion – or experiment on a small test piece before tackling your main project!
Credit: diywithchristine.com
Can You Stain After Using Wood Filler?
It is not recommended that you stain over wood filler. Wood filler is meant to fill in holes and cracks in wood surfaces and when it dries, it forms a hard surface. Once the filler has dried, sanding it smooth will help create an even surface for staining, but the pores of the wood filler will not accept stain.
How Do You Fix Uneven Blotches After Staining?
If you have blotches after staining, there are a few things you can do to fix them. First, you can try sanding the area down to even it out. If that doesn’t work, you can try using a pre-stain conditioner or a wood filler.
You can also try applying the stain in thin coats until the blotches even out.
What Do I Do If My Wood Stain is Blotchy?
If you’re unhappy with the way your wood stain is looking, there are a few things you can do to try and fix it. First, check the label of your stain to make sure that it is compatible with the type of wood you’re working with. Some stains are only meant for certain types of wood and won’t work well (or at all) on others.
Once you’ve confirmed that your stain should work with your wood, take a look at how you applied it. If you didn’t follow the directions on the can, that could be why your stain looks blotchy. Make sure you’re applying an even coat and giving the stain enough time to dry in between coats.
If your stain is still looking blotchy after following these tips, you may need to strip it off and start over. This isn’t always necessary, but if nothing else seems to be working, it’s worth a try. Be sure to use a stripper that is compatible with your type of wood and follow the instructions carefully so as not to damage your piece.
Will Solid Stain Cover Wood Filler?
Whether or not solid stain will cover wood filler depends on the type of wood filler being used. If you are using a water-based wood filler, then solid stain should be able to cover it just fine. However, if you are using an oil-based wood filler, then you may have some issues getting the solid stain to adhere properly.
In either case, it is always best to consult with the manufacturer of the wood filler to see if they have any specific recommendations for what type of topcoat to use.
Best Wood Filler for Staining Over Top Of
Conclusion
It’s important to choose the right wood filler when repairing holes or cracks in wood, otherwise you may end up with blotchy results. A good rule of thumb is to use a filler that is similar in color to the surrounding wood. If you’re unsure, it’s always best to test the filler on a small area before applying it to the entire surface.