How to Make a Bench from Wood
Use a saw to cut the wood into pieces that will form the bench. Make sure to sand down the edges of each piece so that they are smooth. Next, use a drill to create holes for the screws.
Assemble the bench by screwing in the pieces of wood. Finally, stain or paint the bench according to your preference.
- Choose the type of wood you want to use for your bench
- Some good options include cedar, redwood, and teak
- Avoid using pressure-treated lumber as it may contain chemicals that can be harmful
- Cut the boards to size using a saw
- You will need two long side pieces and two shorter pieces for the ends of the bench
- Drill pilot holes in each board using a drill bit slightly smaller than the diameter of your screws or nails
- This will help prevent the wood from splitting when you screw or nail it together later on
- Apply a liberal amount of glue to each end of the side pieces and then attach them to the ends of the shorter boards using screws or nails
- Make sure everything is flush and level before moving on
- Fill any gaps between the boards with wood filler and let it dry completely according to the manufacturer’s instructions before sanding it smooth with sandpaper 6
- Finish off your bench by staining or painting it as desired
How to Make a Wooden Bench With Back
Making a wooden bench with back support is a simple woodworking project that requires only basic carpentry skills. The bench can be made from any type of wood, but using sturdy and weather-resistant lumber will ensure that it lasts for many years. Cedar is a good choice for outdoor furniture, as it is naturally rot-resistant.
You can leave the bench unfinished, or paint or stain it to match your other outdoor décor.
Building the Bench Seat
Cut four pieces of 2×4 lumber to the desired length of your bench seat using a circular saw.
These will be the legs of your bench. Cut two more pieces of 2×4 lumber to create the front and back supports for your seat. Make sure these pieces are slightly longer than the width of your seat so that they extend past the legs when attached.
To make the seat more comfortable, you can add some padding before attaching the front and back supports. Cut a piece of foam insulation to fit snugly inside the frame created by the 4 leg pieces and 2 side supports. Wrap this in batting, then staple or glue fabric over top.
Trim off any excess fabric before attaching the side supports.
Attaching the Side Supports
Position one side support at each end of your bench frame so that they are flush with the tops ofthe legs.
Drill pilot holes through each support into each leg, then secure them in place using 3″ screws driven through washer plates on both sides (this will help prevent splitting).
How to Make a Bench Seat
Making a bench seat is a great way to add extra seating to your home. You can build a simple bench seat out of lumber and some basic supplies, or you can get creative and upholster the bench for added comfort and style. Here’s how to make a bench seat:
1. Cut your lumber to size. You’ll need four boards for the main body of the bench, plus two more for the backrest. If you’re planning on upholstering the seat, you’ll also need some plywood or other material for the bottom of the seat.
2. Assemble the frame of the bench using screws or nails and wood glue. Make sure everything is square and level before moving on.
3. Attach the backrest boards to the frame using screws or nails and wood glue.
Again, make sure everything is square and level before moving on.
4. If you’re upholstering the seat, do that now by stapling fabric or leather to the bottom piece of plywood (or whatever material you’re using). Make sure there’s enough fabric/leather to wrap around to the underside of the plywood so it looks nice when finished.
5 . Attachthe bottom piece of plywood (or other material) tothe frame using screws or nailsand wood glue . Be careful notto over tighten , as this could crackthe plywood .
Trim any excess fabric/leather off Now stand backand enjoy your newbench seat!
How to Build an Outdoor Bench
If you’re looking for a simple, sturdy outdoor bench that will last for years to come, you can’t go wrong with a classic picnic table style bench. Here’s how to build one in just a few hours:
1. Cut your lumber to size.
You’ll need two boards for the seat and two boards for the legs, plus a few extra inches for overhang. If you want your bench to be a certain width, make sure to adjust your cuts accordingly.
2. Drill pocket holes into each board using a Kreg Jig .
This will make it much easier to assemble the bench later on.
3. Assemble the seat by attaching the two seat boards together with screws or nails. Then, attach the legs to the seat using screws or nails (again, pre-drilling pocket holes makes this much easier).
4. Finish as desired – sanding smooth and adding a coat of paint or stain is always recommended!
How to Build a Simple Bench
When it comes to adding a bench to your home, there are a lot of different options out there. But if you’re looking for something simple and straightforward, then building a basic wooden bench is the way to go. This project is easy enough for even beginner DIYers to handle, and only requires a few tools and materials.
Plus, once you’re finished, you’ll have a beautiful piece of furniture that can be used in any room of your house.
To get started, you’ll need:
-1×12 board (8 feet long)
-2×4 boards (8 feet long)
-wood glue
-clamps
-saw
-drill
-screws
-(optional) paint or stain
First, cut your 1×12 board into three equal pieces using a saw. These will be the top, middle, and bottom sections of your bench.
Then, take two of the 8 foot 2×4 boards and cut them down to 6 feet long. These will be used as the legs for your bench.
Next, it’s time to assemble everything!
Place the three sections of the 1×12 board on top of each other and use wood glue and clamps to hold them together while the glue dries. Once that’s done, drill four pilot holes through all three layers at each end of the board stack. Then screw in some screws to really secure everything together. At this point you can also add paint or stain if desired – otherwise just leave your bench natural for a rustic look.
Finally, attach the legs by drilling pilot holes and screwing them into place at each corner of thebenchtop assembly . That’s it – now you have yourself a brand new bench!
How to Build an Outdoor Bench With Back
One of the most popular pieces of outdoor furniture is the bench. Benches can be used in a variety of ways, as they are versatile and functional. They can be used for seating, storage, or even as a decorative piece in your garden.
A bench with a back is even more comfortable and stylish, and it can be easily built using some basic woodworking skills.
If you’re looking to add a bench to your outdoor space, here’s how to build an outdoor bench with back:
1. Cut the lumber for your project.
You’ll need four 2x4s for the main body of the bench, two 1x4s for the seat slats, and one 2×6 for the backrest. If you’re using pressure-treated lumber, make sure to wear gloves when cutting it as the chemicals can be harmful.
2. Assemble the frame of the bench by attaching the 2x4s together with screws or nails.
Make sure that all of the corners are square before moving on.
3. Cut your 1x4s down to size and attach them across the top of the frame as seat slats. Space them evenly so that there’s room for people to sit comfortably without their legs hanging off overhang offthe edge скользить по краюof .
thebench 4.. Once again Make убедитесь в томthat all Checkofyour jointsyourare worksquare is properlybefore done Secureby attachingand levelthebackrest 2x6with into place eitherscrewsnails or bolts., then finish5..
Fillup any holes with wood putty sanding , smooth out any edges until they’re nicea ndeven., thenapply paint primer 6or varnish accordingto7your preference protectantsto keep 8.. Add cushions optional but recommended!
)and throw pillows (for comfort9and style.) Now you havea beautiful new10outdoor bench to enjoyfor years come!
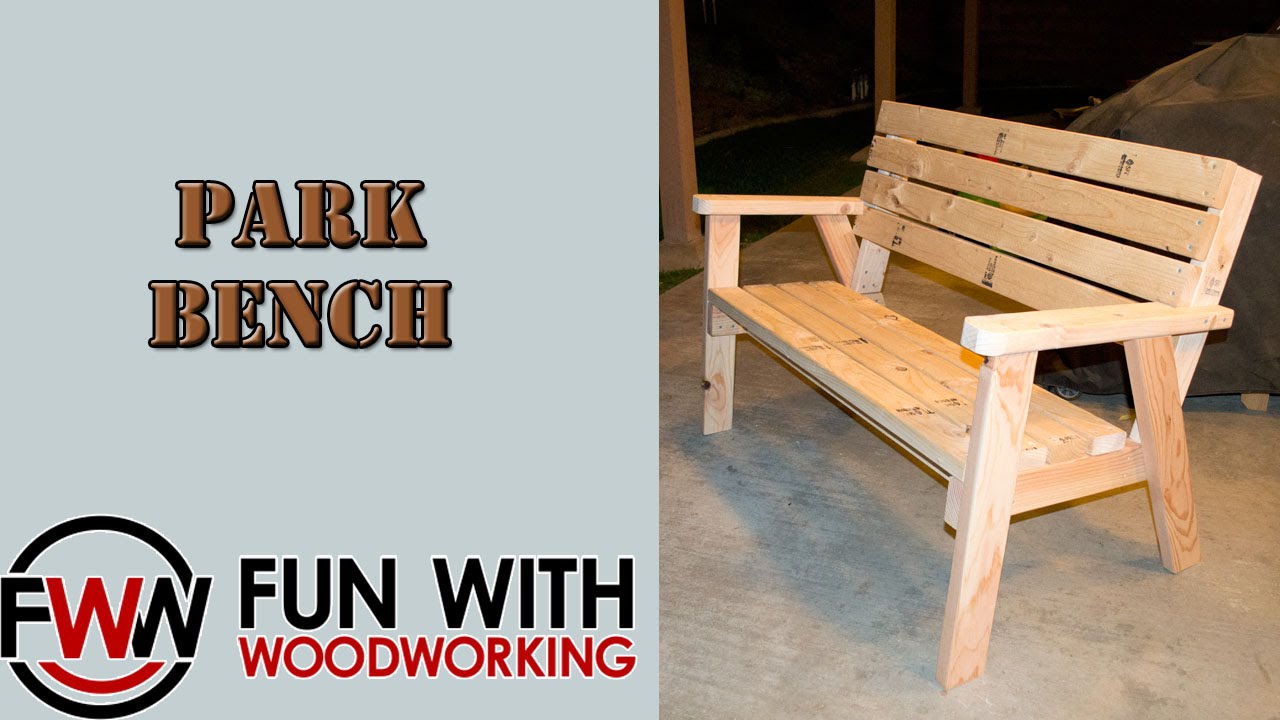
Credit: www.youtube.com
How Do You Make a Simple Wooden Bench Seat?
Assuming you would like a tutorial on how to make a basic wooden bench seat:
First, cut your wood boards to the desired length for the seat and backrest. For a standard size bench, you will need two boards for the seat and two boards for the backrest, each around five feet long.
If you want arm rests on your bench, cut additional boards to attach later.
Next, use wood screws to attach the seat boards together. You may want to drill pilot holes first so that the screw heads do not split the wood.
Then, do the same for attaching the backrest boards together. At this point, you should have two separate pieces – one for the seat and one for the backrest.
Now it’s time to start putting everything together!
Begin by attaching the backrest piece to the seat piece using more wood screws. Make sure that both sides are flush before moving on. If everything looks good so far, continue by attaching each of the legs (if using) onto either side of the bench using L-brackets or by nailing them into place.
Once all four legs are attached (or if you’re not using any), turn your attention to finishing touches like sanding down any rough edges and staining or painting your new bench seat!
What is the Best Wood to Make a Bench Out Of?
When it comes to benches, there is no one “best” wood to use. It all depends on your personal preferences and what type of look you are going for. Some popular woods for benches include cedar, redwood, teak, and eucalyptus.
Cedar is a softwood that is naturally resistant to rot and decay, making it a good choice for outdoor furniture. Redwood is another rot-resistant option that has a beautiful grain pattern. Teak is a durable hardwood that has natural oils that make it resistant to water damage and insect infestation.
Eucalyptus is a fast-growing hardwood with a straight grain and uniform texture. It weathers well and has low shrinkage rates, making it an ideal choice for outdoor furniture.
How to Make an Outdoor Wood Bench?
Most people don’t realize how easy it is to make their own outdoor wood benches. With a few supplies and some basic carpentry skills, you can build a bench that will last for years. Here’s how:
1. Choose your lumber. You’ll need enough boards to create the seat and the legs of the bench. If you’re not sure how much lumber to buy, measure the space where you plan to put the bench and add a few inches for overhang.
Then, consult your local hardware store or lumberyard for advice on what type of wood to select. For durability, we recommend using pressure-treated lumber or cedar.
2. Cut the boards to size.
Use a saw to cut the boards down to the appropriate length for your bench. If you’re not comfortable using power tools, ask someone at the hardware store or lumberyard to make the cuts for you.
3a.
Assemble the seat of the bench (if using pre-made slats). Place the slats side by side on a flat surface and use wood screws or nails to attach them together at each end . . .
How Thick Should Wood Be for a Bench Seat?
One of the most important considerations when building a bench is how thick the wood should be. The answer to this question depends on a few factors, such as the type of wood and the intended use for the bench.
For example, if you are using hardwood for your bench, you will want to use thicker planks so that the bench can support more weight.
On the other hand, if you are using softer woods like cedar or pine, you can get away with using thinner planks.
Another factor to consider is how you will be using the bench. If it is simply for seating, then thickness isn’t as important.
However, if you plan on using the bench for storage or as a work surface, then you will want to use thicker wood so that it can support more weight without sagging or breaking.
In general, most benches will require at least 1″ thick lumber (2″ is even better). Softer woods can get by with less while harder woods will need more.
Ultimately, it comes down to personal preference and what works best for your project.
The $15 Fifteen Minute Bench – Easy DIY Project
Conclusion
This post outlines the steps for creating a bench from wood. The first step is to find a suitable piece of wood. Next, cut the wood to size and shape it as desired.
Finally, sand the wood and finish it with paint or varnish.