How to Engrave Wood Without Tools
Wood engraving is a form of relief printing and is known as one of the oldest forms of printmaking. A design is carved into the surface of a block of wood, which is then inked and used to print images on paper. This type of printmaking does not require any special tools or equipment, making it a perfect activity for those who are just starting out in the world of art and printmaking.
All you need is a sharp knife and a piece of wood.
- Gather your materials
- You will need a piece of wood, a pencil, and a sharp knife
- Draw your design on the wood with the pencil
- Make sure the lines are clear and visible
- Using the sharp knife, carefully carve along the lines of your design
- Be careful not to go too deep or you will ruin your design
- Once you have finished carving, you can sand down the edges if necessary to smooth them out
Credit: www.youtube.com
How Do You Engrave Wood Without Engraver?
There are a few ways that you can engrave wood without an engraver. One way is to use a Dremel tool with a carbide tip. Another way is to use a rotary tool with a diamond-tipped bit.
Finally, you can also use a wood burning tool to create your own design on the wood surface.
How Do You Engrave Wood by Hand?
Wood engraving is a form of relief printing and is usually done by hand. A design is first drawn onto the wood block, which is then carved out using chisels and other tools. The raised areas of the carving will hold the ink when the block is inked and printed.
Wood engraving can be used to create both text and images, and can be very intricate or quite simple. It’s a great way to add a personal touch to your work, whether it’s a handmade card or a piece of art.
If you’re interested in trying wood engraving, there are a few things you’ll need to get started:
– A piece of wood. You can use almost any type of wood for engraving, but softer woods like balsa or basswood are easier to carve.
– Chisels and other carving tools.You’ll need some sharp chisels to get started, as well as maybe some gouges and knives.
– Ink. You’ll need printer’s ink or another type of black ink that can be applied with a roller.
– A brayer.
This is a small roller that’s used to apply ink evenly to the block before printing.
– A printing press (optional). If you have access to one, using a printing press will make it easier to get clean prints from your blocks.
If not, you can just print them by hand using a wooden spoon or something similar.
How Do You Burn Wood Without a Wood Burning Tool?
If you’re looking to burn wood without a wood burning tool, there are a few methods you can try. One is to use a blow torch. Another is to use a soldering iron.
Finally, you can also try using a piece of metal that has been heated in a fire.
Whichever method you choose, make sure that the wood is dry and that there is no green growth on it. If the wood is too wet, it will hiss and steam when you try to burn it and will be very difficult to light.
If there is green growth on the wood, it will release harmful chemicals when burned.
Once you’ve selected your piece of dry wood, start by heating one end of it with your chosen tool. Once it’s hot enough, hold the other end of the wood against the heat source and start rotating it.
As the wood starts to burn, keep moving it around so that all sides are evenly charred.
Once the entire piece of wood is blackened, blow out any remaining flames and allow it to cool before handling. Congratulations – you’ve now burned wood without using a traditional wood burning tool!
What Do I Need for Wood Engraving?
Assuming you would like an answer to the question, “What do I need for wood engraving?” here are some basics:
First, you will need a wood piece that is smooth and even. If your wood piece is not sanded down or planed, your engraving will be more difficult and the lines will not be as crisp.
Second, you need a sharp carving tool. A dull knife will make it hard to get clean lines and can cause splintering. Third, you need a way to hold your wood piece still while you work.
You can use a vise, clamp, or even just prop it up against something sturdy. And lastly, you will need patience! Wood engraving takes time and attention to detail to get good results.
Now that you have all of the supplies necessary for wood engraving, let’s move on to the process itself! The first step is to sketch out your design on paper. Once you have a basic idea of what you want your engraving to look like, transfer your design onto the wood using carbon paper or a tracing method of your choice.
Next, begin carving out your design with small cuts following along the lines of your sketch. Be sure to go slowly and carefully! It is easy to make mistakes when working with such delicate tools on such a small scale.
After you have finished carving out the main lines of your design, start deepening some of the cuts to create shadows and depth within the image. Finally, take a step back and assess your work – touch up any areas that need improvement and add any final details that will bring your engraving to life!
Letter Carving With A Simple Utility Knife
Wood Burning Tool Substitute
If you’re looking for a wood burning tool substitute, there are a few options available. One option is to use a soldering iron. Another option is to use a hot knife.
Finally, you can also use a heat gun.
How to Engrave Wood With Cricut Maker
Assuming you would like a blog post discussing how to engrave wood with a Cricut Maker:
Cricut Maker machines are some of the most versatile on the market. Not only can they cut and score a variety of materials, but they can also engrave!
That’s right – with the right tools, your Cricut Maker can etch wood, leather, and other materials. Here’s a step-by-step guide on how to engrave wood with your Cricut Maker.
First things first – you’ll need an Engraving Tip for your Cricut machine.
This is a separate tool that must be inserted into the housing where your blade normally goes. Once you have your tip installed, load your mat with whatever material you’d like to engrave. For this project, we used basswood from our local craft store.
Next, open up Design Space and select “Make It” in the upper right-hand corner. From there, choose “Upload Images” and upload the design you want to engrave onto your wood piece. Once your design is uploaded, select it and click “Insert Images.”
You may need to resize your design at this point; just click and drag the corners until it’s the size you want.
Now it’s time to send your design to be engraved! Click on “Layer 1” in the Layers panel on the right side of the screen; this will highlight everything in that layer so we can edit it all at once.
In the top toolbar, change the cutting setting from “Score” to “Engrave.” Finally, click “Send To Machine” in the bottom toolbar and choose “Engraving.”
At this point, if everything is set up correctly, Design Space will take over and start sending instructions to your Cricut machine.
Just sit back and let it do its thing! When it’s finished engraving, unload your mat (being careful not to touch any hot surfaces) and voila – you’ve got yourself a beautifully engraved wooden piece!
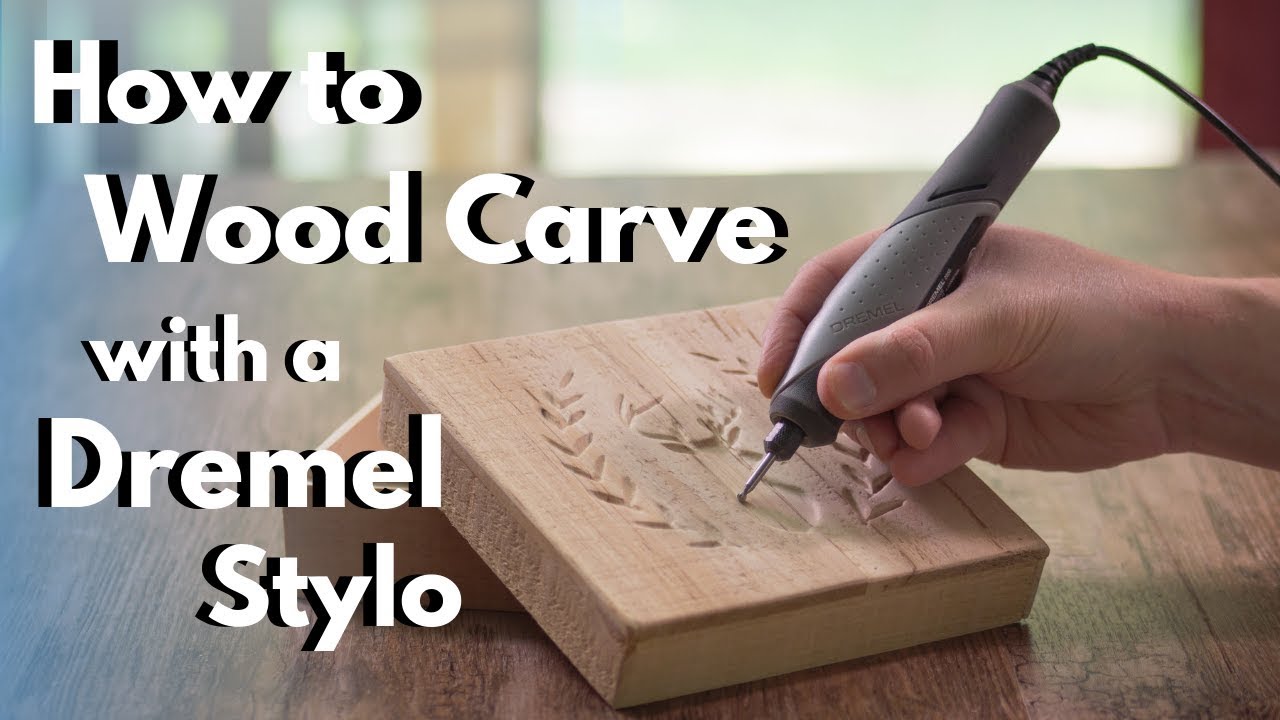
How to Engrave Wood With Dremel
How to Engrave Wood With Dremel
Dremels are a versatile tool that can be used for many different purposes, including engraving wood. If you’re looking to add a personal touch to a wooden object, engraving is a great way to do it.
Here’s how you can engrave wood using a Dremel tool.
First, gather your materials. You’ll need the following: -A Dremel tool -A sharpie or other marker -A piece of wood -Engraving bit (see below for more information on choosing the right one) -Protective eyewear
Once you have all of your materials, it’s time to get started. Begin by putting on your protective eyewear and selecting the appropriate engraving bit for your project. When choosing an engraving bit, keep in mind the depth of the engraved design you want as well as the type of wood you’re working with.
For example, if you’re working with softwood, you’ll want to use a softer material like aluminum oxide or silicon carbide. On the other hand, if you’re looking to create deeper carvings, tungsten carbide bits are ideal.
Once you’ve selected your bit, attach it to your Dremel tool according to the manufacturer’s instructions.
Then, use your sharpie or marker to draw the design onto the piece of wood. Be sure to make any necessary adjustments before starting to engrave so that your design is just how you want it.
When you’re ready, begin slowly moving the Dremel over the surface of the wood following your design lines until desired results are achieved.
If necessary, adjust speed and pressure as needed while carving. Remember to take breaks often so that you don’t overheat either yourself or the Dremel tool!
How to Engrave Wood at Home
Wood engraving is a beautiful way to add personalization and decoration to woodworking projects. It’s also a great way to show off your woodworking skills! Here are some tips on how to engrave wood at home:
1. Choose the right tool for the job. An electric drill with a small bit is ideal for most projects. A Dremel tool can also be used, but it’s not necessary unless you’re doing very detailed work.
2. Practice on scrap wood before you start working on your project piece. This will help you get a feel for the tool and how much pressure to apply.
3. When you’re ready to start, position the tip of the drill bit or Dremel tool where you want the engraving to begin.
Apply gentle pressure as you move the tool in whatever design or pattern you desire. If using a drill, go slowly so that you don’t split the wood fibers.
4. To create different shades of darkness in your engraving, vary the amount of pressure you apply while working.
For example, press harder when making curved lines and lighter when making straight lines or dots.
5 .
Conclusion
Assuming you would like a summary of the blog post titled “How to Engrave Wood Without Tools”:
The blog post outlines a few different ways that wood can be engraved without the use of any tools. One way is to use a soldering iron to burn designs into the wood.
Another way is to use a Dremel tool with a grinding bit attached. The final way that is mentioned is to use sandpaper to create designs in the wood.