Wood Will Not Accept Stain
Wood will not accept stain. This is a common problem when trying to refinish furniture or floors. The wood will not absorb the stain, leaving it looking patchy and uneven.
There are a few things you can do to try and fix this problem. First, sand the surface of the wood lightly. This will open up the pores of the wood and help the stain to be absorbed evenly.
Second, apply a pre-stain conditioner to the wood before staining. This will help the stain to be absorbed more evenly into the wood. Finally, make sure you are using a high quality stain that is designed for use on wood surfaces.
If you follow these steps, you should be able to get an even coat of stain on your wood surface.
Wood is a beautiful, natural material that can add warmth and character to any space. However, wood is also a porous material that can be difficult to stain. If you’re thinking about staining your wood floors or furniture, it’s important to understand that wood will not always accept stain evenly.
In fact, it’s often best to expect that your stained wood will have an uneven appearance.
There are a few things you can do to help ensure that your stain will take evenly to the wood. First, sand the surface of the wood before you start staining.
This will help create a smooth surface for the stain to adhere to. Second, apply the stain in thin coats and allow each coat to dry completely before applying the next one. And finally, don’t be afraid to experiment with different stains and finishes until you find the perfect look for your home.
How to Fix Light Spots in Stain
Are you dealing with light spots in your stain? If so, you’re not alone. Many people have this problem, and it can be frustrating.
Luckily, there are a few things you can do to fix it.
One option is to sand the area lightly with fine-grit sandpaper. This will remove the top layer of wood, which is likely where the light spots are coming from.
Once you’ve sanded the area, simply re-stain it and see if that does the trick.
If sanding doesn’t work or you don’t want to deal with it, another option is to use a wood filler. There are many different kinds of wood fillers on the market, so make sure you choose one that’s compatible with your stain.
Apply the filler to the light spots and let it dry according to the manufacturer’s instructions. Once it’s dry, sand it down until it’s flush with the rest of the surface and then re-stain.
Hopefully one of these methods works for you and you’re able to get rid of those pesky light spots in your stain!
How to Open Wood Grain to Accept Stain
One of the many great things about woodworking is the vast number of different techniques and finishes you can achieve. One popular finish is staining, which can really highlight the natural beauty of the wood grain. But in order to get a good stain job, you need to start with prepping the wood by opening up the grain.
Here’s a quick guide on how to do just that:
The first step is to sand your piece of wood until it’s nice and smooth. You’ll want to use a fairly coarse grit paper (60-80) to start with, followed by a finer grit (120-150) for final smoothing.
Once your wood is sanded, it’s time to apply the grain filler. This is a necessary step because it will help create an even surface for staining. Just apply a generous amount of filler onto your wood, working it into all of the nooks and crannies with a putty knife or other similar tool.
Let the filler dry completely before moving on – this usually takes about 30 minutes or so.
Now that the filler has dried, you’re ready to start staining! Be sure to follow all directions on your chosen stain product, but generally speaking you’ll want to work in long strokes along the grain of the wood.
Apply as many coats as desired – typically 2-3 should be sufficient – letting each one dry completely before adding another. And that’s it! Once your final coat of stain has dried, you can move on to applying any other finishes (like polyurethane) if desired.
Staining can really bring out the best in any piece of wood furniture or decor, so hopefully this guide has been helpful in getting started!
Minwax Stain Not Penetrating
If you’ve ever tried to apply a Minwax stain to your woodworking project and found that it just doesn’t seem to penetrate the wood, you’re not alone. It’s a common problem that can be frustrating, especially if you’re trying to achieve a specific color or finish.
There are a few possible reasons why your Minwax stain isn’t penetrating the wood.
One possibility is that the wood itself is simply too dry. Wood that’s too dry won’t absorb stain as well as moist wood, so if your project has been sitting in a sunny spot or near a heater, it’s likely that the wood is too dry.
Another possibility is that you’re using too much pressure when applying the stain.
If you’re pressing too hard, the stain will sit on top of the wood rather than penetrate it. The best way to apply Minwax stain is with light pressure, using long, even strokes in the same direction.
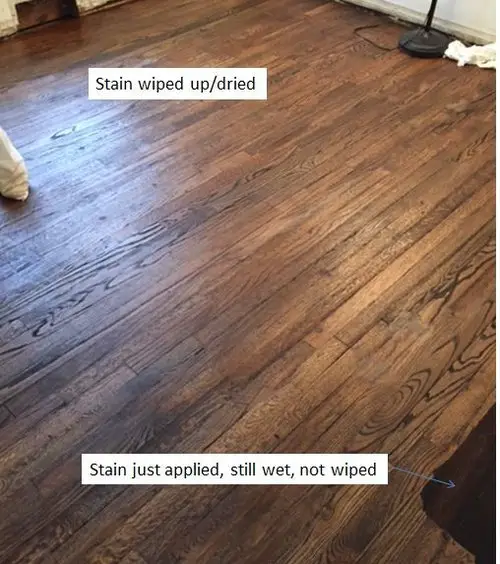
Finally, make sure you’re giving the stain enough time to penetrate before wiping it off.
If you wipe it off too soon, it won’t have had a chance to fully saturate the fibers of the wood and achieve an even coloration. Stick with Minwax’s recommended drying time of at least 8 hours before wiping away any excess stain.
Wood Not Taking Stain Evenly
When you’re staining wood, you want to make sure that the stain is applied evenly so that the final product looks professional and polished. Unfortunately, sometimes wood can be tricky to work with and won’t take stain evenly no matter how hard you try. If this happens to you, don’t worry – there are a few things you can do to fix the problem.
First, take a look at the type of wood you’re working with. Some woods are naturally more porous than others, which means they’ll absorb stain differently. If your wood is particularly porous, it might help to apply a pre-stain conditioner before beginning the staining process.
This will help the wood better accept the stain and ensure an even finish.
If your wood is in good condition but just isn’t taking stain evenly, sanding may be necessary. Start with a medium-grit sandpaper and work your way up to a fine-grit sandpaper until the surface is smooth.
Once you’ve sanded away any roughness, apply your stain using even strokes in one direction only. Allow the stain to dry completely before moving on to the next step in your project.
With these tips in mind, you should be able to get even results when staining wood!
Wood Stain Sweating
Wood stain sweating is a common problem when finishing wood. It occurs when the finish does not fully cure and moisture from the air causes the finish to soften and “sweat” out of the pores of the wood.
This can happen for several reasons, but the most common cause is applying too much finish or not allowing enough time for the finish to dry between coats.
Other causes can include high humidity, temperature changes, or even using certain finishes that are not compatible with each other.
The best way to avoid wood stain sweating is to make sure you allow enough time for each coat of finish to dry completely before adding another layer. If you are working in a particularly humid environment, it may also be necessary to use a slower drying finish or take other precautions such as using a dehumidifier.
If you do find yourself with a piece of furniture that has wood stain sweating, there are a few things you can do to try and fix it. One method is to sand down the affected area until it is smooth again and then apply another layer of finish. This may not always be possible depending on how bad the problem is, but it is worth a try if you don’t want to start from scratch.
Another option is to strip off all of the existing finish and start over. This should only be done as a last resort though, as it will remove any protection that was provided by the original finish.

Credit: furnitureflippa.com
Why is Wood Not Absorbing Stain?
When it comes to staining wood, there are a few things that can go wrong. One of the most common problems is that the wood won’t absorb the stain. There are a few reasons why this might happen, but thankfully there are also some easy solutions.
One reason why wood might not be absorbing stain is because it’s too dry. This is especially common with older pieces of furniture or if the piece hasn’t been properly sanded. If the wood is too dry, it won’t be able to absorb any moisture, and that includes stains.
The solution here is to simply add more moisture to the wood. This can be done by using a damp cloth or even just spraying the piece down with water. Once the wood has had time to soak up some moisture, you should have no problem applying stain.
Another reason why wood might not be absorbing stain is because there’s already a sealant on it. This could be anything from wax to polyurethane and everything in between. If there’s a sealant on your wood, it needs to be removed before you try to apply any type of stain.
Otherwise, the stain will just sit on top of the sealant and never really penetrate into the wood itself. You can remove most sealants with some simple sanding, but always check with your manufacturer first to make sure you don’t damage your piece of furniture!
Once you’ve figured out why your wood isn’t absorbing stain, all that’s left to do is fix the problem and get started on your project!
What Wood Does Not Stain Well?
There are a few woods that do not take stain well. These include: basswood, butternut, cedar, fir, pine and redwood. The reason these woods do not take stain well is because they have a high resin content.
The resin in the wood does not allow the stain to penetrate evenly, resulting in an uneven finish. If you must use one of these woods for your project, it is best to paint or seal it instead of staining it.
Why Won’T My Stain Dry on My Wood?
One of the most common questions we get here at The Wood Whisperer is “Why won’t my stain dry on my wood?”. And unfortunately, there isn’t always a clear-cut answer. In fact, there are quite a few factors that can contribute to this problem.
But don’t worry, we’re going to help you sort it all out.
The first thing you need to do is identify what type of stain you are using. There are two basic types of stains: oil-based and water-based.
Each has its own set of rules and requirements when it comes to drying time and re-coats.
Oil-based stains will generally take longer to dry than water-based stains. You should expect them to take anywhere from 8 to 24 hours to fully cure.
Water-based stains will usually be dry to the touch in 1 to 2 hours, but may still require 48 hours before they are fully cured.
Once you know what type of stain you are using, check the label for specific drying times and recoat information. If the label doesn’t offer any guidance, here are some general tips:
– Oil-based stains: Allow 8-24 hours between coats. If your project requires more than one coat, lightly sand (using 220 grit sandpaper or finer) in between each coat for best results.
What Happens If You Put Stain on Too Thick?
If you put stain on too thick, it will take longer to dry and may not look as even when it dries. It can also be more difficult to remove excess stain from your brush or roller if you put it on too thick.
Stain Failure | How I Recovered & What I Wish I Knew Before
Conclusion
If you’re hoping to add a bit of color to your woodworking project with some stain, you might be out of luck. According to this blog post, wood will not accept stain evenly or consistently, no matter how much prep work you do. Even if you sand the wood down or use a pre-stain conditioner, the stain is likely to come out blotchy and uneven.
If you’re set on using stain, the author recommends testing it on a scrap piece of wood first to get an idea of how it will look.