Wood Slice Craft Ideas
There are many different ways that you can use wood slices to create beautiful and unique crafts. Here are just a few ideas:
1. Use them as coasters for your drinks.
2. Make a wooden wall hanging by gluing or tying the slices together in a pleasing design.
3. Turn them into magnets by glueing on small magnets to the back of each slice.
4. Create jewelry, such as earrings, necklaces, or bracelets, by attaching findings to the wood slices.
5. Make keychains by drilling a small hole in each slice and attaching a key ring.
Wood slice crafts are a great way to add a personal touch to your home decor. There are so many different ways to use them, and they can be customized to fit your own personal style. Here are just a few ideas to get you started:
-Use them as coasters for your drinks. This is a great way to protect your furniture from water damage and stains. Plus, it gives you an opportunity to show off your creative side with some fun designs.
-Turn them into magnets for your fridge or other metal surfaces. This is a great way to display photos or artwork, and they’re also handy for holding important papers in place.
-Make jewelry out of them!
Drill holes into the wood slices and string them together into bracelets, necklaces, or earrings. You can even paint or stain the wood first for added effect.
Whatever way you choose to use them, wood slice crafts are sure to add personality and charm to your home.
So get creative and have fun!
12 Days of Christmas Craft Series 2020 | Wood Slice Ornaments and Tags | Day 1
4 Inch Wood Slices for Crafts
4 inch wood slices for crafts are the perfect addition to any project! Whether you’re looking to add a rustic touch to your decor or wanting to create a one-of-a-kind gift, these sliced logs are perfect for any crafting need. Best of all, they’re incredibly easy to work with – simply sand down the edges and paint or stain them to match your desired look.
Ready to get started? Here’s what you’ll need:
4 inch wood slices (available at most craft stores)
Sandpaper
Paint or Stain (optional)
Step 1: Start by sanding down the edges of your wood slice.
This will help create a smooth surface for painting or staining. If you’re using paint, we recommend using a primer first – this will help the color adhere better and prevent it from chipping over time. Once the edges are sanded, go ahead and apply your paint or stain evenly across the surface.
Allow plenty of time for it to dry completely before moving on to step 2.
Step 2: Now it’s time to add any final details! If you’re creating a sign, use stencils or freehand lettering with sharpie markers.
You can also add embellishments like beads, rhinestones, etc. Get creative and have fun with it! Once you’re happy with how your piece looks, set it aside to let the adhesive dry completely.
And that’s it – your 4 inch wood slice craft is now complete!
What to Do With Tree Trunk Slices
If you have tree trunk slices lying around, there are many different ways to put them to good use! Here are some ideas:
-Use them as coasters for your drinks.
-Turn them into trivets for hot dishes.
-Use them as unique decoration pieces in your home.
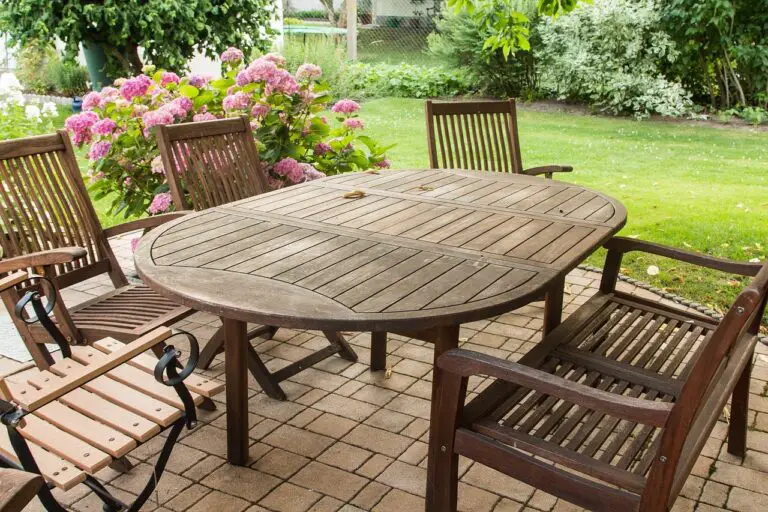
-Make a rustic table out of a slice by attaching legs to it.
-Create a DIY clock by adding numbers and hands to a slice.
-Get creative and use tree trunk slices in any other way you can think of!
Small Wood Slices for Crafts
Small wood slices are a great way to add a personal touch to your crafts. You can use them to make signs, ornaments, or even jewelry. They’re also relatively inexpensive and easy to find.
Here are some tips on how to use small wood slices in your next craft project:
1. Choose the right type of wood. Softwoods like pine or cedar are best for slicing into thin pieces.
Hardwoods like oak or maple will be more difficult to slice and may crack if not cut correctly.
2. Use a sharp knife or saw blade when cutting the wood slices. A dull blade will make it more difficult to get clean cuts and may cause the wood to splinter.
3. Sand the edges of the wood slices smooth after cutting them. This will help prevent any sharp edges from hurting you or catching on fabric when you’re working with them later on.
4. Drill holes into the top of the wood slices if you plan on stringing them together for a necklace or bracelet design.
This will make it easier to thread the cord through without damaging the wood itself.
5., Paint, stain, or otherwise decorate the wood slices however you see fit!
Wood Slices for Crafts Hobby Lobby
Wood slices are a great way to add a natural element to your crafts. They can be used for a variety of projects, including coasters, wall art, and more. You can find wood slices at your local craft store, or online.

Credit: www.archerandolive.com
What Can I Make With Wooden Slices?
Wooden slices are a versatile crafting material that can be used to create a variety of different projects. Here are just a few ideas of what you can make with wooden slices:
– Rustic wall art: Wooden slices make for beautiful rustic wall art.
Simply arrange the slices in any desired pattern and secure them to the wall using nails or adhesive.
– DIY coasters: Protect your surfaces from water damage by making your own coasters out of wooden slices! Just add cork backing to each slice and voila – instant protection.
– Wooden signs: Add some personality to your home décor by creating custom wooden signs using wood slices. You can paint or stain the wood whatever color you like, then add any text or design you want using stencils or freehand.
– Holiday decorations: Get into the holiday spirit by decorating with wooden sliced snowflakes, reindeer, Christmas trees, pumpkins, and more!
The possibilities are endless.
How Do You Make Homemade Wood Slices?
If you’re looking for a fun and unique DIY project, why not try making your own wood slices? With a little time and effort, you can create beautiful pieces of art that are perfect for decorating your home. Here’s how to do it:
1. Start by finding the right tree. You’ll want to look for a hardwood tree that is at least 12 inches in diameter. Avoid trees that have been treated with chemicals or pesticides, as these can be harmful to work with.
2. Cut the tree into logs that are about 2 feet long. These will be easier to work with than larger pieces of wood.
3. Use a saw to cut the logs into 1-inch thick slices.
If you don’t have a saw, you can also ask your local hardware store to do this for you.
4. Sand down the edges of each slice so they’re smooth and safe to handle. You may also want to sand down the surface of each slice if it’s too rough.
5. Once all of your slices are sanded, it’s time to decorate them! You can paint them, stain them, or even carve designs into them using a Dremel tool or other sharp instrument. Be creative and have fun!
How Do You Seal Wood Slices for Centerpieces?
If you’re looking for a creative and unique way to add a natural element to your decor, wood slices are a great option! But before you can use them as part of your centerpiece or other DIY project, you’ll need to seal the wood to protect it from water damage. Here’s how to do it:
1. Start by sanding the surface of the wood slice with medium-grit sandpaper. This will help create a smooth surface for the sealer to adhere to.
2. Next, wipe down the wood slice with a damp cloth to remove any dust from sanding.
3. Once the wood is clean and dry, apply a thin layer of sealer evenly across the surface using a paintbrush or foam brush. Be sure to follow the instructions on your chosen sealer for best results.
4. Allow the sealer to dry completely before using the wood slice in your project.
Can You Modge Podge Wood Slices?
Yes, you can modge podge wood slices. You will need to sand the wood slices first to create a smooth surface. Then, apply a layer of modge podge to the wood slice using a brush.
Allow the modge podge to dry completely before applying another layer. Repeat this process until you have 3-4 layers of modge podge on the wood slice.
Conclusion
Wood slice crafts are a great way to add a rustic touch to your home décor. There are many different ways to use wood slices, from coasters and trivets to wall art and jewelry. Here are some ideas to get you started:
Coasters: Paint or stain wood slices and add cork backing for DIY coasters that will protect your furniture from water rings.
Trivets: Make heat-resistant trivets by gluing four wood slices together in a square. Add felt pads to the bottom so they won’t scratch your countertops.
Wall art: Create unique wall art by painting or staining wood slices and arranging them in any design you like. You can also glue on beads, buttons, or other embellishments for added interest.
Jewelry: Drill holes in wood slices and thread with leather cord or chain to make one-of-a-kind necklaces, bracelets, and earrings.