How to Make a Wood Pen
Wood pens are stunning and unique writing instruments that can be made at home with just a few tools and some patience. The most important part of making a wood pen is choosing the right blank – a piece of wood that is straight, has no knots, and is large enough to comfortably hold in your hand. Once you have your blank, you’ll need to drill a hole through the center of it using a handheld drill or lathe.
Then, simply glue in the pen hardware and allow the glue to dry overnight. Your new wood pen will be ready to use first thing in the morning!
- Decide on the type of wood you want to use for your pen
- Cut the wood into thin strips using a saw or other cutting tool
- Glue the strips of wood together, making sure they are aligned evenly
- Allow the glue to dry completely before moving on to the next step
- Once the glue is dry, sand down the wood until it is smooth to the touch
- Drill a small hole through the center of the wood strip, big enough to fit the pen tip through snugly
Handmade Wooden Pens
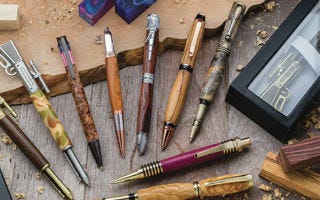
Handmade wooden pens are a beautiful and unique way to write. They offer a natural feel and look that is unmatched by any other type of pen. Each wooden pen is handmade with care and attention to detail.
No two pens are exactly alike, making each one a truly special piece.
Wooden pens can be made from a variety of different woods, each with its own unique grain pattern and color. Some popular woods for wooden pens include maple, cherry, walnut, and ebony.
You can even find pens made from exotic woods like zebrawood or purpleheart.
The construction of a wooden pen is quite simple. A block of wood is machined down to the desired size and shape.
Once the basic shape is achieved, the wood is then sanded smooth before being finished with a protective coating. This coating helps to protect the wood from moisture and wear over time.
Wooden pens can be fitted with a variety of different nibs depending on your writing style.
Fountain pen nibs come in many different sizes and materials, including gold and silver plated options. Ballpoint or rollerball refills are also available for use in wooden pens.
If you’re looking for a truly unique writing experience, consider investing in a handmade wooden pen today!
Pen Turning Lathe
A lathe is a machine that rotates a workpiece about an axis of rotation to perform various operations such as cutting, sanding, knurling, drilling, or deformation. Lathes are used in woodworking, metalworking, and other materials processing applications.
A pen turning lathe is a type of lathe specifically designed for turning pens.
Pen turning is a popular hobby among woodworkers and there are many different ways to make a pen. A pen turning lathe typically has several different attachments that can be used to shape the wood or other material being turned into a pen.
If you’re interested in learning how to turn pens on a lathe, there are many resources available online and in books.
Once you learn the basics of using a lathe, you can experiment with different techniques and create unique pens that are sure to impress your friends and family.
Pen Turning for Beginners
Are you thinking about trying your hand at pen turning? It’s a fun and rewarding hobby that anyone can do with the right tools and supplies. If you’re new to pen turning, there are a few things you should know before you get started.
In this blog post, we’ll give you an overview of what pen turning is, the necessary supplies, and some tips to get you started.
Pen turning is the process of creating pens from wood or other materials using a lathe. A lathe is a tool that spins the material while you shape it with various tools.
The finished product is a beautiful, handmade pen that can be used for writing or given as a gift.
The first thing you’ll need for pen turning is a lathe. There are many different types of lathes available on the market, so do some research to find one that’s right for your needs and budget.
Once you have a lathe, you’ll also need some basic woodturning tools like gouges, chisels, and sandpaper. You can find these items at most hardware stores or online retailers specializing in woodworking supplies.
Now that you have all the necessary supplies, it’s time to start turning!
Begin by mounting your blank (the piece of material you’ll be shaping into a pen) onto the lathe. Then use your gouge to create an indentation in the center of the blank; this will serve as a guide for shaping the rest of the pen. Next, use your chisels to shape the blank into an elongated cylinder; make sure all sides are even and smooth as you work.
Finally, sand down any rough edges and finish off your pen with polish or wax for protection.
If you’re looking for more detailed instructions on how to get started with pen turning, check out this helpful video tutorial: https://www .youtube .
com/watch ?
Pen Making Kit
A pen making kit is a great way to get started in the wonderful world of pen making. With a few simple supplies, you can create beautiful pens that are perfect for gifts or keepsakes. Here’s what you’ll need to get started:
-Pen blanks (these can be made of wood, acrylic, or other materials)
-Drill bits (to create the barrel of the pen)
-Mandrels (to hold the drill bit and blank while you’re drilling)
-Pen kits (which include the hardware needed to assemble your pens)
-Lathe (optional, but helpful for creating perfectly round barrels)
Once you have your supplies gathered, you’re ready to start making pens!
The first step is to drill out the barrel of the pen using your chosen drill bit and mandrel. If you’re using a lathe, this step is much simpler – just attach your blank to the mandrel and let the lathe do its work. Otherwise, you’ll need to use a handheld drill (or drill press, if you have one).
Be careful not to apply too much pressure – you don’t want to split your blank!
Next, it’s time to assemble your pen kit. This part can vary depending on which kit you’ve chosen, but most follow similar steps.
First, fit the tube into the barrel and glue it in place. Then, add the tip section and screw it onto the barrel. Finally, add any decorative elements like clip screws or end caps.
Once everything is in place, give your new pen a try – it should write smoothly and look great!
How to Make Wooden Pens on a Lathe
Woodturning is an incredibly rewarding hobby, and one of the best things you can make on a lathe are wooden pens. Not only are they beautiful and unique, but they make great gifts for family and friends. In this guide, we’ll show you how to make your own wooden pens on a lathe.
The first step is to find some suitable wood. You’ll want to look for hardwoods that are reasonably straight-grained. Avoid using softwoods like pine, as they’re difficult to work with and don’t produce as nice of a finished product.
Once you’ve found some wood that you like, it’s time to start shaping it.
Using a roughing gouge, shape the blank into a cylinder that’s slightly larger than the finished pen you want to create. Then, switch to a parting tool and cut off one end of the blank at a 45-degree angle.
This will be the top of the pen cap. Next, use a spindle gouge to create the basic shape of the pen body. Be sure to leave enough material at the end of the blank for the tip of the pen!
Now it’s time to start working on the details. Using small carving tools, add any desired embellishments to your pen body. Once you’re happy with how it looks, it’s time to start sanding.
Begin with coarse-grit paper and work your way up through finer grits until the wood is smooth to the touch. Finally, apply several coats of finish before assembling your new wooden pen!
Credit: www.rockler.com
How Do You Make a Wooden Pen at Home?
If you’re looking to make a wooden pen at home, there are a few things you’ll need to gather first. You’ll need a piece of wood that’s approximately 6 inches long and 3/4 of an inch in diameter. You’ll also need a drill, some sandpaper, wood glue, and a lathe.
Once you have all of your materials gathered, follow these steps to create your very own wooden pen:
1. Begin by drilling a hole near one end of the wood piece that’s big enough to fit the lathe’s mandrel through. This mandrel is what the wood will be attached to while it’s being shaped on the lathe.
2. Next, use sandpaper to smooth down the edges of the hole you just drilled. This will help prevent the wood from splintering when it’s attached to the mandrel later on.
3. Now it’s time to attach the wood to the mandrel using wood glue.
Make sure that the glue is evenly distributed around the circumference of the hole before insertingthe mandrel into it. Allow the glue to dry for at least an hour before proceedingto step 4.
4.Now it’s time to start shaping the wood on the lathe!
Slowly turn onthe machine and guidethewoodpieceagainstthe various chisels and knivesuntilyouachievethedesired shapeand size for your pen barrel . Remember topace yourself – if you go too fast, you risk damaging or even breakingthewoodpiece .
5 .
Onceyou’rehappywithhowyourpenbarrellooks ,it ‘s time toturnoffthemachineanddetachthewoodfromthemandel .Allthat ‘s left nowistoaddapenkitwhichwill includeeverythingelseyouneedtoputyournewpen together(inkrefill , nib , etc .) andscrewitalltogether ! Andthat ‘ s howyoudiyawoodenpenrightathome !
What Do You Need to Make Wood Pens?
Wood pens can be made with a few simple tools and materials. You will need a piece of wood that is at least 6 inches long and 3/4 inch wide. A lathe is the best tool for shaping the wood, but you can also use a hand drill or a power drill with a sanding attachment.
You will also need some sandpaper, wood glue, and finish of your choice.
Start by cutting the piece of wood to size on the lathe. Then, shape the body of the pen using either the lathe or the drill.
Once the body is shaped, glue on the cap and barrel. Allow the glue to dry completely before sanding down any rough edges. Finish up by applying your chosen finish to protect and beautify your new wood pen!
What is the Best Finish for Wood Pens?
When it comes to wood pens, the best finish is typically a lacquer. This provides a hard, durable surface that is resistant to scratches and wear. It also gives the pen a beautiful shine that makes it look great.
There are other finishes available for wood pens, but lacquer is by far the most popular and effective option.
How Do You Make a Wood Fountain Pen?
Assuming you would like a step by step guide on how to make a wood fountain pen:
1.Start by cutting your wood into small pieces that will be used for the barrel, cap, and grip of the pen. If you are using a lathe, cut your blanks to size accordingly.
For this project, we will be using a 3/4” x 3/4” x 5” piece of cherry wood for the barrel, a 3/8” x 1-1/2” piece of maple for the cap, and a 1/2” x 1-1/2” piece of ebony for the grip.
2.Next, use a drill press to drill out the holes for the nib and ink cartridge in the barrel blank. The hole for the ink cartridge should be drilled first so that it can be used as a guide for drilling the hole for the nib.
Once both holes have been drilled, test fit an ink cartridge and nib to make sure everything lines up correctly.
3.Now it’s time to start shaping your blanks on the lathe. First, shape the outside of each blank to its desired shape.
For this project we will be turning each blank down to approximately 0.75” in diameter so that they are comfortable to hold when writing. Next, turn each blank around and begin hollowing out the inside until it is just slightly larger than your ink cartridges (this will ensure that they fit snugly inside). Once all three blanks have been shaped and hollowed out, sand them smooth with progressively finer grits of sandpaper until they are silky smooth to the touch.
4.To assemble your pen, start by inserting an ink cartridge into the barrel blank followed by the nib assembly (if you need help with this part, check out our article on How to Assemble a Fountain Pen). Next, screw on either end cap until it is snug against the barrel (do not overtighten!). Finally, attach your grip section by screwing it onto one end ofthe barrel until it is flush withthe end cap (again, do not overtighten!).
And there you have it – your very own handmade wooden fountain pen!
How to Make a Wooden Pen
Conclusion
Assuming you would like a summary of the blog post titled “How to Make a Wood Pen”:
This post outlines the supplies and steps needed to make a wood pen. The supplies you will need are: a block of wood, pen blanks, a drill, dowel rod, sandpaper, CA glue, and finishing supplies.
First, you will need to drill a hole in your block of wood that is slightly smaller than your dowel rod. Then, cut your dowel rod to size and glue it into the hole you just drilled using CA glue. Once the glue has dried, sand down the end of the dowel rod until it is flush with the block of wood.
Next, take one of your pen blanks and drill a hole through its center using a drill bit that is slightly smaller than your dowel rod. Cut the blank in half so that you have two pieces, then slide each piece onto either side of the dowel rod. Glue these pieces on using CA glue and let dry.
Once everything is dry and glued on securely, start shaping and sanding your pen until it is smooth and resembles the shape of a traditional pen. Finish off by applying any desired finishes or oils to protect the wood.