How to Make Wood Plugs
Wood plugs are an essential part of many woodworking projects. While you can buy them commercially, making your own plugs is easy and can save you money. Here’s how to make wood plugs:
1. Start with a dowel or other piece of round stock that’s slightly larger in diameter than the hole you need to plug.
2. Cut the dowel into short pieces, each about 1″ long.
3. Use a Forstner bit or other type of drill bit to bore a shallow hole in each plug, slightly deeper than half the length of the plug.
4. Tap the plugs into the holes using a mallet or hammer until they’re flush with the surface of the wood.
- Drill a pilot hole into the piece of wood you wish to make a plug for
- The size of the hole will depend on the size of the dowel or tenon you are using
- Cut a length of dowel or tenon to fit snugly into the pilot hole
- Insert the dowel or tenon into the pilot hole and tap it in with a hammer until it is flush with the surface of the wood
- Trim off any excess dowel or tenon sticking out of the plug with a sharp knife
- You can now sand and finish the plugs as desired!
How to Make and Install Wood Plugs
Can You Make Wood Plugs Without a Drill Press?
If you’re new to woodworking, or even if you’re a seasoned pro, there’s always something new to learn. In this case, we’ll look at how to make wood plugs without a drill press. While it’s certainly possible to do this with other tools, a drill press will give you the most consistent results.
That said, let’s get started! The first thing you’ll need is a Forstner bit. This type of bit cuts cleanly and leaves a smooth surface, which is perfect for creating plugs.
You’ll also need a dowel jig; this will help ensure that your plugs are perfectly aligned every time. Finally, you’ll need some sandpaper (we recommend 150-grit) and some wood glue.
Now that you have your supplies gathered, let’s get started!
Begin by drilling a hole in your piece of wood using the Forstner bit; the size of the hole should be slightly larger than the plug you want to create. Next, use the dowel jig to create two more holes on either side of the first one; these will serve as guide holes for our plugs.
Once all three holes have been drilled, it’s time to start shaping our plugs.
We recommend using a hand saw for this step; however, if you’re working with hardwood, an electric saw may be necessary. Cut each plug slightly longer than its corresponding hole; this will allow for any discrepancies in size between the hole and the plug itself.
After each plug has been cut to size, it’s time to start sanding them down until they fit snugly into their respective holes – but don’t force them!
If they’re too tight, sand them down until they fit comfortably without being loose. Once all three plugs are properly sized, it’s time to glue them into place using wood glue – again taking care not leave any gaps between the plug and its corresponding hole..
And that’s it! You’ve now successfully made wood plugs without a drill press – congratulations!
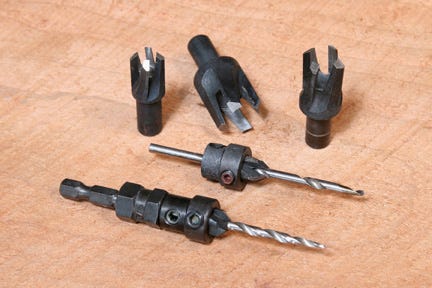
How to Make a Plug Cutter?
A plug cutter is a handy tool that every woodworker should have in their arsenal. This guide will show you how to make your own plug cutter so that you can cut perfect plugs every time.
First, gather the following materials: a block of wood, a drill bit slightly smaller than the outside diameter of your desired plug, and a dowel rod or other cylindrical object that is slightly larger than the inside diameter of your desired plug.
For this example, we will be making a ¼” plug cutter.
Next, mark out the length of yourplug on the block of wood. For our ¼” example, we will need a 1” longplug .
Once you have marked out the length, use the drill bit to drilledown into the center of your mark. Keep drilling until the bit comes outthe other side of the block. Now take your dowel rod or other cylindricalobject and insert it into the hole you just drilled.
This will serve asa guide for cutting your Plug .
Now it’s time to start cutting! Using a sharp chisel, start at one endof your hole and begin chopping away at the wood.
Be sure to keepyour cuts perpendicular to the surface of the block; otherwise youwill end up with an angled or lopsided plug . Once you have cut allthe way through, remove yourPlug from theblock and trim off any rough edges with a knife or sandpaper. Andthat’s it – you’ve now made yourself a brand new Plug Cutter !
How Do You Make a Large Wood Plug?
Assuming you would like instructions on how to make a large wooden plug:
First, select a drill bit that is slightly smaller in diameter than the hole you need to fill. Attach the drill bit to your drill and secure the piece of wood you’ll be drilling into so it doesn’t move.
Drill a hole straight down into the center of the wood.
Next, use a saw to cut a dowel or wooden rod to a length that is slightly longer than the depth of the drilled hole. Insert the dowel into the hole and use a hammer to tap it in until it’s flush with the surface of the wood.
Now you need to create something called a “bung.” This will ensure that your plug is watertight. To do this, mix together equal parts flour and water to form a paste.
Spread this paste onto one end of the dowel sticking out of your hole (the end that isn’t flush with the surface). Allow it to dry for 24 hours. Once it’s dry, trim off any excess bung material so it’s level with the rest of the dowel.
Your large wooden plug is now complete!
How Do You Finish Wood Plugs?
When it comes to finishing wood plugs, there are a few different methods that can be used. The most common method is simply to sand the plug down until it is flush with the surface of the wood. This can be done by hand or with a power sander.
Another option is to use a chisel to remove the excess material from around the plug. Once the plug is flush with the surface, it can then be stained or painted to match the rest of the piece.
Credit: www.rockler.com
How to Make Wood Plugs Without a Plug Cutter
Making wood plugs is a fairly simple process that can be done without the need for a plug cutter. All you need is a drill and some dowel rods. The first step is to drill a hole in the center of the dowel rod.
Next, cut the dowel rod into small pieces, making sure that each piece is slightly longer than the depth of the hole you drilled. Finally, insert each piece of dowel into the hole and tap it until it is flush with the surface of the wood.
Wooden Plugs for Screw Holes
If you’re looking for a way to cover up screw holes in your woodworking projects, wooden plugs are a great option. Here’s everything you need to know about using them.
What are wooden plugs?
Wooden plugs are small discs of wood that are used to cover up screw holes. They can be made from any type of wood, but they’re most commonly made from hardwoods like oak or maple.
Why use wooden plugs?
There are a few reasons why you might want to use wooden plugs. First, they’re a lot more aesthetically pleasing than leaving the screw hole exposed. Second, they help to prevent the Screw Hole from Splitting .
Third, if you ever need to remove the screw, the plug can be easily removed and replaced.
How do you install wooden plugs? Installing wooden plugs is easy.
Just drill a pilot hole slightly smaller than the diameter of the plug, then tap it in with a hammer until it’s flush with the surface of the wood. If necessary, you can trim off any excess with a sharp knife or chisel.
Wood Plugs Screwfix
Wood plugs are an essential for any toolbox and are perfect for a variety of applications, including carpentry, engineering and construction. At Screwfix, we stock a wide range of wood plugs to suit all budgets and requirements. Whether you need dowel plugs, wooden expansion plugs or screw-in wooden plugs, we have the perfect solution for your needs.
Conclusion
Wood plugs are a great way to add a decorative touch to your woodworking projects. They can be used to cover up screw holes or other imperfections, and they come in a variety of colors and styles to match your project. Making your own wood plugs is easy with the right tools and a little bit of practice.
Here’s how to make wood plugs for your next project:
First, gather the materials you’ll need: a drill, dowel jig, chisel, saw, and sandpaper. You’ll also need some wood glue and finishing nails.
Choose a hardwood such as oak or maple for your plugs – softwoods like pine will split too easily. Cut your dowels to size using the saw, then use the drill and dowel jig to create evenly spaced holes in the center of each one.
Next, use the chisel to create a small groove around the edge of each hole.
This will help the plug stay in place once it’s inserted. To finish up, sand the plugs smooth and apply a coat of wood glue before inserting them into the holes in your project piece. Secure them with finishing nails if necessary.