How to Make a Wood Carving Knife
There are a few different ways to make a wood carving knife. One way is to use a chisel and hammer. Another way is to use a saw.
If you want to use a chisel and hammer, start by finding a piece of wood that is the right size and shape for your project. Then, use the chisel to mark where you want to cut the wood. Next, use the hammer to carefully split the wood along the line you marked with the chisel.
Once you have split the wood, you can use the chisel to carve it into any shape you want.
If you want to use a saw, start by finding a piece of wood that is the right size and shape for your project. Then, mark where you want to cut the wood with a pencil or pen.
Next, use a sawtooth blade attachment on your drill or handheld sawto cut along the line you marked on the wood.
- Start with a piece of wood that is at least 6 inches long and 2 inches wide
- Cut the piece of wood into three equal pieces using a saw
- Take one of the pieces of wood and carve it into a handle for the knife using a carving knife
- Be sure to carve away any rough edges
- Carve a second piece of wood into a blade for the knife
- Again, be sure to remove any rough edges with the carving knife
- Attach the blade to the handle using glue or nails
- Allow the glue or nails to dry completely before using your new knife
Making a Wood Carving Knife with NO Power Tools! Easy DIY Knife Making Project.
Making a Carving Knife from a Saw Blade
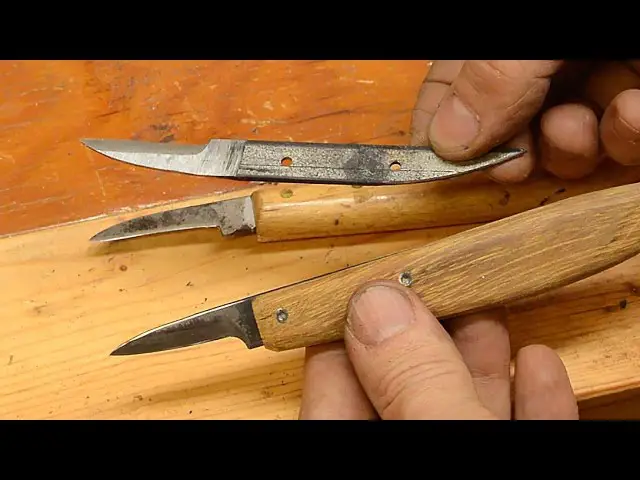
A carving knife is a specialized type of knife used for carving wood. It is usually smaller and more delicate than a regular kitchen knife, with a sharp point and a comfortable grip. A good carving knife should feel like an extension of your hand, and it should be able to handle the intricate cuts required for detailed work.
One of the most popular ways to make a carving knife is from an old saw blade. Saw blades are made from high-quality steel that can be easily sharpened to a very fine edge. They are also relatively thin, which makes them ideal for carving knives.
To make your own carving knife from a saw blade, start by using a grinder to remove any teeth or other protrusions. Next, use a file or bench grinder to shape the blade into the desired shape. Remember to leave the spine (the back edge of the blade) thicker than the rest of the blade, as this will help prevent it from breaking during use.
Finally, use a honing stone or whetstone to sharpen theblade to razor-like sharpness.
With your new DIY carving knife in hand, you’re ready to tackle any woodworking project imaginable!
How to Make a Wooden Knife Easy
Making a wooden knife is easy and only requires a few supplies. You will need a piece of wood that is about the size and shape of the knife you want to make, a sharp knife, and some sandpaper. First, use your sharp knife to carve out the basic shape of the knife from the piece of wood.
Then, use the sandpaper to smooth out the edges of your carving. Finally, put a handle on your knife (this can be anything from another piece of wood to rope or leather) and you’re done!
How to Make a Wooden Knife Without Power Tools
Assuming you would like a blog post discussing how to make a wooden knife without the use of power tools:
One of the most basic and simple tools known to man is the knife. Over time, knives have been made out of all sorts of materials including bone, stone, wood, and metal.
You can even find plastic knives these days. But there’s something special about a wooden knife. Maybe it’s the fact that it’s more natural or maybe it’s because they just look nicer than their metal counterparts.
Whatever the reason may be, making your own wooden knife is a fun project that anyone can do with just a few simple supplies and no power tools required!
You will need:
-A piece of wood (any type will do although softer woods are easier to carve)
-A sharp carving knife (a regular kitchen knife will work in a pinch)
-A saw (optional but helpful)
-Sandpaper
-Linseed oil or beeswax (optional but recommended)
First things first, you need to find or cut yourself a piece of wood that is long enough and wide enough to fashion into a blade. Once you have your block of wood, use your carving knife to whittle away at it until you have achieved the desired shape for your blade.
If you want to get really detailed, you can even carve out some faux rivets on either side near the handle for decoration. Just be careful not to make them too big or else they might weaken your blade.
Diy Wood Carving Tools
There is something special about wood carving. It’s a relaxing, therapeutic hobby that anyone can enjoy. And it’s also a great way to create beautiful, one-of-a-kind pieces of art.
If you’re new to wood carving, the thought of choosing the right tools may be daunting. But don’t worry – we’re here to help! In this blog post, we’ll give you a rundown of the different types of wood carving tools, and what each one is used for.
Armed with this knowledge, you’ll be ready to tackle any project – big or small!
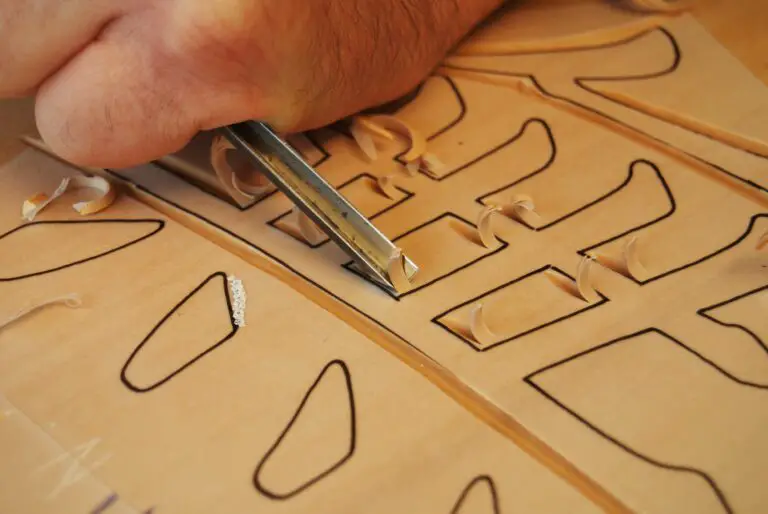
The most important tool for wood carving is undoubtedly the knife. There are many different types and sizes of knives available, so it’s important to choose one that feels comfortable in your hand and suits the type of carving you want to do.
For general purpose carving, a medium sized knife with a curved blade will work well. For more detailed work, smaller knives with straight blades are better suited. Whittling knives have very sharp points and are good for making precise cuts.
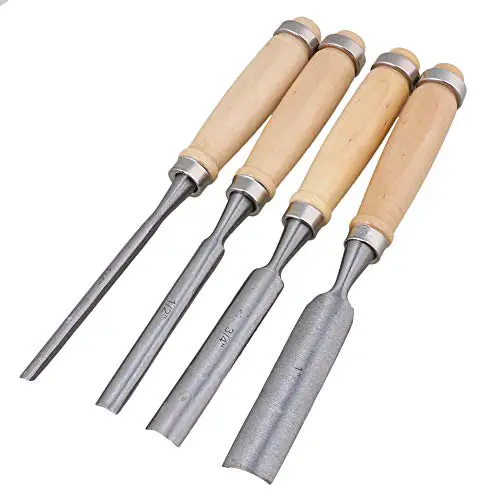
Chisels are another essential tool for woodcarving. They come in various widths and shapes, so you can use them to create both large and small details in your piece. A V-shaped chisel is perfect for gouging out larger chunks of wood, while a U-shaped chisel is ideal for creating finer details.
Hammers are also useful for shaping wooden pieces – just be sure not to overdo it or you’ll risk splitting the wood!
Once you’ve carved out your design using knives and chisels, it’s time to add some finishing touches with files and sandpaper. Files come in different shapes and sizes too, so you can use them to create smooth surfaces or add texture as desired.
Start with a coarse file then move on to a finer one until your piece has the desired finish. Finally, use sandpaper to remove any rough edges or splinters from your carving – then sit back and admire your handiwork!
.jpg)
Credit: ibuildit.ca
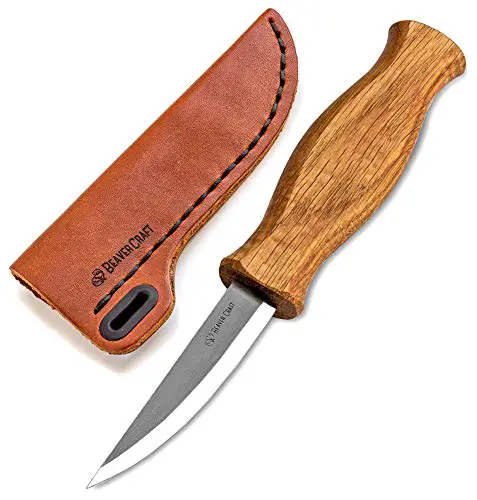
What Knife Do You Use for Wood Carving?
There are many different types of knives that can be used for wood carving. The most important factor to consider when choosing a knife is the size and shape of the blade. The blade should be able to reach the desired area on the wood without being too large or small.
A common type of knife used for wood carving is called a coping saw. It has a thin, curved blade that is ideal for making intricate cuts. Another popular option is a chisel knife, which has a straight blade that is perfect for creating clean, straight lines.
No matter what type of knife you choose, always make sure it is sharp and in good condition before using it on your project. With the right tools, wood carving can be a fun and rewarding hobby!
How Thick Should a Wood Carving Knife Be?
When it comes to wood carving, the thickness of your knife can make a big difference in the results you achieve. A thicker blade will allow you to take on larger projects, while a thinner one is better suited for smaller, more delicate work.
As a general rule of thumb, most wood carving knives have blades that are between 2 and 4mm thick.
However, there is no hard and fast rule – ultimately it comes down to personal preference and what feels comfortable for you to use.
If you’re just starting out in wood carving, we recommend opting for a knife with a blade that is on the thinner side. This will give you more control over your cuts and help you avoid making any mistakes.
Once you get more experience under your belt, feel free to experiment with thicker blades to see what they can do!
How Do You Carve a Knife With a Piece of Wood?
Assuming you don’t have access to a proper knife-making forge and tools, carving a knife out of a piece of wood is going to be a difficult and time-consuming task. Even with the best tools, it’s not an easy process – but it is possible. Here’s a quick overview of how to do it:
1. Start by finding a piece of wood that is strong and stiff – hardwoods like oak or maple are ideal. You’ll also need a sharpening stone or belt sander to get the edge on your knife nice and sharp.
2. Cut out the basic shape of your knife from the piece of wood.
A good way to do this is to use a jigsaw or bandsaw for the initial cut, then clean up the edges with a chisel or rasp.
3. Once you have the basic shape cut out, start working on getting the edge nice and straight – this will take some time and patience. Again, using a sharpening stone or belt sander will help here.
4. Once you’re happy with the edge, it’s time to start working on the handle. This can be tricky, as you’ll need to make sure it’s comfortable to hold while also being sturdy enough that it won’t break easily. Again, hardwoods are usually best for handles.
Carve out a basic shape then sand down any rough edges until it feels comfortable in your hand.
What is the Difference between a Carving And Slicing Knife?
A carving knife is a type of kitchen knife used for slicing meat. It is usually longer and thinner than a chef’s knife, making it easier to carve thin, even slices. A slicing knife is also a type of kitchen knife used for slicing meat; however, it is shorter and wider than a carving knife.
This makes it better suited for cutting thick, uneven slices.
Conclusion
If you’re looking for a way to add a personal touch to your woodworking projects, why not try carving? It’s a great way to show off your skill and add some unique flair to your pieces. But before you can start carving, you’ll need a good carving knife.
In this blog post, we’ll show you how to make your own wood carving knife using just a few simple tools.
First, you’ll need to gather some supplies. For the blade, you can use an old chisel or even a hacksaw blade.
You’ll also need a piece of hardwood for the handle, some epoxy glue, and some sandpaper. Once you have all of your materials ready, it’s time to get started.
Begin by cutting the blade to size.
It should be about 4-5 inches long and 1 inch wide at the widest point. Next, shape the blade into a gently curved shape with one sharp edge and one dull edge. The dull edge will be used for most of the carving while the sharp edge can be used for finer details or cleanup work.
Now it’s time to attach the blade to the handle. First, drill two holes in the handle that are slightly smaller than the thickness of the blade . Then insert the blade into these holes and secure it in place with epoxy glue .
Allow the glue to dry completely before moving on to shaping the handle .
Use sandpaper to smooth down any rough edges on both the knife blade and handle . Once everything is nice and smooth , your new wood carving knife is ready for action!