How to Learn to Carve Wood
Wood carving is a rewarding and relaxing hobby that can be enjoyed by people of all ages. If you’re interested in learning how to carve wood, there are a few things you need to know before getting started.
First, you’ll need to gather some basic supplies, including a sharp knife, a piece of wood, and some sandpaper.
You might also want to invest in a set of chisels if you plan on doing more advanced carving projects.
Once you have your supplies, it’s time to start practicing! Begin by tracing a simple design onto your piece of wood.
Then, using your knife, carefully start carving out the outline of the design. Be sure to go slowly and take your time – it’s easy to make mistakes when you’re first starting out.
As you become more comfortable with carving, you can start experimenting with different techniques and styles.
There are many books and online resources available that can teach you more about wood carving and help you develop your skills. With a little practice, you’ll be an expert carver in no time!
- Select the type of wood you would like to carve
- Some woods are easier to carve than others
- Choose a carving knife that is comfortable for you to hold and that is the right size for the type of wood you have selected
- Practice carving on a piece of scrap wood before starting on your project piece
- Draw or trace your design onto the wood
- Use a pencil or pen so that the lines can be easily erased if necessary
- Start carving along the lines of your design, being careful not to go too deep at first
- You can always remove more wood later if necessary, but it is difficult to add wood back once it has been removed
- Once you have finished carving, sand the surface of your project piece smooth with fine-grit sandpaper
How to Carve Wood by Hand
Carving wood by hand is a skill that takes time and practice to perfect. But once you master the basics, carving wood by hand can be a relaxing and satisfying hobby. Here are the basics of how to carve wood by hand:
1. Choose the right tools. For beginners, it’s best to start with a few basic carving tools like a straight knife, a V-shaped chisel, and a gouge. As you become more experienced, you can add more specialized tools to your collection.
2. Start with softwood. Softer woods like pine or basswood are easier to carve than hardwoods like oak or maple. And if you make a mistake while carving, it’s not as difficult to fix in softwoods as it is in hardwoods.
3. Sketch your design on the wood first. This will help you plan out your carving and avoid making any mistakes along the way. You can use pencils or chalk to sketch your design onto the wood surface.
4 . Carve along the grain of the wood . This will make carving much easier and help prevent your tools from slipping and breaking off pieces of wood grain (known as “tear out”).
Always carve with caution though – even when following the grain – as it’s easy to slip and cut yourself while carving! If possible, try using gloves while carving for added protection against cuts . 5 .
Take your time . Carving can be therapeutic , but rushing through it will only lead to frustration (and possibly injury). Relax, take deep breaths , and enjoy the process of slowly transforming a piece of wood into something beautiful !
Beginner Wood Carving Projects
If you’re looking for some beginner wood carving projects, look no further! These three project ideas are perfect for those just starting out in wood carving. And the best part is, they can all be completed in a weekend!
Project #1: Carved Wooden Spoons
This first project is a great way to get comfortable with using basic carving tools. You’ll need a few simple supplies including a wooden spoon blank (available at most craft stores), a utility knife, and some sandpaper.
Start by tracing your desired design onto the spoon blank with the utility knife. Then, use your carving tools to remove excess wood and shape your design. Once you’re happy with your work, sand down any rough edges and finish with a clear sealant if desired.
Project #2: Whittled Candle Holder
This next project is perfect for those who want to try their hand at whittling – one of the most popular forms of wood carving. For this project you’ll need a block of softwood (balsa or basswood works well), a sharp knife, and some candles.
Start by sketching your candle holder design onto the block of wood. Then begin whittling away at the wood, following your sketched lines as closely as possible. Be sure to work slowly and carefully so that you don’t accidently cut yourself!
When you’re finished, sand down any rough edges and test out your new candle holder!
Project #3: Woodburning Artwork
And finally, if you want to try something different altogether, why not give woodburning a try?
This unique form of art uses special pens or pencils to burn designs into wood surfaces – it’s really easy once you get the hang of it! For this project all you need is some thin plywood (or even cardboard would work), some graphite pencils or other woodburning tools, and an image to use as inspiration for your artwork. First trace your chosen image onto the plywood surface using graphite pencils or another transfer method. Then start burning away! Experiment with different strokes and shading techniques until you create a piece that you’re happy with. Sand down any rough edges when finished and display proudly!
Wood Carving Classes near Me
If you’re looking for wood carving classes near you, there are plenty of options available. Whether you want to learn how to carve as a hobby or you’re looking to start a business, there’s a class out there that’s perfect for you.
One option is the Wood Carving School in Atlanta, Georgia.
This school offers classes for all levels of experience, from beginners to advanced carvers. The classes cover a variety of topics, such as relief carving, figure carving, and lettering. You’ll also have the opportunity to use different tools and techniques during your time at the school.
If you’re not able to make it to Atlanta, another great option is online courses. These can be found through sites like Udemy and Craftsy. Online courses offer the same level of instruction as traditional classes, but they’re more convenient and often less expensive.
Plus, you can work at your own pace and complete the course on your schedule.
Whether you choose an in-person or online class, wood carving is a fun and rewarding hobby that anyone can enjoy. With a little bit of practice, you’ll be well on your way to creating beautiful pieces of art.
Best Wood for Carving
There is no definitive answer when it comes to the best wood for carving. It depends on the type of carving you want to do, and what kind of finish you are hoping to achieve. For instance, some woods are better suited for detailed work, while others are better for more robust carvings.
Some popular woods used for carving include basswood, walnut, maple, oak and cherry. Each has its own unique grain pattern and hardness level, which will affect how easy or difficult it is to carve. Softer woods like basswood are often preferred for beginners as they are easier to carve and less likely to splinter.
Harder woods like oak can be more challenging to carve but may produce a more refined finished product.
It’s also important to consider the size and shape of the piece you’re carving. Some Woods are better suited for large pieces while others work better for small intricate designs.
And finally, the type of finish you want will also play a role in choosing the best wood for your project. A high-gloss finish may require a different type of wood than a more rustic look.
When it comes time to start your next carving project, take some time to consider all these factors before choosing your wood.
With so many options available, there’s sure to be a perfect match out there for your vision!
How to Carve Wood Without Tools
Carving wood is a skill that can be learned without any tools. However, it is important to have the proper supplies before starting. A sharp knife, saw, or other cutting tool will make the carving process much easier.
In addition, a small piece of sandpaper will help to smooth out any rough edges.
The first step in carving wood without tools is to select the piece of wood that you would like to carve. It is important to choose a piece of wood that is soft enough to carve easily, but not so soft that it will break apart easily.
Once you have selected your piece of wood, use your knife or saw to cut off any excess pieces.
Next, use your knife or saw to create the basic shape of your carving. It is important to start with a simple shape and then add more details as you go along.
When carving shapes into the wood, always cut away from yourself so that you do not accidently hurt yourself.
Once you have created the basic shape of your carving, use sandpaper to smooth out any rough edges. You can also use a small drill bit to create holes for eyes or other features on your carved wooden figure.
With a little practice, anyone can learn how to carve wood without tools! This is a great way to create unique gifts or decorations for your home.
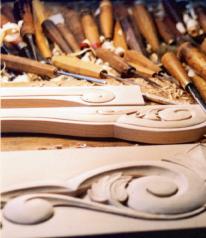
Credit: www.davidcalvo.com
How Do You Start Wood Carving?
Assuming you would like tips on starting wood carving:
1. Start with a vision or plan for your project whether it is a sketch, picture, or idea in your head. This will help you determine what tools and type of wood you need to get started.
2. Choose the right tools for the job. If you are a beginner, it is recommended that you start with simple carving knives before moving onto gouges and chisels. You can find these at your local hardware store or craft store.
3. Select the piece of wood you will be working with keeping in mind the hardness of the wood and how easy it is to carve. Softwoods like pine are good for beginners as they are easier to carve but hardwoods like oak will give your project more detail and last longer.
4. Begin by making light, shallow cuts into the wood following your pattern or design until you get a feel for how the tool moves and how deep of a cut you can make without going too deep.
Is Wood Carving Easy?
Assuming you would like a blog post discussing whether wood carving is easy:
Wood carving is often seen as a very daunting task, however with the right tools and enough practice, it can be quite easy! The most important thing to remember when starting out is to take your time.
Rushing will only result in mistakes and frustration.
There are two main types of wood carving – power carving and hand carving. Power carving uses electric tools such as rotary tools or chisels while hand carving uses, well, your hands!
Many people find power carving to be much easier as it requires less effort. However, hand carving provides more control and precision.
The type of wood you use also makes a difference in how easy the process is.
Softer woods are generally easier to work with as they require less force to carve. Harder woods will require sharper tools and more patience.
In short, wood carving can be easy if you have the right tools, take your time, and start with a softer wood.
Is It Difficult to Carve Wood?
Wood carving is a form of woodworking by which items are created by cutting, carving, and often sculpting wood. Woodcarving is one of the oldest arts of humankind. It is a type of relief sculpture in which figures are raised from a flat background, usually in low relief or high relief.
High relief carvings can also be done in intaglio (the design incised into the surface of the block), or in bas-relief (partially sunken into the surface). The definition may also include carved decoration such as lettering and crests. The term “woodcarving” only came into use in the 19th century; before that time works carved in wood were simply called “carvings” or “sculpture”.
By contrast, “woodcut” refers to designs—usually illustrations—printed on paper from blocks cut from wood; these blocks can then be used for other purposes including printing onto fabric.
The main difficulty with carving wood is that it tends to splinter and break easily if not handled correctly. Sharp tools and a steady hand are essential for successful carving.
It is also important to have a good understanding of the grain direction of the wood you are working with, as this will affect how your carve turns out.
What Does a Beginner Wood Carver Need?
Assuming you would like an answer to the question: What does a beginner wood carver need?
A beginner wood carver needs a few essential tools in order to get started. A carving knife is the most important tool for any wood carver, as it will be used for the majority of shaping and detailing work.
A gouge can also be useful for quickly removing larger chunks of wood, while chisels are perfect for creating clean cuts and grooves. A mallet can be helpful for striking chisels and other tools, while a rasp can be used for smoothing and refining surfaces. Finally, a sharpening stone will keep all of your carving tools in top condition.
Wood Carving for Beginners – Basics&Tips
Conclusion
In order to learn how to carve wood, one must first find a good teacher. Once you have found a teacher, it is important to practice as much as possible. You should also try to find books or online resources that can help you learn more about the process of carving wood.