How to Install Wood Planks on Wall
To install wood planks on a wall, first measure the width and height of the area you want to cover. Cut your wood planks to size, using a saw. Sand the edges of the planks to smooth them out.
Apply construction adhesive to the back of each plank and press it into place on the wall. Use a level to make sure each plank is level as you go. Once all the planks are in place, let the adhesive dry for 24 hours before caulking any gaps between the planks.
- Cut the wood planks to size using a saw
- Apply adhesive to the back of each plank and position on the wall
- Use a level to ensure the planks are straight, then nail or screw into place
- Fill in any gaps between the planks with caulk or wood filler, then sand smooth
- Paint or stain the wood planks as desired
How to Install Reclaimed Wood Wall Planks | DIY Reclaimed Wood Accent Wall | WoodyWalls
How Do You Stick Wood Planks to the Wall?
You can stick wood planks to the wall in a few different ways. The most common way is to use adhesive strips that are applied to the back of the plank and then pressed against the wall. Another option is to use small nails or screws to secure the planks to the wall.
Whichever method you choose, be sure to follow the manufacturer’s instructions for best results.
How Do You Attach Wood Planks to a Wall Without Nails?
There are a few ways to attach wood planks to a wall without nails. The first is by using adhesive strips. These are thin, flexible strips with an adhesive backing that can be applied directly to the wall.
Another option is to use small dowels or screws inserted into pilot holes drilled into the wall. Once the dowels or screws are in place, the wood plank can be attached by sliding it over the top and screwing it into place.
How Do You Install Plank Wall Studs?
Installing plank wall studs is a pretty simple process, but there are a few things you need to keep in mind. First, make sure that the studs are evenly spaced and level. Secondly, when you’re attaching the studs to the wall, make sure that they’re flush with the surface of the wall.
Third, use screws or nails that are long enough to penetrate through the drywall and into the stud behind it. Fourth, predrill holes for your screws or nails to avoid splitting the wood. Finally, when you’re attaching the last piece of trim or baseboard, use a level to make sure everything is even and level.
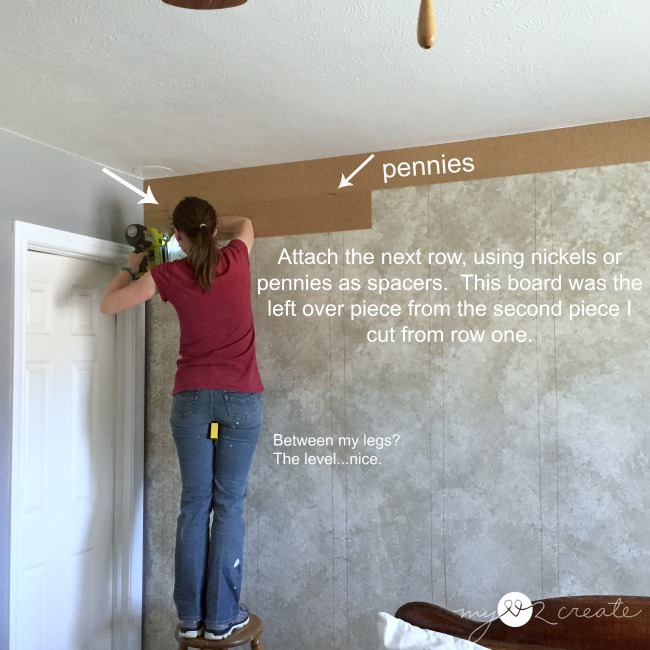
Credit: www.mylove2create.com
How to Install Vertical Wood Plank Walls
Vertical wood plank walls are a popular design trend in both home and commercial spaces. They add visual interest and texture to any room, and can be used to create a variety of looks, from rustic to modern.
Installing vertical wood plank walls is relatively easy, but there are a few things you’ll need to keep in mind before you get started.
First, you’ll need to decide on the type of wood planks you want to use. There are many different options available, so take some time to browse through your choices and pick the ones that best fit your style and budget.
Once you’ve selected your planks, it’s time to start installing them.
Begin by measuring the area where you want your wall to go and mark out the top and bottom corners with a pencil. Then, using a level, draw a horizontal line across the marks at the desired height of your wall. This will be your starting point for installation.
Next, begin attaching your planks at the top of the line using construction adhesive or nails/screws (depending on what type of material you’re working with). Work your way down the line, making sure each successive row is offset from the one above it by half a plank width. This staggered effect will give your finished wall more depth and interest.
Once all of your planks are in place, finish up by adding trim around the edges if desired. That’s it! You’ve now successfully installed vertical wood plank walls in your space!
How to Stagger Wood Planks on Wall
When it comes to staggering wood planks on a wall, there are a few things to keep in mind. First, you’ll want to make sure that the wall is clean and free of any debris. Next, you’ll need to determine the width of each individual plank.
Once you have those measurements, you can start planning out your design.
Generally speaking, it’s best to stagger the planks so that they’re not all lined up perfectly next to each other. This creates a more natural and organic look.
To do this, you can offset the joints by about one-third of the plank width. So, if your plank width is six inches, you would offset the joints by two inches.
Once you have your planks cut to size and your joints staggered, it’s time to start installing them on the wall.
Begin at the bottom and work your way up, nailing each plank into place as you go. If necessary, use construction adhesive along with nails for extra hold (especially at the top of the wall).
And that’s it!
With these tips in mind, you should be well on your way to creating a beautiful wood accent wall in your home.
How to Install Wood Wall Panels
Installing wood wall panels is a great way to add visual interest and texture to your walls. Wood wall panels can be used in a variety of different ways: as an accent wall, as wainscoting, or even as floor-to-ceiling paneling. No matter how you use them, wood wall panels are sure to add character and charm to your space.
Here’s how to install wood wall panels in your home:
1. Choose your wood paneling. There are many different types and styles of wood paneling available on the market today.
You’ll need to decide what type of look you’re going for before you can start shopping around. Do you want something rustic? Modern?
Traditional? Once you know what style you’re after, it will be easier to find the perfect wood paneling for your home.
2. Prep your walls.
Before you install any type of paneling, it’s important to prep your walls first. This means patching up any holes or cracks, sanding down any rough spots, and making sure the surface is clean and free of dust or debris. If you don’t prep your walls properly, thepanel installation won’t go as smoothly (and may not look as good either).
3. Measure & cut the panels . Once you have all of your materials ready, it’s time to measure and cut the panels accordingto the size of your space (don’t forget to account for trim!). It’s important to take precise measurements here – if the panels are too big or too small, they won’t fit right and will throw off the entire look of the space.
Use a level when cutting each piece so that they fit together perfectly when installed onthewall .
4 . Install th e trim & baseboard s .
Conclusion
Installing wood planks on a wall is a relatively easy task that can add beauty and character to any room. Here are a few tips on how to install wood planks on your wall:
1. Choose the right type of wood for your project.
Depending on the look you want to achieve, different types of wood may be better suited. For example, if you want a more rustic look, reclaimed wood or barnwood would be a good choice. If you want a cleaner look, new lumber may be the way to go.
2. Cut the boards to size. Once you have selected the lumber for your project, it will need to be cut down to size before being installed on the wall. A miter saw or hand saw can be used for this task.
3. Install a backing board onto the wall if necessary. This step is not always necessary, but if your chosen lumber is thinner than 1/2 inch (1 cm), then installing a backing board will help prevent warping and ensure stability over time. To do this, simply screw some pieces of plywood or MDF onto the wall where you will be installing the planks . . . make sure that these are level before moving onto the next step!
4) Attach the boards to the wall using nails or screws and appropriate hardware (i..e., brackets). Start at the bottom and work up when attaching each row of boards; this will help prevent any gaps from showing up later on as gravity starts to pull them down slightly over time .