How to Do Wood Siding
Wood siding is a popular choice for homes and businesses because it is visually appealing and provides good protection against the elements. There are several different types of wood siding, including cedar, redwood, and pine. When choosing wood siding, it is important to consider the climate in which it will be installed.
For example, cedar is a good choice for locations with high humidity levels, while redwood is better suited for areas that experience more extreme temperature changes. Pine is a versatile option that can be used in most climates.
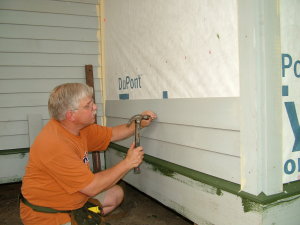
To install wood siding, first prepare the surface by removing any old siding or trim and repairing any damage to the underlying structure.
Next, install felt paper or house wrap to create a moisture barrier. Once the felt paper or house wrap is in place, begin installing the wood siding panels using nails or screws. Start at the bottom of the wall and work your way up, overlapping each panel as you go.
Finish by installing trim around doors and windows.
- Choose the type of wood siding you would like to use
- Some common options include cedar, redwood, and pine
- Purchase the amount of wood siding needed for your project
- Be sure to take into account the width, length, and thickness of each piece when making your calculations
- Cut the wood siding to fit the dimensions of your project area
- A power saw will likely be needed for this step
- Apply a sealant or primer to the raw wood surface if desired
- This will help protect it from weathering and rot over time
- Nail or screw the wood siding into place, starting at one corner and working your way around until all pieces are secure
Credit: www.askthebuilder.com
What Do You Put behind Wood Siding?
There are a few things that you can put behind wood siding in order to ensure its longevity. One of the most important things is to make sure that the siding is properly sealed and caulked. This will help to prevent moisture from seeping in and causing damage.
Another thing that you can do is to install a vapor barrier behind the siding. This will help to keep the humidity levels down, which can also prevent damage.
What is the Best Wood to Use for Siding on a House?
There are a few different types of wood that can be used for siding on a house. The most common type of wood used is cedar, which is durable and has a natural resistance to rot and pests. Other options include redwood, cypress, and spruce.
Each type of wood has its own advantages and disadvantages, so it’s important to consult with a contractor or architect before making a final decision.
Is It Cheaper to Do Siding Yourself?
If you’re considering undertaking a siding project yourself in order to save money, it’s important to factor in all of the potential costs before making a final decision. While it’s true that you will likely save on labor costs by doing the work yourself, there are other expenses to consider, such as materials and equipment rental. To get an accurate estimate of what your project might cost if you DIY, start by getting quotes from several contractors for comparison.
In terms of material costs, siding can range anywhere from $2-$8 per square foot. The type of siding you choose will affect the overall price – for example, higher-end materials like stone or brick veneer tend to be more expensive than standard vinyl options. Once you’ve selected your desired siding, make sure to calculate how much you’ll need for your home’s exterior – don’t forget waste factor!
It’s always better to err on the side of ordering too much rather than not enough.
As for tools and equipment, you may already have some items in your garage or shed that would be suitable for use on a siding project (such as ladders and power drills). However, there are certain specialized tools required for certain types of siding installation that you may need to rent or purchase – these could include things like snap lock punch sets and pneumatic staplers.
Make sure to do your research so that you know exactly what will be needed before starting the project.
Once all of the potential costs are considered, it’s up to you to decide whether taking on a DIY siding project is worth the savings. If you’re confident in your abilities and have factored in all necessary expenses, then go for it!
Just remember that even with careful planning, unexpected challenges can come up during any home improvement project – so be prepared mentally and financially for anything that comes your way.
How Hard is It to Do Siding Yourself?
It is possible to do siding yourself, but it is not recommended unless you have experience with this type of home improvement project. Siding installation requires special tools and equipment that most homeowners do not have access to. Additionally, siding must be installed correctly in order to avoid leaks and other problems.
If you are not confident in your ability to install siding correctly, it is best to hire a professional contractor who can ensure the job is done right.
How To Install Real Wood Siding
How to Install Vertical Wood Siding
Installing vertical wood siding is a great way to add some curb appeal to your home. Here are the steps you need to take in order to get the job done right:
1. Start by measuring the area where you will be installing the siding.
You will need to purchase enough boards to cover this area, plus an additional 10% for waste and trim.
2. Cut the boards to size using a circular saw or power miter saw. Be sure to wear protective gear, such as gloves and safety glasses, when operating these tools.
3. Install furring strips on the wall if necessary. This will provide a flat surface for the boards to be attached to. Use nails or screws specifically made for attaching furring strips (often called “self-tapping”).
4. Begin attaching the boards at one corner of the wall, working your way up vertically until you reach the top edge of the area you are covering. Use nails or screws that are long enough to penetrate through both the board and furring strip (if applicable), into the studs behind them. Space nails or screws about 8” apart along each board.
How to Install Wood Siding on a Shed
Installing wood siding on a shed is a great way to add character and style. Here are some tips on how to install wood siding on a shed:
1. Start by measuring the area where you will be installing the wood siding.
This will help you determine how much siding you will need to purchase.
2. Next, cut the plywood or OSB sheathing to size using a circular saw or power miter saw. Be sure to wear safety goggles when using power tools.
3. Apply construction adhesive to the back of the sheathing, then position it against the shed wall. Use clamps or weights to hold it in place while the adhesive dries (follow the manufacturer’s instructions for drying time).
4. Once the adhesive has dried, begin installing your wood siding boards from bottom to top, working left to right.
It is important that each board is flush with the one below it, so use a level as you work your way up. To avoid splitting the boards, predrill pilot holes before nailing them into place with 8d galvanized nails (or 6d if using cedar). Space nails about 8″ apart along each board edge and 12″ apart in between each board edge (for example, two nails per stud).
How to Make Clapboard Siding
If you’re looking for a rustic, yet refined look for your home’s exterior, clapboard siding is a great option. Clapboard siding is made up of long, thin boards that overlap each other. It’s a traditional style of siding that has been used for centuries on homes in New England and other parts of the country.
Clapboard siding is usually made from cedar or pine, although you can also find it in fiber cement and composite materials. Cedar is a popular choice because it’s naturally resistant to rot and decay. Pine is also a durable option, but it will require more maintenance than cedar since it’s prone to knots and splits.
Fiber cement and composite clapboard are low-maintenance options that will give you the look of wood without the upkeep.
When choosing clapboard siding, pay attention to the thickness of the boards. The thicker the board, the longer it will last.
Also take into account the climate where you live. If you live in an area with harsh winters, choose a thicker board so it won’t warp from the cold temperatures. If you live in a hurricane zone, opt for hurricane clips to help secure the boards to your home’s framing.
Once you’ve chosen your material and thickness, it’s time to install your clapboard siding. Start at the bottom of your wall and work your way up, nailing each board into place as you go. Be sure to use galvanized nails or screws so they won’t rust over time.
When installing horizontal boards (also called “battens”), start at the bottom and work up so water will run off them properly when it rains or snows . Use caulk around all joints and seams to create a weather-tight seal . Finish by painting or staining your new clapboard siding to protect it from UV rays and extreme weather conditions .
How to Install Exterior Wall Siding
If you’re looking to add siding to your home’s exterior, there are a few things you need to know before getting started. Here’s a step-by-step guide on how to install exterior wall siding:
1. Choose your siding material.
There are a variety of options available, so do some research and select the material that best suits your needs.
2. Measure the area where the siding will be installed and calculate how much material you’ll need. Be sure to add an extra 10% for waste and trimming.
3. Install any necessary trim pieces around doors and windows before beginning to install the siding itself. This will make for a cleaner finished look.
4. Start at one end of the wall and work your way down, applying each piece of siding with nails or screws (depending on the type of material).
Overlap each piece slightly as you go along.
5 . Finish up by adding any additional trim pieces as needed and caulking all seams for a weatherproof sealant .
Conclusion
Wood siding is a great way to add value and curb appeal to your home. It’s also relatively easy to install, making it a do-it-yourself project for many homeowners. Here are the basics of how to do wood siding:
1. Choose the right type of wood siding for your climate. Cedar and redwood are good choices for wetter climates, while pine and fir are better suited for drier conditions.
2. Install furring strips on the exterior walls of your home if you’re planning on attaching the wood siding directly to the wall surface.
This will provide a space for air circulation between the wall and the siding, preventing moisture damage.
3. Cut the wood siding panels to size using a power saw or hand saw. Make sure all cuts are straight and clean so that the panels fit together properly when installed.
4 .Attach the panels to the furring strips or wall surface using nails or screws driven into predrilled holes . Start at the bottom of each panel and work your way up, overlapping each piece as you go .
Finish by trimming off any excess material at the top with a power saw or handsaw .