How to Build a Wood Awning Over a Door
Building an awning over a door is a great way to protect your home from the elements and add curb appeal. The first step is to measure the door and decide how wide and long you want the awning to be. Next, cut the lumber to size and assemble the frame using brackets or braces.
Then, attach the frame to the house with lag screws or masonry anchors. Finally, cover the frame with canvas or metal sheeting and secure it with screws or rivets.
- Building a wood awning over a door is a great way to add curb appeal and protect your entryway from the elements
- Here are some tips on how to build a wood awning over a door: 1
- Choose the right location for your awning
- The best place for an awning is above the door, extending at least 3 feet out from the doorway
- If you have an overhang, you can install your awning directly onto the overhang
- Otherwise, you will need to build or buy supports for your awning
- Measure the area where you will be installing the awning and cut your lumber accordingly
- You will need two long horizontal beams and two shorter vertical supports
- Assemble your frame by nailing or screwing the beams together at the corners
- Install your frame onto the supports (if necessary) or directly onto the overhang/building exterior using large screws or lag bolts
- Cover your frame with canvas, tarpaulin, or another waterproof material, stapling it in place around all sides of the frame
How to Build an Awning Frame from Wood
If you want to add some shade and protection from the elements to your deck or patio, an awning is a great solution. And while you can certainly buy a ready-made awning, it’s also easy (and more economical) to build your own frame from wood. Here’s how:
The first step is to gather all of your materials. You’ll need lumber for the frame (we used 2x4s), outdoor-grade hardware like screws and bolts, and fabric for the canopy. Once you have everything, lay out the lumber for the frame on a level surface.
Cut the lumber to size according to your measurements, then use brackets or other hardware to attach the pieces together securely.
Now it’s time to add the fabric canopy. First, drape it over the frame and mark where you’ll need to make cuts or holes for things like hooks or grommets.
Then remove the fabric and cut it as needed before reattaching it to the frame. If desired, you can also add trim around the edges of the canopy for a finished look.
And that’s it!
Your new DIY awning frame is complete and ready to provide much-needed shade and protection from sun and rain.
How to Build an Awning Over a Door
If you have a door that opens to the outdoors, you may want to consider building an awning over it. Awnings provide protection from the sun and rain, and can be a great addition to any home. Here are some tips on how to build an awning over a door:
1. Choose the right materials. The most important part of any awning is the frame. Make sure to use materials that are durable and will withstand weather conditions.
Aluminum or steel frames are good choices.
2. Assemble the frame. Once you have all of your materials, it’s time to start assembling the frame.
If you’re using aluminum or steel tubing, make sure to use connectors that will allow you to create a sturdy structure.
3. Attach the fabric cover. The next step is to attach the fabric cover to the frame of the awning.
Use heavy-duty staples or screws to secure it in place. Make sure the fabric is taut so that it doesn’t sag when wet weather hits.
4..
Hang your new awning! Now all that’s left to do is hang your new awning over your door! Use strong hooks or screws designed for outdoor use to support the weight of the structure.
. You’re now ready to enjoy some time outdoors without worry about harmful UV rays or getting soaked by raindrops!
Credit: www.youtube.com
How Do You Install an Awning Over a Door?
Assuming you would like a step-by-step guide on how to install an awning over a door:
1. Choose the right awning for your needs. There are many different types, sizes, and colors of awnings available on the market, so it is important to select one that best fits your home and personal preferences.
2. Position the awning over the door. Make sure that the front edge of the awning is level with the top of the door frame. It is also important to ensure that the sides of the awning are parallel with each other.
3. Use screws or nails to secure the awning in place. Be sure to predrill holes for the screws or nails to avoid splitting the wood on your doorframe. Start at either end of the awning and work your way towards the middle, attaching it securely at multiple points along its length.
4. Hang any curtains or other decorative items from your new awning, if desired. This can add extra shade and privacy to your doorway area while also enhancing its curb appeal!
How Do You Make a Simple Wood Awning?
Assuming you would like a blog post discussing how to make a basic wooden awning:
Awnings are a great way to add some protection from the sun and rain while also improving the look of your home. While there are many different ways to build an awning, using wood is one of the most popular methods.
With some basic carpentry skills and tools, you can easily construct a wooden awning that will last for years.
Before starting any project, it’s important to make sure you have all the necessary materials and tools on hand. For this project, you’ll need:
-4×4 posts (amount will depend on size of desired awning)
-2x4s (again, amount will depend on size of desired awning)
-1×6 boards (length will depend on size of desired awning)
-Galvanized screws
-Exterior grade wood glue
-Caulking gun & caulk
-Paint or stain (optional)
Once you have all your supplies gathered, you can begin construction. If you’re building an awning over an existing structure, like a deck or patio, then you’ll first need to attach the 4×4 posts to the surface.
You’ll want to use galvanized screws here for added durability against rust. If you’re not attaching the awning to anything, then simply set the 4x4s in concrete so they’re nice and sturdy.
Next, it’s time to start building the frame.
Cut your 2x4s into lengths that will span between each of the 4×4 posts. Then use these pieces to create top and bottom plates for your frame by screwing them into each post. Once that’s done, cut more 2x4s to create vertical supports that will go in between each pair of top and bottom plates. Screw these in place as well so everything is nice and secure.
Now it’s time for the roof! Cut your 1×6 boards down to size so they fit snugly between each pair of vertical supports on your frame. Attach them using exterior grade wood glue and galvanized screws placed every few inches along their length. And that’s it – your basic wooden awning is now complete! All that’s left is optional painting or staining before enjoying its shade and protection from the elements!
How Big Should an Awning Over a Door Be?
Awnings are a great way to add curb appeal and protection from the elements to your home. But how do you know what size awning is right for your door?
There are a few things to consider when selecting the size of your awning.
The first is the width of your door. You’ll want to leave at least two feet on either side of the door for clearance, so an awning that’s four feet wide would be ideal.
Another thing to keep in mind is the height of your door.
An awning should be about one-third the height of your door, so if you have an eight-foot tall door, an awning that’s three feet tall would be just right.
Finally, think about how much sun and weather protection you need. If you live in an area with intense sun and heat, you’ll want an awning that’s large enough to provide shade for your entire door.
On the other hand, if you’re mostly concerned with rain protection, an awning that only covers the top half of your door will suffice.
No matter what size or style of awning you choose, it’s sure to add both function and beauty to your home!
How to Build a Canopy Over Front Door?
Building a canopy over a front door is a great way to add curb appeal to your home. It is also a relatively easy project that can be completed in a weekend. Here are the steps you need to take to build your own front door canopy:
1. Decide on the size and style of your canopy. Do you want it to be large enough to shelter two people or just big enough for one? What kind of roof do you want?
A flat roof or pitched?
2. Gather Materials. For this project, you will need some lumber, plywood, shingles, flashing, and nails/screws.
If you are not comfortable working with wood, you can also purchase a pre-made kit from most home improvement stores.
3. Cut the lumber to size and assemble the frame of your canopy using nails or screws. Make sure the frame is level and square before attaching the plywood sheets to form the roof.
4. Cover the roof with asphalt shingles, starting at the bottom edge and working up towards the peak. Nail down each row of shingles as you go along. Finally, install flashing around all edges of the roof where it meets up with walls or other structures (such as an existing porch).
This will help keep water from seeping in behind your new canopy during heavy rains.
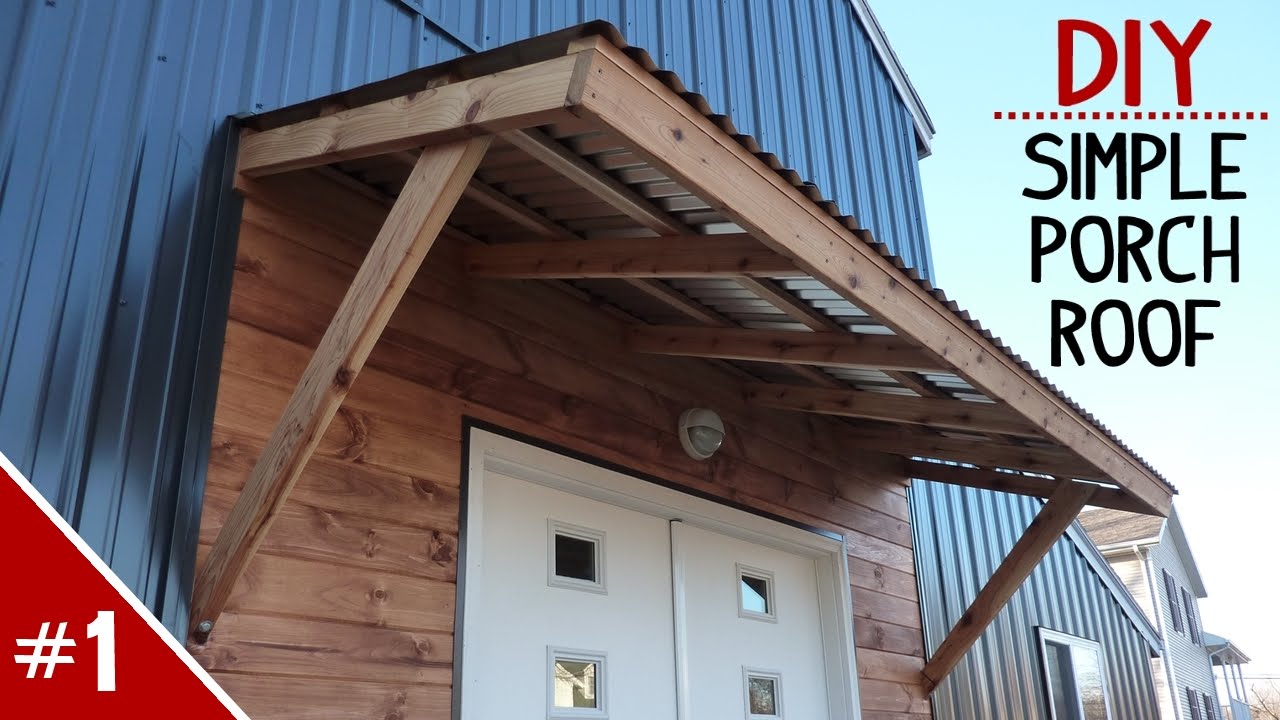
Build an Awning Frame from Wood – Workshop Renovation Series
Conclusion
Building a wood awning over a door is a great way to add curb appeal and protection from the elements. The first step is to measure the door opening and cut two pieces of 2×4 lumber to fit. Next, use a drill to screw the 2x4s into the door frame on either side of the opening.
Then, cut four more 2x4s to create supports for the awning. Screw these into place so that they are flush with the top of the door frame. Finally, cut two more 2x4s to create crossbeams for the awning.
Attach these using screws and brackets. Now you can add your choice of roofing material and finish off the edges with trim molding.