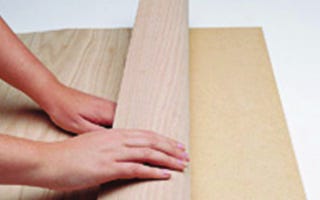
How to Apply Wood Veneer
Wood veneer can add a natural, warm look to any room in your home. It’s also relatively easy to apply, as long as you have the right tools and supplies. Here’s what you’ll need to get started:
-A piece of wood veneer (you can find this at most hardware stores)
-A utility knife
-A straight edge
-Sandpaper (both fine and coarse grits)
-Wood glue
- Purchase the wood veneer of your choice
- You can find this at most hardware stores
- Cut the veneer to size, if necessary
- If you’re covering a large area, you may need to piece the veneer together like a puzzle
- Apply adhesive to the back of the veneer, then press it into place on the surface you’re covering
- Use a roller or other smooth object to help remove any air bubbles and ensure good contact between the adhesive and both surfaces
- Trim off any excess veneer with a sharp knife or scissors, then sand the edges smooth
How to Apply Wood Veneer to Curved Surface
If you want to add wood veneer to a curved surface, there are a few things you need to do to make sure it looks good and lasts long. Here are the steps:
1. Prepare the surface by sanding it smooth.
This will help the veneer adhere better and also create a nice smooth finish.
2. Cut the veneer to size. It’s important to have enough excess so that you can wrap it around the curve of the surface.
3. Apply glue to both the surface and the back of the veneer. Be generous with the glue so that it has a chance to really adhere well.
4. Press the veneer onto the surface and then use a roller or something similar to press it down firmly all over.
You don’t want any air bubbles trapped under there!
5. Use a sharp knife to trim away any excess veneer along the edges. You want it to be as flush as possible with no overhang.
6 . Finish up by sanding down any rough edges and then applying your chosen finish (stain, paint, etc).
How to Install Wood Veneer on Wall
Wood veneer is a popular choice for wall coverings because it is relatively easy to install and can provide a warm, natural look to any room. There are a few things to keep in mind when installing wood veneer on your walls, however, in order to ensure a successful installation.
First, you need to make sure that the wall surface is smooth and clean before beginning.
Any bumps or imperfections will be visible once the veneer is applied, so it’s important to take the time to prep the surface properly. You’ll also want to make sure that the wall is dry before starting – if it’s even slightly damp, it could cause the veneer to warp or bubble up as it dries.
Once you’ve prepped the surface, you can begin applying the veneer.
Start at one corner of the room and work your way around, using a brayer or roller to smooth out any bubbles or wrinkles as you go. It’s important to work quickly while the adhesive is still wet, otherwise you may have trouble getting the veneer to stick properly.
If you’re happy with how everything looks, allow the adhesive to dry completely before moving on.
Once dry, you can trim away any excess veneer along the edges of the walls using a sharp knife or scissors. And that’s it! With just a little bit of effort, you can transform any room in your home with wood veneer wallcoverings.
How to Apply Veneer to Plywood
Veneer is a thin layer of wood that is glued to the surface of plywood. Veneer can be made from any type of wood, but it is most commonly made from hardwoods. Applying veneer to plywood is a relatively simple process, but there are a few things you need to know before you get started.
The first thing you need to do is determine which side of the plywood will be the visible side. The veneer will be glued to this side. If you are unsure which side is the front, flip the sheet over and look for any manufacturer markings or logos.
These will usually be located on the back side of the sheet.
Once you have determined which side is the front, sand the surface lightly with fine-grit sandpaper. This will help create a smooth surface for the veneer to adhere to.
Be sure to remove all dust from sanding before proceeding to the next step.
Next, lay out your veneer pieces on top of the plywood. Make sure they fit snugly together and that there are no gaps between them.
If necessary, trim the veneer pieces with a sharp knife or scissors so they fit perfectly together.
Now it’s time to apply glue to both the plywood and veneer pieces. There are many different types of glue that can be used for this project, but we recommend using an adhesive designed specifically for woodworking projects like this one.
Apply a thin layer of glue evenly across both surfaces using a brush or roller. Be sure not to use too much glue, as this can cause problems later on when trying to remove excess glue from finished project . .
How to Apply Wood Veneer to Cabinets
If you’re looking for a way to add a touch of luxury to your kitchen cabinets, wood veneer may be the perfect option. Veneer is a thin layer of wood that can be applied to surfaces like cabinets, floors, and walls. It’s often used as an accent material or to give furniture a more expensive look.
Applying wood veneer to cabinets is relatively simple and can be done in a few hours. The first step is to clean the surface of the cabinet doors with a mild cleaner. Next, measure and cut the veneer sheets to size.
It’s important to use sharp scissors or a utility knife so that the cuts are clean and straight.
Once the veneer is cut to size, apply adhesive glue or double-sided tape along the back edge. Gently press the veneer into place on the cabinet door, starting at one end and working your way across.
Use a roller or brayer to smooth out any bubbles or wrinkles.
For best results, finish off by trimming away any excess veneer with a sharp knife or razor blade. You can also sand down any rough edges for a smoother finish.
How to Apply Veneer to Mdf
If you’re looking for a wood veneer that’s both inexpensive and easy to work with, MDF is a great option. Here’s how to apply veneer to MDF:
1. Start by sanding the MDF surface with 120-grit sandpaper.
This will create a smooth surface for the veneer to adhere to.
2. Next, use a brush or roller to apply adhesive evenly across the surface of the MDF. Be sure to use enough adhesive so that the veneer will be able to stick properly.
3. Now it’s time to apply the veneer! Carefully place the sheet of veneer on top of the adhesive, making sure that it’s aligned correctly. Once it’s in place, use a roller or brayer to press down on the veneer and ensure good contact between it and the adhesive.
4 . Trim away any excess veneer using a sharp knife or scissors. Then, allow the adhesive to dry completely before proceeding further.
5 . Finally, give your newly-veneered MDF piece a light sanding with 220-grit sandpaper before finishing as desired (staining, painting, etc.).
Credit: www.rockler.com
How Do You Attach Wood Veneers?
There are a few different ways to attach wood veneers, and the method you choose will depend on the project you’re working on and your personal preference. Some common methods include using adhesive, nails, or screws.
If you’re using adhesive to attach the wood veneer, you’ll first need to apply an even layer of glue to the surface of the veneer.
Then, align the veneer in the desired position and press it firmly into place. Once the adhesive has dried, you can trim any excess veneer with a sharp knife.
For a more permanent attachment, nails or screws can be used.
Simply drive the fastener through the veneer and into the underlying substrate. Be sure to countersink any nails so that they don’t protrude from the surface of the veneer.
Whatever attachment method you choose, be sure to take care when handling wood veneers as they can be easily damaged.
What Kind of Glue Do You Use for Wood Veneer?
There are a few different types of glue that can be used for wood veneer, but the most common is PVA (polyvinyl acetate) glue. This type of glue is white or clear, and it dries quickly. It’s also relatively inexpensive and easy to find.
Another type of glue that can be used for wood veneer is contact cement. This type of glue creates a very strong bond, but it takes longer to dry and can be more difficult to work with.
How Do You Prepare Wood for Veneer?
If you’re working with raw wood, the first step is to plane it down to a consistent thickness. This will ensure that your veneer is evenly applied and looks professional. Next, sand the surface of the wood smooth.
You don’t want any bumps or imperfections in the wood before you apply the veneer.
Now it’s time to apply the veneer. There are two ways to do this: cold press and hot press.
With cold press, you simply apply pressure to adhere the veneer to the wood. Hot press involves using an adhesive along with heat and pressure to bond the veneer to the wood.
Once the veneer is applied, you can trim it flush with a sharp knife or router bit.
And that’s it! Your wood is now ready for whatever project you have in mind.
Can I Put Veneer on Plywood?
Yes, you can put veneer on plywood. Veneer is a thin layer of wood that is used to cover another piece of wood. It is usually glued or bonded to the surface with an adhesive.
Plywood is made up of layers of wood veneer glued together. It is a strong and stable material that is often used in construction and furniture making. Because it is made up of thin layers of wood, it can be sanded down and finished to create a smooth surface.
Applying veneer to plywood is a relatively simple process. First, the surface of the plywood must be sanded down until it is smooth. Next, the veneer must be cut to size and then glued or bonded to the surface using an adhesive.
Once the veneer has been applied, it can be sanded down and finished as desired.
How to Apply Wood Veneer | Rockler Skill Builders
Conclusion
Wood veneer can give your furniture or home decor a high-end look without the high-end price tag. You can find wood veneer at most hardware stores, and it’s relatively easy to apply. Here’s how:
1. Clean the surface you’ll be applying the veneer to with a damp cloth. This will help the veneer adhere better.
2. Cut the veneer to size, using a sharp knife or scissors.
3. Apply a thin layer of glue to the back of the veneer, then press it onto the surface. Use a roller or your hands to smooth out any bubbles or wrinkles.