How to Stencil on Rough Wood
Rough wood can be a challenge to stencil, but with the right technique it can be done. Here are some tips on how to stencil on rough wood:
1. Choose the right paint for the job.
A good stencil paint will have good coverage and be easy to work with.
2. Prep your surface. Make sure the wood is clean and dry before you start painting.
3. Use a foam brush or roller to apply the paint evenly over the stencil design.
4. Don’t overdo it! Too much paint will make it difficult to remove the stencil later on.
Just use enough paint to get good coverage without being too heavy-handed.
5 .
- Start by painting your rough wood surface with a base coat of paint in the color of your choice
- Next, print out or draw your stencil design onto paper
- Cut out the individual pieces of your stencil design with scissors
- Tape the stencil pieces to the rough wood surface using painter’s tape
- Use a foam roller or brush to paint over the stencil with a second color of paint
- Carefully remove the stencil pieces from the wood surface and allow the paint to dry completely before enjoy your new piece of art!
Credit: renovatedfaith.com
How Do You Stencil Rough Wood Without Bleeding?
If you’re looking to add some pattern or color to rough wood surfaces, stenciling is a great option! But if you’ve ever tried stenciling on rough wood, you know that it can be tricky to get clean lines without the paint bleeding under the stencil. So how do you avoid this problem?
Here are a few tips:
– Use a high-quality acrylic paint designed for stenciling. Cheap paint is more likely to bleed, so it’s worth investing in a good-quality brand.
– Prime the wood surface before stenciling. This will help to create a barrier between the paint and the wood, reducing the risk of bleeding.
– Use painters’ tape to secure your stencil in place.
This will help to keep it from moving around as you work and creating messy lines.
– Use a light touch when applying the paint. Too much pressure can cause the paint to seep under the stencil.
Dab or pounce the brush lightly over the surface instead of brushing back and forth.
With these tips in mind, you should be able to achieve clean, crisp lines when stenciling on rough wood surfaces!
Read: How Do You Empty a Hole Saw?
Can You Stencil on Raw Wood?
Yes, you can stencil on raw wood. The key to success is to use the right type of paint and primer. We recommend using a water-based paint or primer for best results.
How Do You Stencil on a Rough Board?
When stenciling on a rough board, the first step is to sand the surface of the board until it is smooth. You will then need to apply a primer to the board before stenciling. Once you have applied the primer, you can then begin to stencil your design onto the board.
Read to know: What Color Alcohol Ink Do You Use for Wood Grain?
How Do You Get Clean Lines When Stenciling on Wood?
When it comes to stenciling on wood, one of the most important things to achieve clean lines is to use a good quality stencil brush. A stencil brush has stiff bristles that help create a crisp line when painting. Another helpful tip is to use a light layer of paint so that the paint doesn’t bleed under the stencil.
To do this, apply your paint to the brush and then offload most of it onto a paper towel before applying it to your surface. When you’re ready to stencil, hold the brush at an angle and dab it into the paint. Then, using light pressure, follow along the edge of your stencil.
Be sure to check your work as you go and make any necessary touch-ups before moving on. With a little practice, you’ll be able to achieve perfect results every time!
Read also: How Do You Make a Shotski?
How To Stencil on Wood [Without Bleeding!]
Mod Podge Stencil on Wood
Looking for a fun and easy way to add some personality to your home décor? Why not try stenciling with Mod Podge? It’s a quick and easy way to give any piece of wood furniture or décor a one-of-a-kind look.
Plus, it’s really easy to do!
Here’s what you’ll need:
– A piece of wood (furniture, picture frame, etc.)
– Mod Podge matte finish (you can also use the glossy finish if you prefer)
– A stencil of your choice (there are lots of great ones available online or at your local craft store)
+ Paintbrush or foam brush
+ Paint
optional: sandpaper, clear sealer
First, decide which design you want to use and where you want to place it on your wood piece.
Once you have that figured out, trace the stencil onto the wood using a pencil. Then, cut out the inside of the design with a sharp knife. Now you’re ready to start stenciling!
Apply a generous amount of Mod Podge over the entire surface of the stencil. Then, apply your paint color of choice over the top. Be sure to use a light hand so that the paint doesn’t bleed under the edges of the stencil.
Remove the stencil while the paint is still wet and allow everything to dry completely before proceeding.
If you want, you can sand down any rough edges and then seal everything with a clear coat of sealer. But that’s totally up to you! Now enjoy your new custom-stenciled wood piece!
Conclusion
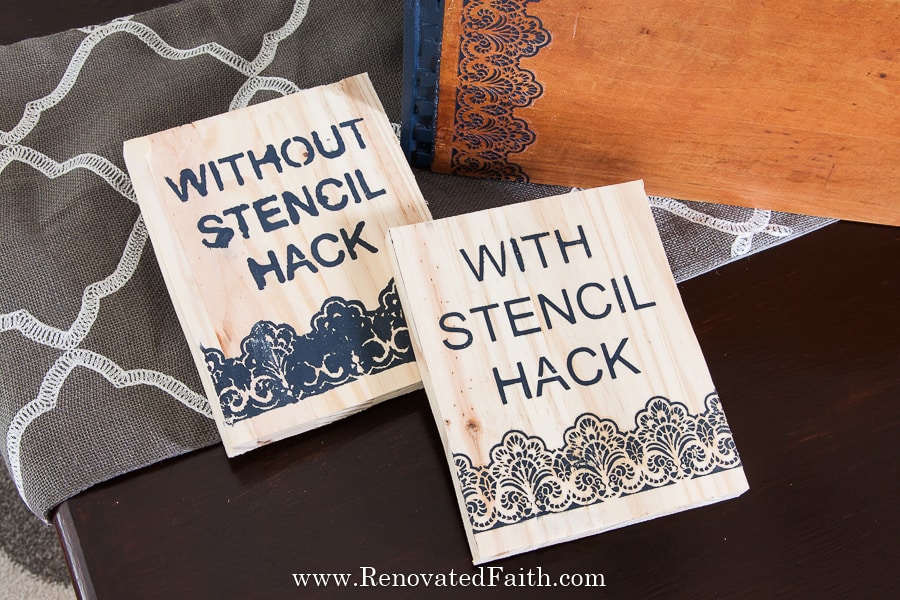
This is a great tutorial for anyone who wants to learn how to stencil on rough wood. The author provides clear instructions and step-by-step photos so that even beginners can succeed at this project. After preparing the wood surface, you’ll use a foam roller to apply paint to your stencil.
Then simply remove the stencil and enjoy your beautiful new piece of decor!