How to Preserve Wood Slices for Centerpieces
To preserve wood slices for centerpieces, start by selecting a hardwood like oak or maple. Cut the log into thin rounds using a bandsaw or handsaw, then sand the rounds smooth. To prevent the wood from cracking or warping, soak the rounds in water for 24 hours before applying a sealant.
Once the sealant is dry, decorate the wood slices as desired and enjoy your beautiful centerpiece!
- Find a log or branch that is the desired thickness for your wood slices
- The thicker the log, the wider the slices will be
- Cut the log or branch into even rounds using a saw
- If you want thinner slices, you can cut the rounds in half lengthwise
- Place the wood slices on a wire rack and let them dry for at least 24 hours, preferably longer if possible
- Once they are completely dry, brush on a layer of polyurethane to seal in the natural color of the wood and prevent fading from sunlight exposure
- Let them dry completely before handling further
Credit: www.youtube.com
What to Put on Wood Slices to Preserve Them?
If you’re looking to preserve wood slices, there are a few things you can do. First, sand the surface of the wood slice with fine-grit sandpaper until it’s smooth. Then, wipe down the wood slice with a damp cloth to remove any debris.
Next, apply a thin layer of beeswax or another type of sealant to the wood slice. Allow the sealant to dry completely before using or displaying the wood slice.
How Do You Finish a Wooden Centerpiece Slice?
When it comes to finishing a wooden centerpiece slice, there are a few different things that you can do. You can either paint it, stain it, or simply leave it as is. If you want to add some extra protection to the wood, you can also varnish it.
Let’s take a closer look at each of these options:
If you decide to paint your wooden centerpiece slice, you will need to sand it down first. This will help the paint to adhere better and give you a more even finish.
Once the piece is sanded, you can then apply a primer before painting it with your desired color. It is best to use an oil-based paint for this project so that it will be more durable and resistant to scratches.
If staining is more your style, again you will want to start by sanding the wood.
This time though, you won’t need to prime it before applying the stain. Simply choose the color of stain that you want and apply it evenly across the surface of the wood using a rag or brush. Wipe off any excess stain with another clean rag after a few minutes and allow it to dry completely before moving on.
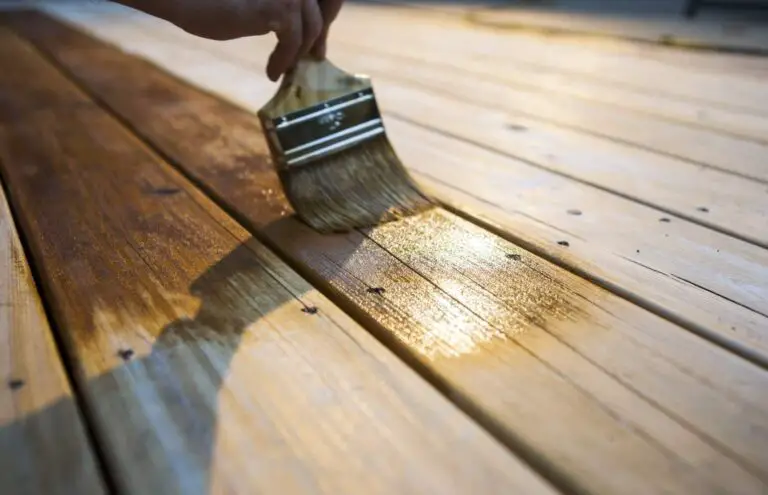
For those who prefer a natural look, leaving the wood unfinished is always an option. If you do choose this route though, make sure that you seal the wood first so that it doesn’t absorb moisture and warp over time. You can do this by applying several coats of clear polyurethane or another type of sealer designed for use on wood surfaces.
Allow each coat plenty of time to dry completely before adding another one on top.
Should I Seal Wood Slices before Painting?
One of the first things you need to do when preparing wood slices for painting is to seal them. This will help protect the wood from moisture and provide a smooth surface for painting. You can use a variety of different products to seal your wood slices, but we recommend using a product like Mod Podge or Polycrylic.
Simply brush on a thin layer of sealer and allow it to dry completely before proceeding with painting.
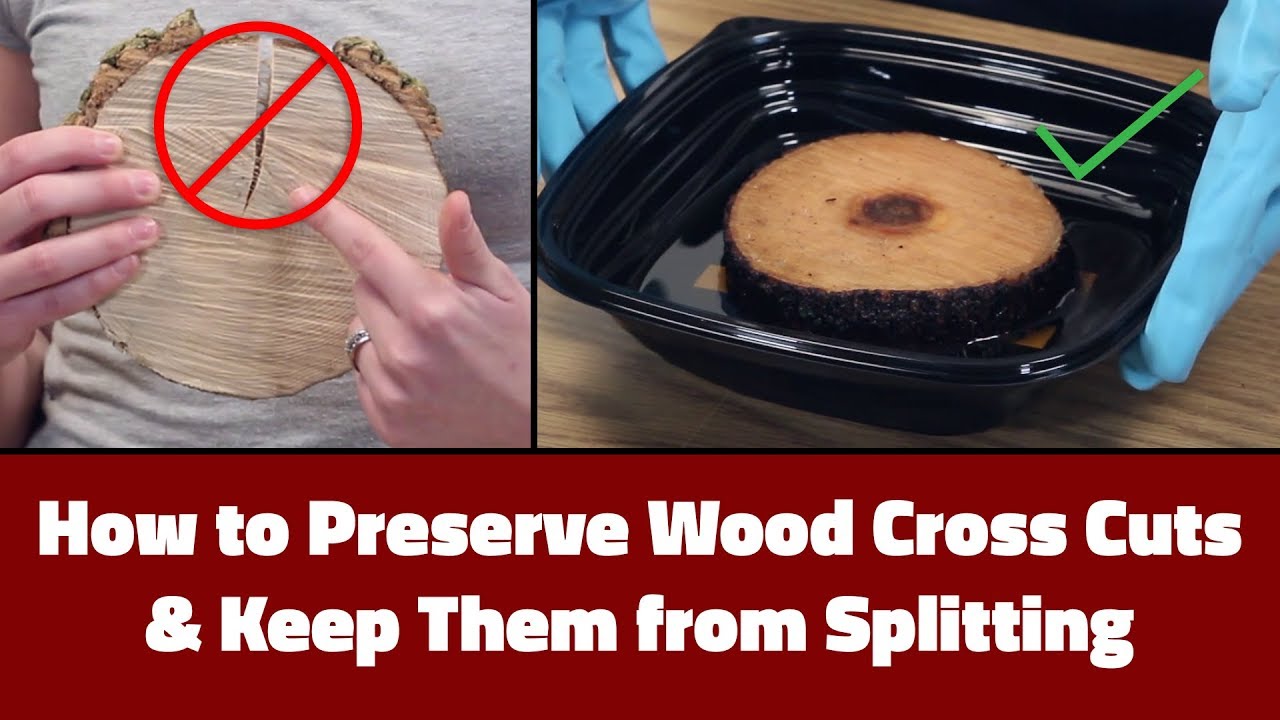
How Do You Treat Wood Slices So They Don’T Crack?
When it comes to treating wood slices so they don’t crack, there are a few things you can do. First, make sure that the wood is properly dried. If it’s too wet, it will be more likely to crack.
You can dry it out by letting it sit in a warm, dry place for a few days.
Once the wood is dry, you can apply a sealant to help prevent cracking. There are many different kinds of sealants available, so be sure to choose one that’s right for your project.
Apply the sealant according to the manufacturer’s instructions and let it dry completely before using the wood slice.
If you take these precautions, your wood slice should stay in good condition for many years to come!
How To Seal Your Wood Slices! | WEDDING DIY
How to Preserve Wood Slices Naturally
Wood slices are a great way to add a natural element to your decor, and they can be preserved so that they last for years to come. Here are some tips on how to preserve wood slices naturally:
1. Choose the right wood.
Hardwoods like oak and maple are best for preserving, as they will withstand the elements better than softer woods.
2. Prepare the wood slices. Start by sanding them down with fine-grit sandpaper to create a smooth surface.
Then, use a sealer or primer designed for outdoor use to protect the wood from moisture and decay.
3. Hang them up or keep them dry. Once you’ve sealed the wood slices, make sure to hang them up or store them in a dry place out of direct sunlight.
This will help keep them looking their best for years to come!
Conclusion
Wood slices are a beautiful and natural way to add a rustic touch to your home decor. If you’re looking for a unique way to preserve wood slices for centerpieces, here are some tips.
First, choose the right type of wood.
Hardwoods like oak or maple are ideal, as they’re less likely to warp or crack over time.
Next, coat the wood slice with a sealant like polyurethane or beeswax. This will help protect it from moisture and keep it looking fresh for years to come.
Finally, store the wood slice in a cool, dry place away from direct sunlight. With proper care, your preserved wood slice will last for many years!