How to Make a Nativity Scene Out of Wood
Nativity scenes are a popular way to decorate for Christmas, and they can be made out of many different materials. Wood is a classic material for nativity scenes, and it can be used to create a variety of different looks. Here are some tips on how to make a nativity scene out of wood.
One way to make a nativity scene out of wood is to create a simple silhouette. This can be done by cutting shapes out of thin plywood or cardboard, and then painting them black. Attach the shapes to a piece of wood or another flat surface using glue or tape, and then display your finished silhouette in a window or on a wall.
Another option is to carve your own nativity scene out of a block of wood. You can find small blocks of basswood at most craft stores, which are perfect for carving. Begin by sketching your design onto the block of wood with pencil, and then use a carving knife or saw to cut out the basic shapes.
Be sure to work slowly and carefully so that you don’t accidently damage your carving! Once you’ve carved all of the pieces, sand them smooth and paint or stain them as desired. Assemble your finished carvings on a base such as an overturned box lid or piece of plywood, and enjoy your homemade nativity scene!
DIY Wooden Nativity Set: A Simple DIY with Free Pattern
- Gather the materials you will need to make your nativity scene out of wood
- You will need a saw, wood glue, clamps, paint, and other decorations as desired
- Cut the pieces of wood that you will need to create the different parts of the nativity scene
- The stable, Mary, Joseph, baby Jesus, the animals, and the angel can all be made from wood
- Glue the pieces of wood together with wood glue and clamp them in place until they are dry
- Paint or decorate your nativity scene as desired
- You may want to paint it one solid color or add details such as a star on top of the stable or flowers around Mary and Joseph
Plywood Nativity Scene Patterns Free
This holiday season, why not try your hand at creating a beautiful plywood nativity scene? These free patterns will help you get started.
The first step is to find the right plywood for your project.
You’ll want to use a smooth, unfinished sheet of plywood that’s at least 1/4-inch thick. Once you have your wood, you can start tracing out the patterns.
There are a variety of different patterns available online, so take some time to browse and find the perfect one for your scene.
Once you’ve found it, print it out and tape it to your plywood. Use a sharp pencil or pen to trace around the pattern, then carefully cut it out with a saw or jigsaw.
Now comes the fun part: painting and decorating your nativity scene!
You can go with traditional colors like brown and white, or get creative and use whatever colors you like best. Just be sure to seal your finished project with a layer of polyurethane to protect it from moisture and wear.
Once complete, display your nativity scene prominently in your home as a beautiful reminder of the true meaning of Christmas.
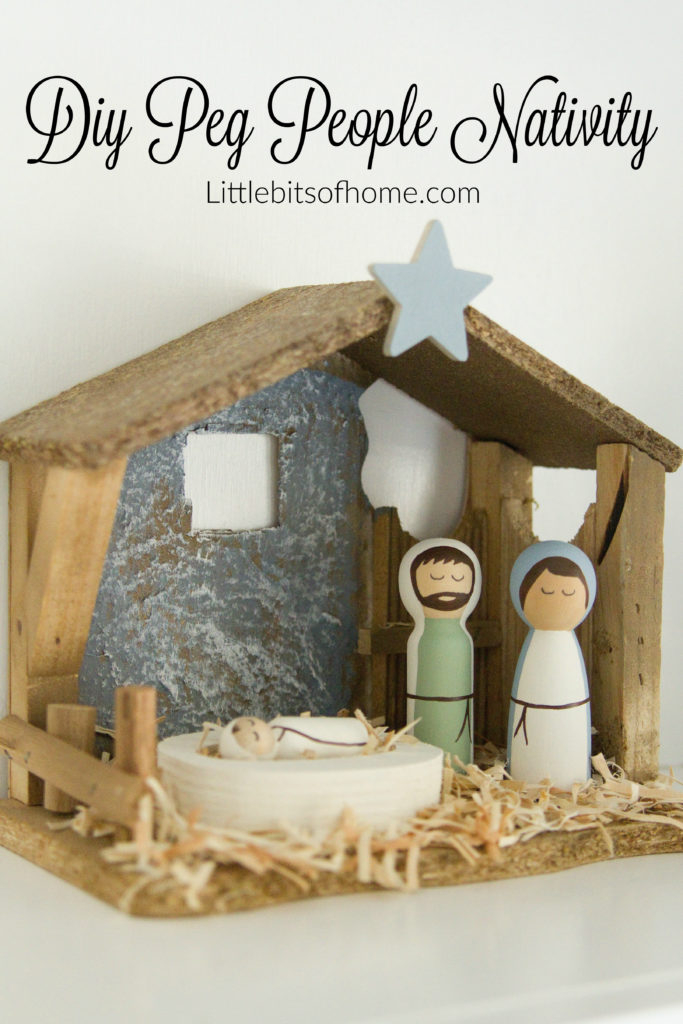
Credit: www.littlebitsofhome.com
How Do You Make a Nativity Scene?
Nativity scenes are a popular way to decorate for Christmas. While they can be purchased pre-made, many people enjoy making their own. Here is a guide on how to make your own nativity scene.
First, you will need to gather some supplies. You will need figures of Mary, Joseph, the baby Jesus, shepherds, angels, animals, and a stable or manger. You can find these items at craft stores or online.
Once you have all of your supplies, it’s time to start assembling your nativity scene.
Position the stable or manger in the center of your display area. Then, add the figures of Mary and Joseph in front of it.
Baby Jesus can go in the stable or manger. Next, add the shepherds and angels around them. And finally, position the animals however you’d like.
Now that your nativity scene is assembled, you can get creative with the rest of your Christmas decorations! Add some lights and garland around it or keep it simple with just the nativity scene itself. Whatever you choose, enjoy this wonderful time of year and celebrate the birth of Jesus Christ!
How Do You Make a Nativity Shadow Box?
If you want to make your own nativity shadow box, it’s actually quite simple. All you need is a few supplies and some patience. Here’s what you’ll need:
-A sturdy cardboard box with a lid (shoe boxes work well)
-Black construction paper or cardstock
-Tape
-Scissors
-Nativity scene figures
-A small light source (tea light candles work well)
First, cut out a large rectangle from the black construction paper. This will be the background for your nativity scene. Next, use tape to attach the rectangle to the back of the lid of your box.
Make sure that the edges are secure and there are no gaps. Now it’s time to arrange your nativity scene figures on the black background. Once you’re happy with their placement, gently press them into place so that they won’t move around when you close the lid of the box.
Now it’s time to add your light source. Place a tea light candle in the bottom of the box and close the lid. The candle will cast shadows of your nativity scene onto the background, creating a beautiful effect.
Enjoy your homemadeshadow box!
How Do You Make a Natable Stable Out of Pallets?
You can make a Natable stable out of pallets by following these simple steps:
1. Start by finding some pallets that are the same size and shape. You will need at least two, but more is better.
2. Place the pallets side-by-side so that they are flush against each other. If necessary, use some rope or straps to keep them together.
3. Use wood screws or nails to attach the pallets together at all four corners.
This will create a strong frame for your stable.
4. Cover the frame with some sort of roofing material. This could be tarpaper, shingles, or even metal sheeting.
Make sure it is securely attached so that it won’t blow away in the wind!
5. Line the inside of the stable with straw or hay to provide bedding for your Natable animals. They will appreciate having a cozy place to sleep!
What are Nativity Scenes Made Of?
A nativity scene, also called a manger scene, crib, or creche, is a depiction of the birth of Jesus as described in the gospels of Matthew, Luke and John. Nativity scenes are often made in the form of dioramas, which may be elaborate with multiple figures and animals or simple enough for children to make themselves. Common materials used to make nativity scenes include wood, clay, paper mâché, fabric and plastic.
The earliest known nativity scene was created by Saint Francis of Assisi in 1223. Francis was inspired by a story from the Bible in which Jesus told his disciples that they would one day see him “born again as an infant.” In response, Francis created a manger scene with live animals as part of his Christmas celebration.
This tradition quickly caught on and soon nativity scenes were being created all over Europe.
Today, nativity scenes can be found in homes, churches and public places all over the world. They are often used as a way to teach children about the birth of Jesus and to encourage people to reflect on the true meaning of Christmas.
Conclusion
This blog post provides step-by-step instructions for creating a Nativity scene out of wood. The first step is to cut out the basic shapes of the figures from plywood using a scrollsaw or jigsaw. Next, the pieces are sanded smooth and then painted or stained.
Finally, they are glued together and mounted on a base. This project can be completed in a weekend and makes a beautiful addition to any holiday decor.