How to Inlay Metal into Wood
Inlaying metal into wood is a process of embedding pieces of metal into drilled holes in a wood substrate. It is often used to create decorative designs or logos in furniture, cabinets, and floors. Inlayed metal can be made from many different metals, including brass, copper, aluminum, and stainless steel.
The most common method of inlaying metal into wood is to use a router with a specially designed bit to cut the recesses for the metal pieces.
The first step in this process is to drill pilot holes for the router bit at the desired locations on the wood substrate. Next, the router bit is attached to the router and set to make cuts that are slightly wider than the thickness of the chosen metal inlay material.
The router is then used to follow the outline of each design element, cutting away enough material so that when the metal piece is inserted it will sit flush with or slightly below the surface of the surrounding wood. After all of the necessary routes have been cut, any rough edges onthe inside surfaces ofthe routed areas can be sanded smooth before proceedingto installthemetalinlays.
To installthemetalinlays, small stripsofdouble-sidedtapeareusuallyplacedon one sideof each piecebefore setting itinto its routed area onthewoodsubstrate.
Onceallof themetalinlayshavebeen installedandthesurfaceofthewoodis smoothand freeof anyexcessadhesivefrom thosedouble-sidedtapes ,itcanbeprotectedwitha clearcoat finish .
Wire Inlay: Inspired to Make
- Choose the metal you would like to inlay into the wood
- Cut the metal to size using a saw or other cutting tool
- Prepare the wood by sanding it down and making sure it is smooth
- Apply a layer of adhesive to the back of the metal piece
- Place the metal piece into the desired location on the wood surface
- 6) Use a mallet or other tool to gently tap the metal piece into place so that it is flush with the wood surface
- 7) Allow the adhesive to dry completely before proceeding further
How to Inlay Metal Wire into Wood
Inlaying metal wire into wood is a great way to add a unique touch to your woodworking projects. This technique can be used to create decorative patterns or functional elements like handles and hinges. Inlaying metal wire into wood is not difficult, but it does require some patience and attention to detail.
Here are the steps you need to follow to inlay metal wire into wood:
1. Cut a groove in the wood for the wire using a router or chisel. The depth of the groove should be slightly shallower than the thickness of the wire.
2. Insert the wire into the groove and use a hammer or mallet to tap it down until it’s flush with the surface of the wood.
3. Use a sharp knife or saw blade to carefully trim away any excess wire that extends beyond the edges of the groove.
4. Apply a thin layer of glue along both sides of the wire and allow it to dry completely before proceeding to step 5.
If you want your inlayed design to be extra durable, you can also solder the joints between pieces of wire before gluing them down.
5. Use fine-grit sandpaper (100-200)to lightly sand over top ofthe wiresuntil they’re flush withthe surfaceof thewood . Be careful not totake off too much material–you just wantto smooth outany rough edges, not remove the wires entirely!
Credit: toolsforworkingwood.com
How Do You Inlay Metal?
Inlaying metal is a process of inserting a design into a metal surface. The most common method is to cut a groove into the metal, then solder or weld in the desired design. Other methods include using adhesives or rivets to attach the design.
When cutting a groove for inlaying, it’s important to use the correct size and type of cutter. For example, if you’re using thin sheet metal, you’ll need a fine-toothed saw blade to avoid damaging the material. Once you’ve cut your groove, clean up any burrs or sharp edges with a file or sandpaper.
Next, it’s time to add your design. If you’re soldering or welding, be sure to use flux and heat-resistant materials that won’t melt under high temperatures. When attaching with adhesives or rivets, make sure the products you choose are suitable for use with metals.
Follow the manufacturer’s instructions for best results.
Finally, once your design is in place, polish or finish the piece as desired. Inlaying metal can add beauty and interest to any project – get creative and have fun!
How Do You Inlay Wire into Wood?
Inlaying wire into wood is a great way to add a unique touch to your woodworking projects. There are a few different ways to do it, but the most common is to use a router.
First, you’ll need to decide on the design of your inlay.
Once you have that figured out, you’ll need to create a template for your inlay. You can either use a piece of paper or cardboard, or you can purchase a pre-made template.
Once you have your template, trace it onto the piece of wood that you’re going to be using for your project.
Then, use a router to cut out the shape of your inlay. Be sure to use a sharp bit so that you get clean cuts.
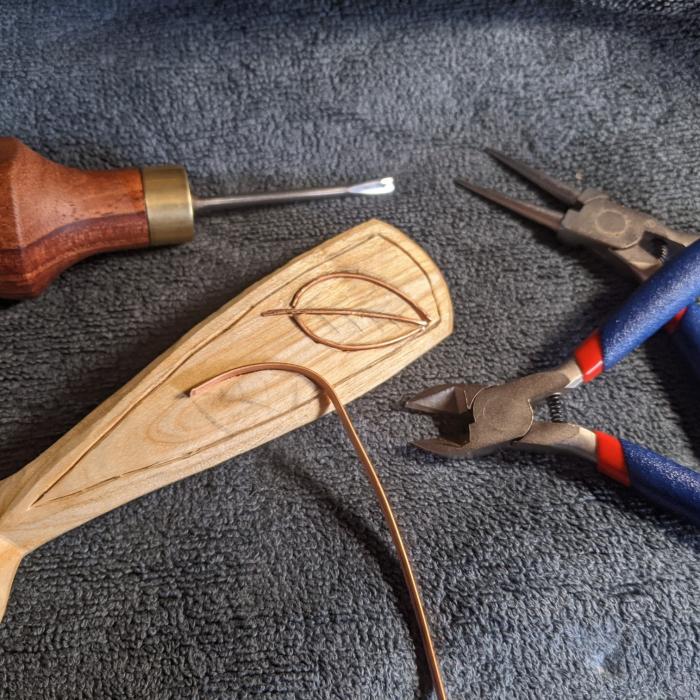
Now it’s time to start inlaying the wire.
Start by threading the wire through the holes in your template. Then, use pliers to bend the wire into place so that it fits snugly against the edges of your routed out area. Once all of the wire is in place, carefully remove the template and admire your handiwork!
How Do You Put Metal on Wood?
When it comes to putting metal on wood, there are a few different ways that you can go about doing so. The most common method is to simply use screws or nails to attach the metal piece to the wood surface. However, depending on the type of metal and the weight of the piece, this might not be the best option.
Another option is to use adhesive strips or Velcro dots to adhere the metal piece to the wood. This can be a stronger hold than using screws or nails, but it is not always as durable in the long run. If you are looking for a more permanent option, you can try drilling holes into both the metal and wood pieces and then attaching them together with bolts or rivets.
Whichever method you choose, make sure that you predrill any holes in order to avoid splitting the wood.
Can You Inlay Copper into Wood?
Yes, you can inlay copper into wood. This is a process that has been used for centuries to add beauty and value to furniture and other wooden objects. There are two main ways to do this: by using a metal-inlay technique or by using a wood-inlay technique.
The metal-inlay technique involves embedding thin sheets of copper into grooves that have been cut into the wood. This method is typically used for larger projects, such as creating intricate designs on tables or chests.
The wood-inlay technique is similar, but instead of using sheets of copper, thin strips of wood are glued into the grooves.
This method is often used for smaller projects, such as inlaying designs onto jewelry boxes or picture frames.
Both methods require some patience and skill, but the results are definitely worth it! Copper adds a beautiful warm glow to any piece of woodwork, and it will last for many years with proper care.
Conclusion
This blog post shows how to inlay metal into wood, a process that can add beauty and interest to any woodworking project. The first step is to create a design or stencil for the inlay. Next, the metal is cut to size and shape using a jeweler’s saw.
The metal is then glued into place using epoxy or super glue. Finally, the excess metal is trimmed away and the inlay is sanded and finished as desired.