How to Copy a Curve Shape into Wood
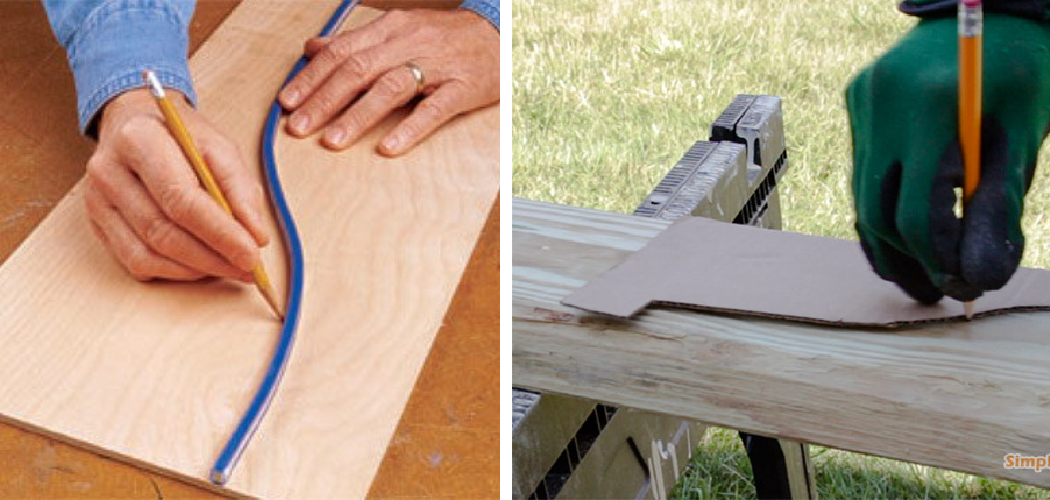
To copy a curve shape into wood, you will need a piece of wood that is at least as long as the curve you want to copy, a pencil, a saw, and some sandpaper. First, trace the curve onto the piece of wood with the pencil. Then, use the saw to cut along the line you traced.
Be sure to wear gloves and eye protection when using the saw. After you have cut out the shape, sand down any rough edges.
- Use a pencil to trace the outline of the curve onto a piece of wood
- Cut out the shape using a scroll saw or jigsaw
- Smooth the edges of the cutout with sandpaper
- Apply a thin layer of wood glue to one side of the curve and press it onto the wood surface
- Clamp the curve in place and allow the glue to dry for 24 hours before removing the clamp
Tracing Shapes, transfer the shape of anything to any surface.
How to Make a Template of a Curved Surface
If you want to make a template of a curved surface, there are a few things you’ll need to do. First, you’ll need to find a piece of paper that is large enough to fit the entire curve. Next, you’ll need to trace the outline of the curve onto the paper.
Once you have the outline traced, you’ll need to cut out the shape.
Now that you have your template, you can use it to trace the curve onto any material. This is particularly useful when working with wood or other materials that are difficult to bend.
Simply place your template on the material and trace around it. Then, cut out the shape and you’re ready to go!
How to Scribe a Curved Wall
When it comes to scribing a curved wall, the process is pretty similar to scribing a straight wall. The main difference is that you’ll need to use a flexible ruler or tape measure to follow the curve of the wall. Here’s a step-by-step guide on how to do it:
1. Measure the width of the area you’re scribing. This will be your starting point.
2. Place your flexible ruler or tape measure at one end of the starting point and begin tracing the curve of the wall.
3. As you trace the curve, make sure to keep an even pressure so that your line is consistent.
4. Once you reach the other end of the starting point, remove your flexible ruler or tape measure and check your work. Make any necessary adjustments and then proceed to Step 5.
How to Cut a Perfect Arch in Wood
Arches are a beautiful way to add architectural interest to any home. They can be used inside or outside, and they come in all different sizes and styles. If you’re looking to add an arch to your home, you’ll first need to know how to cut a perfect arch in wood.
There are a few different ways that you can go about cutting an arch in wood. The easiest way is to use a jigsaw. Simply draw your desired shape onto the piece of wood, and then use the jigsaw to cut along the lines.
If you want a more precise look, you can use a router with a template. This method will take some practice, but it will give you clean, crisp lines.
No matter which method you choose, always take your time and make sure that your cuts are straight and even.
With a little practice, you’ll be able to create beautiful arches that will add character and charm to your home.
Best Tool for Cutting Curves in Plywood
When it comes to cutting curves in plywood, there are a few different options available. But which one is the best?
For starters, you could use a jigsaw.
This is probably the most common option and it can work well if you take your time and use a sharp blade. However, jigsaws can be a bit tricky to control and they can leave behind a somewhat ragged edge.
Another option is to use a router.
This is definitely the more precise option, but it can be more difficult to set up and use than a jigsaw. If you’re not experienced with using routers, then this might not be the best choice for you.
Finally, you could always just cut the curves by hand using a saw or some other type of cutting tool.
This option takes the most time and effort, but it will give you the most precise results. Plus, it’s really satisfying to cut something by hand!
So what’s the best tool for cutting curves in plywood?
It really depends on your own preferences and skill level. If you’re not sure which method to try, we suggest starting with a jigsaw and then progressing to a router if you find that you’re up for the challenge.
Credit: woodfixes.com
How Do You Cut a Curve to Match Wood?
In order to cut a curve that matches wood, you will need to use a jigsaw. First, you will need to find the center of your curve. Once you have found the center, mark it with a pencil.
Next, start your saw at the center and work your way out. Be sure to keep the blade perpendicular to the wood as you cut. Finally, use a sanding block to smooth out the edges of your curve.
How Do You Replicate a Curve?
There are many ways to replicate a curve. Some methods are more accurate than others and some are faster than others. In general, the most common method is to use a spline or NURBS curve.
A spline is a mathematical function that interpolates between points. There are many different types of splines, but the most common type is the cubic spline. A cubic spline has four control points: two endpoints and two middle points.
The middle points control the shape of the curve and the endpoints control the slope of the curve at each endpoint.
NURBS (Non-Uniform Rational B-Splines) curves are similar to splines, but they have additional control over the shape of the curve. NURBS curves have weights associated with each control point that control how much influence that point has on the shape of the curve.
NURBS curves also have knots which define how the curve wraps around each control point.
Both Splines and NURBS can be used to create very accurate representations of curves, however NURBS usually require more computational resources than Splines.
How Do You Put a Curve in Wood?
If you’re looking to add a curve to your woodworking project, there are a few different ways you can go about it. One option is to use a jigsaw or scroll saw to cut out the desired shape. This is probably the most straightforward method, but it does require some patience and precision.
Another way to create curves in wood is by using a router. This approach gives you more control over the final shape and allows for more intricate designs. However, it does require some knowledge of how to use a router and can be somewhat time-consuming.
Finally, if you want to create very large or complex curves, you may need to resort to steam bending. This involves heating up the wood so that it becomes pliable enough to bend into the desired shape. Once cooled, the wood will retain its new shape.
This method takes the longest amount of time and requires special equipment, but it’s great for creating truly one-of-a-kind pieces.
How Do You Scribe a Curve on Wood?
There are a few ways to scribe a curve on wood. The most common way is to use a flexible ruler or template. You can also use a compass or freehand if you’re feeling confident.
First, mark out the general shape of the curve with pencil lines. Then, start at one end and begin bending the ruler or template along the lines until you reach the other end. Make sure to keep the tool tight against the wood so that you get an accurate reading.
Once you’ve reached the other end, remove the tool and connect the dots with a pencil to complete your curve.
Conclusion
This blog post details how to copy a curve shape into wood. The author begins by outlining the supplies needed for the project, which include a piece of wood, a pencil, and a jigsaw. Next, the author explains how to trace the curve onto the wood using a pencil.
Once the curve is traced, the author demonstrates how to cut along the line with a jigsaw. Finally, the author offers tips on how to sand and finish the edges of the cut-out curve.