How to Carve Wood by Hand
Carving wood by hand is a skill that takes time and practice to perfect. However, with the right tools and a little bit of patience, anyone can learn how to carve wood into intricate shapes and designs. The first step is to choose the right type of wood for your project.
Softer woods like pine or basswood are good choices for beginners, while harder woods like oak or maple will require more experience. Once you have selected your wood, use a sharp knife to trace out your design onto the surface. For more detailed carving, you may want to use a Dremel tool or other power carving tool.
When using power tools, always wear safety goggles and follow the manufacturer’s instructions carefully. Start with small cuts and work your way around the entire piece of wood until you have carved out your design. Sand the edges smooth with fine-grit sandpaper and finish with a coat of varnish or paint if desired.
With a little bit of practice, anyone can learn how to carve beautiful pieces of art from wood!
- Start with a piece of wood that is easy to carve
- Soft woods like basswood or balsa are good choices
- Hardwoods like maple or oak are more difficult to carve
- Sketch your design onto the wood with a pencil or pen
- You may want to use a light box to trace your design onto the wood
- Use a carving knife or chisel to start carving out your design
- Be careful not to cut yourself! 4
- If you’re using a power tool, start with a lower speed setting and gradually increase the speed as needed
- Again, be careful not to hurt yourself! 5
- Sand your carved piece smooth once you’ve finished carving it out
- You can use different grits of sandpaper, starting with coarser sandpaper and working your way up to finer sandpaper for a smoother finish
Wood Carving for Beginners – Basics&Tips
How to Carve Wood Without Tools
Assuming you would like a step-by-step guide on how to carve wood without using any tools:
1. Start with a piece of softwood that is easy to carve. Cut the wood into the desired shape with a saw.
2. Use a sharp knife to remove any rough edges from the wood. Be careful not to cut yourself!
3. Begin carving the wood by hand, using your fingers or a blunt object such as a spoon or fork.
Work slowly and carefully, taking care not to splinter the wood.
4. Once you have achieved the desired shape, use sandpaper to smooth out any rough edges.
How to Carve Wood With a Knife
Are you interested in learning how to carve wood with a knife? If so, you’re in luck! Carving wood with a knife is a skill that can be learned relatively easily, and it can be incredibly satisfying.
Here are some tips to help you get started:
1. Start by selecting the right knife. A carving knife should have a sharp, pointed blade that is slightly curved.
Avoid using a kitchen knife or other type of utility knife, as these are not designed for carving and could damage the wood or injure you.
2. Choose the right piece of wood. Softwoods like pine or cedar are good choices for beginners, as they are easier to carve than hardwoods.
Avoid using pressure-treated lumber, as the chemicals in the wood can be harmful if inhaled or ingested.
3. Sketch your design onto the wood before starting to carve. This will give you a guide to follow and help prevent mistakes.
Use a pencil or other non-permanent marker so that you can erase any lines that you don’t want carved into the final product.
4 . Start carving at one end of your sketch and work towards the other end .
Be sure to use gentle, even strokes – too much pressure can cause the blade to slip and result in an injury . If possible , try to practice on scrap pieces of wood before moving on to your final project .
5 .
Once you’re finished carving , sand down any rough edges with fine-grit sandpaper . You may also want to apply a finish , such as varnish or paint , to protect your carving and make it look its best .
Beginner Wood Carving Projects
If you’re looking for some beginner wood carving projects, you’ve come to the right place. Wood carving is a fun and rewarding hobby that anyone can enjoy. It’s also a great way to spend some time outdoors while getting some exercise.
There are a few things you’ll need to get started with wood carving:
– A sharp knife: You’ll need a sharp knife to carve the wood. There are many different types of knives available for wood carving, so it’s important to choose one that feels comfortable in your hand and is the right size for the project you’re working on.
– A piece of wood: You can use any type of wood for carving, but softer woods like basswood or cedar are usually best for beginners. Avoid using pressure-treated lumber, as the chemicals in it can be harmful if they come into contact with your skin.
– Safety equipment: Always wear gloves and eye protection when working with sharp tools.
once you have all of your supplies, you’re ready to start carving! Here are a few easy projects to get you started:
1) Carve a simple shape out of a piece of wood.
Start by sketching your design onto the wood with a pencil. Then, use your knife to carefully cut along the lines you’ve drawn. Remember to take your time and be careful not to cut yourself!
2) Make a wooden spoon. This is a great project for beginners because it doesn’t require too much precision cutting. Start by shaping one end of the spoon into an oval bowl shape.
Then, carve out the handle using curved cuts until it’s comfortable to hold in your hand. Finish off by sanding down any rough edges with sandpaper 3) whittle away at a piece of wood until it resembles something else entirely! This is known as “free form” carving, and it’s perfect for those who want to experiment without following set instructions . Just grab a piece of wood and start shaving off thin pieces with your knife until you create something that looks cool (or weird, depending on how you look at it). Be sure not stay safe while doing this – always keep your fingers away from the blade!
These are just three ideas to get you started with beginner wood carving projects . The possibilities are endless , so don’t be afraid explore and try new things . With practice , patience , and proper safety precautions , anyone can become skilled at this enjoyable pastime .
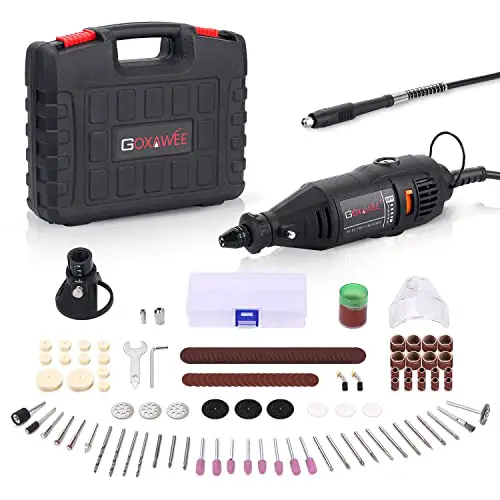
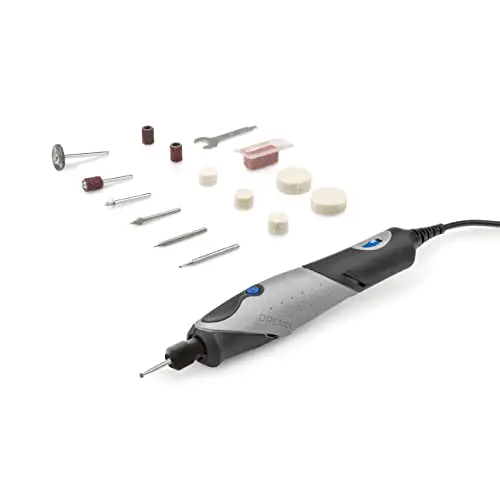
How to Carve Wood With Dremel
Assuming you would like a blog post discussing how to carve wood with a Dremel:
If you’re interested in taking up wood carving, one of the most important tools you’ll need is a good rotary tool. A rotary tool is an electrically powered handheld device that can perform many different types of cutting, grinding, and polishing tasks.
And while there are many different brands and models on the market, the Dremel is arguably the most popular. In this blog post, we’ll show you how to use a Dremel to carve wood.
The first thing you need to do is select the right bit for your project.
The most common bits used for wood carving are ball-shaped bits with razor-sharp teeth. These bits can quickly remove large chunks of wood, so they’re perfect for roughing out your design. Just be sure to use light pressure when carving with these bits, as they can easily damage your workpiece if you’re not careful.
Once you’ve selected the right bit, it’s time to get started! Begin by attaching the bit to your Dremel (consult your owner’s manual if you’re unsure how to do this). Then hold the Dremel like a pencil and start carving away at your piece of wood.
Remember to go slowly and apply light pressure—you can always remove more material later if necessary. As you carve, periodically stop and check your progress; it’s easy to accidentally veer off course when working with such a small tool.
When you’re happy with your design, it’s time to sand down any rough edges using progressively finer grits of sandpaper until everything is nice and smooth.
Finally, finish up by applying a coat of varnish or other sealant; this will help protect your carved creation from moisture and wear & tear over time.

Credit: theartofhandtools.com
How Do You Start Hand Carving Wood?
There are a few different ways that you can start hand carving wood. The first way is to use a sharp knife to carve out your design. You will need to be very careful when doing this so that you do not cut yourself.
The second way is to use a chisel and hammer to carve out your design. This method is more difficult than using a knife but it will allow you to create more intricate designs. The third way is to use power tools such as an electric drill or router.
This method is the quickest and easiest way to carve wood, but it is also the most dangerous. Always be sure to wear safety goggles and gloves when using power tools.
What is the Easiest Wood to Carve by Hand?
There is no definitive answer to this question as it depends on the individual and their level of expertise. However, some woods are generally easier to carve by hand than others. Softer woods like pine or basswood are often recommended for beginners, as they are easy to manipulate and don’t require too much force to cut through.
Harder woods like oak or maple can be more challenging to carve, but may produce a more detailed and polished finished product. Ultimately, it is up to the carver to decide what wood is best for them based on their own skill level and preferences.
Is It Better to Carve Wood Wet Or Dry?
Most woodworkers will tell you that it is better to carve wood when it is wet. Wet wood is softer and easier to carve than dry wood. It is also less likely to crack or split as you carve it.
However, there are some drawbacks to carving wet wood. First, it can be more difficult to control your carving tools when they are wet. Second, wet wood can be more slippery, making it easy to slip and cut yourself.
Finally, carved wet wood will need to be allowed to dry completely before you can seal or finish it – otherwise the finish may not adhere properly.
What Should I Carve Out of Wood for Beginners?
Wood carving is a great activity for people of all ages and skill levels. Whether you’re a beginner or an experienced carver, there’s always something new to learn. In this blog post, we’ll share some tips on what to carve out of wood for beginners.
One of the best things about wood carving is that you can use any type of wood you have on hand. If you’re just starting out, we recommend using softwoods such as pine or basswood. These woods are easier to carve and won’t require as much sanding as harder woods.
When choosing a project, it’s important to start with something simple that you can complete in a short amount of time. We suggest avoiding projects with intricate details or tight curves. Instead, look for patterns with large, flat surfaces and straight lines.
Once you’ve mastered the basics, you can move on to more challenging projects.
Some other things to keep in mind when carving include:
– The grain of the wood: When carving along the grain, your tool will slide easily through the wood; however, if you try to carve against the grain, your tool will catch and potentially break.
Always carve along the grain whenever possible.
– The direction of your cuts: It’s important to make sure your cuts are all going in the same direction; otherwise, your piece may become uneven or warped over time.
Conclusion
In order to carve wood by hand, you will need a few tools. A saw, chisel, and gouge are the most important tools you will need. You will also need a workbench or some other type of surface to work on.
Make sure the wood you select is not too soft or too hard – a medium hardness is ideal. Start by sketching your design onto the wood with a pencil. Once you have your sketches ready, start carving out the rough shape with your saw.
Next, use your chisel and gouge to refine the details of your carving. Keep in mind that it takes practice to get good at carving – so don’t be discouraged if your first few attempts aren’t perfect!