How to Carve a Ring from Wood
To carve a ring from wood, you’ll need to start with a piece of wood that’s about 1 inch thick. Cut the piece of wood into a circle that’s about 2 inches in diameter. Then, use a sharp knife to carve out the inside of the ring so that it’s about 1/4 inch thick all the way around.
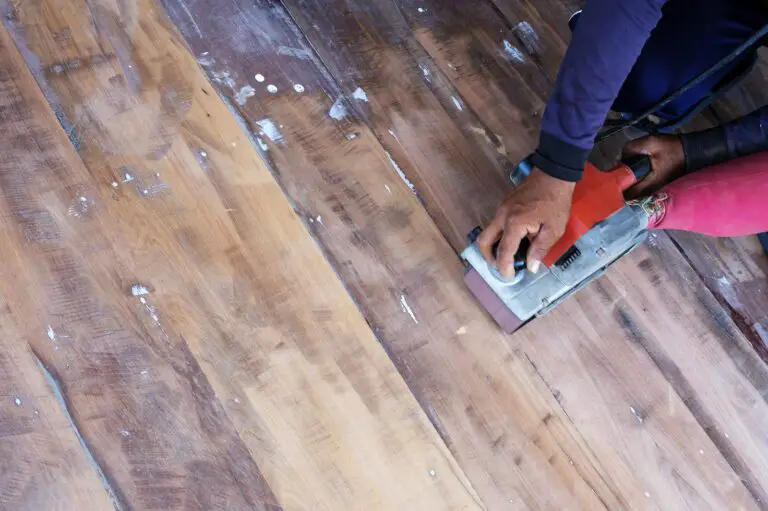
Next, use a fine-grit sandpaper to smooth out the inside and outside of the ring. Finally, finish off the ring by applying a coat of clear varnish or Danish oil to protect it from moisture.
- Gather the supplies you will need including a piece of wood, a sharp knife, and a saw
- Cut the piece of wood into a ring shape using the saw
- Carve out the inside of the ring with the knife to create a hole that is big enough to fit on your finger
- Shape the outside of the ring with the knife however you like
- sand down any rough edges with sandpaper
How to Make a Wooden Ring Without Power Tools
One of the great things about woodworking is that it doesn’t require a lot of expensive power tools to get started. In fact, with just a few simple hand tools, you can make some really beautiful and unique pieces of furniture and decor.
One project that is perfect for beginners is making a wooden ring without power tools.
This project is not only easy, but it’s also a great way to show off your woodworking skills.
To start, you’ll need to find a piece of wood that is the right size and shape for your finger. Once you have your piece of wood, use a sharp knife to carefully carve out a ring shape.
If you’re not comfortable carving with a knife, you can also use a Dremel tool or other rotary tool to create the same effect.
Once you have your ring shape carved out, sand the edges smooth and then finish it with your favorite stain or paint color. You can even add some embellishments like beads or stones to really make it your own!
That’s all there is to making a wooden ring without power tools! This project is quick, easy, and produces stunning results. Give it a try today and see for yourself how satisfying woodworking can be!
How to Make a Wooden Ring With Hand Tools
If you’re interested in making your own wooden rings with hand tools, here’s a detailed guide on how to do it! The first step is to find a piece of wood that you like the look and feel of. You’ll also need a saw, drill, and sandpaper.
Once you have your materials gathered, follow these steps:
1. Cut your wood into thin slices using the saw. The thickness of the slices will determine the final thickness of your ring.
2. Drill a hole through the middle of each slice. This will be where you insert the band that will hold everything together.
3. Use sandpaper to smooth out all of the edges of your slices.
This includes the holes that you drilled earlier.
4. Stack your slices on top of each other, alternating between different types of wood if desired for contrast. Insert the band through all of the holes and secure it in place.
5. That’s it! Your wooden ring is now complete!
Wood Ring Making Kit
We often think of engagement and wedding rings as being made of precious metals like gold or platinum. But there are actually lots of different materials that can be used to create beautiful rings! One option is wood.
Wood rings have a unique look and can be very affordable.
If you’re interested in making your own wood ring, you’ll need a few supplies. First, you’ll need to choose the type of wood you want to use.
There are lots of different kinds of wood with different colors and grain patterns, so take some time to decide which one you like best. Once you’ve chosen your wood, you’ll need to get a ring blank – this is basically a pre-cut piece of wood that’s the right size for a ring. You can find these online or at craft stores.
Next, you’ll need some sandpaper and router bits . Router bits come in all sorts of shapes and sizes, so you can really get creative with the design of your ring! Once you have all your supplies, it’s time to start creating!
Wood rings are definitely a unique choice for an engagement or wedding ring. If you’re looking for something different than the traditional metal options, give wood a try!
How to Make Wood Rings Stronger
Making wood rings stronger is a process that can be achieved in several ways. The most common method is to add a resin or epoxy to the inside of the ring. This will create a hard, durable surface that will resist wear and tear.
Another way to make your wood ring stronger is to apply a clear coat of polyurethane to the outside of the ring. This will help protect the wood from moisture and other elements that could cause it to break down over time.
How to Make a Wooden Ring With Inlay
Making a wooden ring with inlay is a great way to add personalization and style to your jewelry. Here are the supplies and steps you’ll need to create your own unique wooden ring:
-A block of wood that is at least 2 inches wide and 1 inch thick.
The type of wood you use is up to you, but we recommend something sturdy like oak or maple.
-A saw (we recommend a band saw) for cutting the wood into the desired shape.
-A drill for creating holes in the wood for the inlay pieces.
-Inlay material of your choice (we like using crushed turquoise or mother of pearl).
-Wood glue.
-Sandpaper (100 grit or higher).
The first step is to cut your piece of wood into the desired shape using a saw. If you’re not sure what shape you want, start by tracing around an existing ring that fits well on your finger. Once you have your basic shape cut out, it’s time to drill holes for the inlay pieces.
Make sure these holes are slightly smaller than the pieces of inlay material so they fit snugly.
Next, apply glue into each hole and insert the inlay pieces one at a time until all holes are filled. Allow the glue to dry completely before moving on to the next step.
Now it’s time to sand down any rough edges on both the inside and outside of the ring using progressively finer sandpaper until everything is smooth. Once you’re happy with how it looks, give it a final polish with some beeswax or another natural oil before wearing proudly!
What Tools Do You Need to Make Wood Rings?
You can make wood rings without any special tools, but it’s definitely easier (and more fun) with a few key tools. Here’s what you’ll need to get started:
– A mandrel: This is a metal rod that you’ll wrap your wood strip around to form the ring shape.
You can find mandrels at most hardware stores or online.
– A saw: You’ll need some kind of saw to cut your wood strips into rings. A handheld saw will work fine, but a power saw will make the job go much faster.
– Wood glue: This will help hold your rings together while they’re drying.
– Sandpaper: You’ll use this to smooth out the edges of your wood rings before finishing them.
What is the Best Wood to Make a Ring Out Of?
If you’re looking for a material to make a ring out of, wood is a great option. It’s strong and durable, yet still relatively lightweight. Plus, it can be carved or engraved with whatever design you desire.
But what type of wood is the best for making rings?
There are a few different types of wood that are commonly used for making rings. These include cherry, maple, oak, and walnut.
Each type of wood has its own unique grain pattern and coloration, so you can choose the one that best suits your style.
Cherry is a popular choice for making rings because it’s fairly strong and has a beautiful reddish hue. Maple is also quite strong and has a more subtle grain pattern than cherry.
Oak is another good option if you’re looking for strength, as it’s one of the hardest woods available. Walnut is usually chosen for its attractive dark coloration and smooth grain texture.
No matter which type of wood you choose, make sure it’s properly sanded and sealed before you start working with it.
This will help protect the wood from moisture damage and ensure that your ring lasts for many years to come!
Can You Engrave a Wooden Ring?
Yes, you can engrave a wooden ring. There are a few different ways to do this, but the most common is to use a laser engraver. This type of engraving machine uses a high-powered laser to burn away the top layer of wood, revealing the grain beneath.
The result is a deep, permanent engraving that will not fade or wear away over time.
Can You Make a Ring With a Dremel?
Yes, you can make a ring with a Dremel. You will need to purchase a Dremel ring kit, which includes a mandrel (a tool used to shape metal) and various bits. Follow the instructions that come with the kit to attach the mandrel to your Dremel.
Then, use the bits to drill holes and carve out the design of your ring. Finally, sand and polish your ring until it is shiny and smooth.
Conclusion
In this blog post, the author describes how to carve a ring from wood. First, the author explains how to find the right piece of wood. Next, the author outlines the tools and supplies needed for carving a ring.
Finally, the author provides step-by-step instructions for carving a wooden ring.