Can Mod Podge Be Used on Wood
Yes, Mod Podge can be used on wood. It is a decoupage medium that can be used to attach paper or fabric to wood surfaces. It can also be used to seal and protect painted surfaces.
Yes, Mod Podge can be used on wood! You can use it to decoupage images or fabric onto wood surfaces, as well as seal and protect painted wood surfaces. When using Mod Podge on wood, be sure to sand the surface first to help the adhesive adhere better.
Mod Podge Tutorial: Basic Steps of Applying Paper to Wood Using Mod Podge
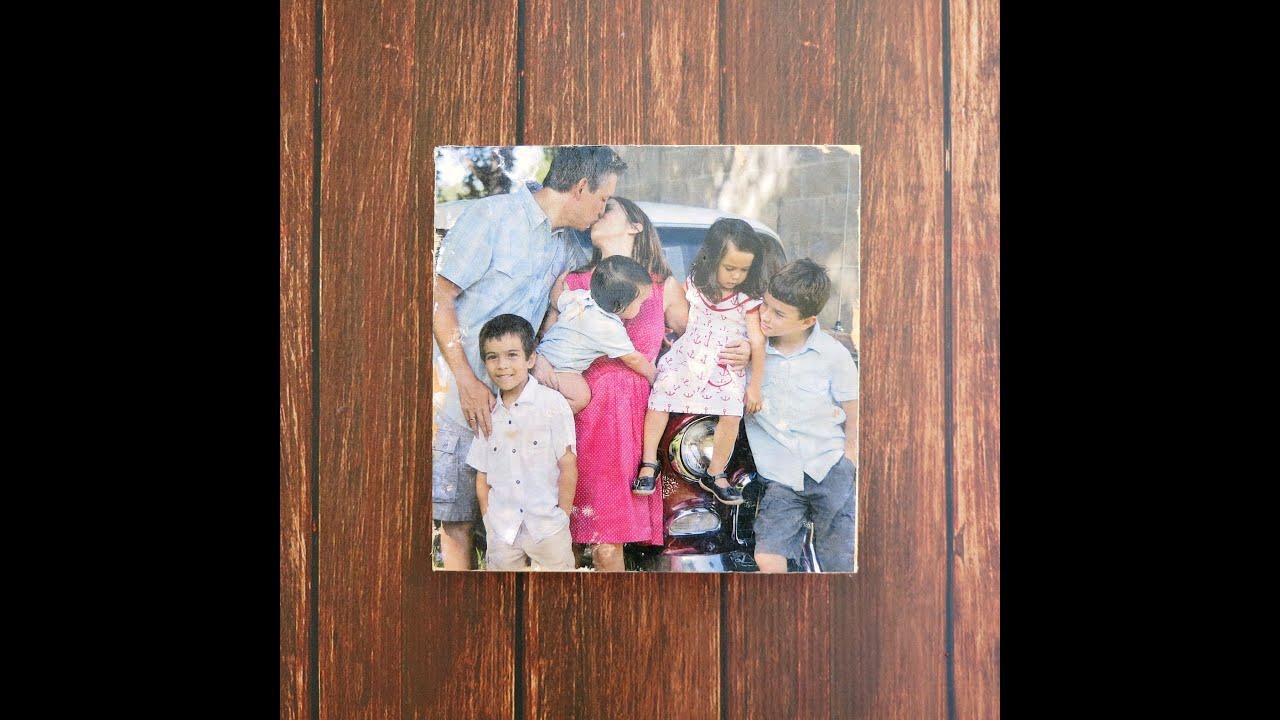
How to Mod Podge an Actual Photo
If you’re looking for a way to add a personal touch to your décor, try mod podging an actual photo! It’s a simple process that anyone can do, and the results are stunning. Here’s how:
1. Choose the photo you want to use. If it’s a print, make sure it’s nice and sharp. If it’s a digital file, you’ll need to print it out on photo paper.
2. Cut around the edges of the photo so that it’s the same size as your piece of wood or other surface.
3. Apply a layer of mod podge to the back of the photo, then place it on the surface. Smooth out any bubbles with your fingers.
4. Let the mod podge dry completely, then apply another layer over top of the photo (this will help protect it from moisture and wear). Let this dry completely as well before enjoying your new creation!
Read: Consider a Composite Wall That Includes an 8-Mm-Thick Hardwood Siding
How to Use Mod Podge
If you’re looking for a way to add some personal flair to your home décor, look no further than Mod Podge. This decoupage medium can be used on a variety of surfaces to create unique and one-of-a-kind pieces. Here’s a quick guide on how to use Mod Podge so you can start crafting your own custom creations.
Mod Podge is essentially a glue that is made specifically for decoupage projects. It comes in both matte and glossy finishes, so you can choose the look that best suits your project. Once you’ve selected the finish you want, simply apply the Mod Podge to your surface with a brush or roller.
Then, place your paper or fabric onto the adhesive and smooth it out.
Once your design is in place, allow it to dry completely before applying another layer of Mod Podge over top. This will seal in your design and protect it from wear and tear.
When you’re finished, simply stand back and admire your handiwork!
How to Use Mod Podge As a Sealer
Mod Podge is a decoupage medium used to attach paper or fabric to surfaces. It can also be used as a sealer to protect painted surfaces. Mod Podge is available in matte, glossy, and sparkle finishes.
It dries clear and can be sanded to a smooth finish.
To use Mod Podge as a sealer, first paint your surface with a base coat of paint. Once the base coat is dry, apply a thin layer of Mod Podge with a foam brush or paintbrush.
Allow the Mod Podge to dry completely before applying another layer. Repeat this process until you have achieved the desired level of protection.
Significant: Can You Cut Meat on a Plastic Cutting Board
How to Seal Paper to Wood
Sealing paper to wood is a fairly simple process that can be accomplished with a few supplies that are easily found at any hardware store. The first thing you will need is some type of sealer. There are many different kinds of sealers on the market, so it is important to choose one that is compatible with the type of paper you are working with.
Once you have your sealer, simply apply it to the back side of your paper using a brush or roller. Be sure to evenly coat the entire surface of the paper.
Next, place your paper onto the wood surface you wish to adhere it to and use a rolling pin or something similar to smooth out any air bubbles.
You may also want to weight down the edges of your paper so that it does not curl up as it dries. Allow the sealer to dry completely before moving on to the next step.
Now it’s time for glue!
Apply glue along all four edges of your paper using a small paintbrush or foam applicator. Once again, be sure to apply an even amount of glue so that your paper will adhere evenly to the wood surface. Press down firmly on all four edges and allow the glue to dry completely before hanging or displaying your project.
Read also: Can You Use Lysol on Laminate Floors
How to Use Mod Podge on Glass
If you’re looking for a way to add a personal touch to your home décor, using Mod Podge on glass is a great option. You can use Mod Podge to decoupage images or fabric onto glass surfaces, giving them a unique and one-of-a-kind look.
To get started, you’ll need some supplies.
In addition to Mod Podge, you’ll need scissors, fabric or images (printed on regular printer paper), and foam brushes. You’ll also need a glass surface to work on – any size will do!
Once you have your supplies gathered, begin by trimming your fabric or images to fit your glass surface.
Next, brush a layer of Mod Podge onto the back of your image or fabric. Be sure to cover the entire back so that no adhesive is left exposed.
Now it’s time to apply your image or fabric to the glass surface.
Starting at one corner, press down gently and smooth outwards until the entire piece is adhered. If there are any air bubbles trapped under the surface, use a pin to puncture them and then smooth out again with your fingers. Allow the piece to dry for at least 30 minutes before proceeding.
After it has dried, brush another layer of Mod Podge over top of the image or fabric (this will act as a sealer). Once this layer is dry, your project is complete!
How to Use Mod Podge on Paper
If you’re looking for a way to add a bit of personalization and DIY flair to your home décor, look no further than Mod Podge. This product is perfect for decoupage, which is the art of adhering paper or fabric onto surfaces. And best of all, it’s easy to use!
In this blog post, we’ll show you how to use Mod Podge on paper so you can get started on your own decoupage projects.
First, gather your supplies. You’ll needMod Podge, a foam brush, scissors, and your chosen paper design(s).
Once you have everything assembled, cut your paper into desired shapes or sizes.
Next, apply a layer of Mod Podge to the surface you’re working on with the foam brush. Be sure to cover the entire area evenly.
Then carefully place your cut-outs onto the adhesive surface and press down gently. If needed, trim away any excess paper.
Finally, apply another layer of Mod Podge over top of the paper design(s).
Allow it to dry completely before using or displaying your project. That’s all there is to it! With just a few simple steps, you can transform plain surfaces into one-of-a-kind works of art using Mod Podge and some pretty paper designs.
How to Seal Decoupage on Wood
Decoupage is a great way to add a personal touch to any wood surface. You can decoupage just about anything onto wood, from family photos to scrapbook paper and fabric. Once you’ve applied your decoupage medium of choice to the wood surface, it’s important to seal it so that your design will be protected from wear and tear.
Here’s how to do it:
1. Choose a sealer that is compatible with your decoupage medium. If you’re using Mod Podge, for example, you’ll want to use a water-based sealer.
2. Apply the sealer according to the manufacturer’s instructions. This usually involves brush application or spraying on a thin layer of sealer and then letting it dry completely before proceeding.
3. Once the sealer is dry, apply another layer of decoupage medium over top of your design.
This will help protect it from scratches and other damage.
4. Let the piece dry completely before using or displaying it.
How to Use Mod Podge on Canvas
If you’re looking for a way to add some personal flair to your home décor, why not try using Mod Podge on canvas? This easy-to-use product can help you create unique and stylish artwork for your walls. Here’s how to get started:
1. Choose the design or image you want to use for your project. You can find plenty of inspiration online or in magazines. Once you’ve decided on a design, print it out onto regular copy paper.
2. Cut out your design, then trace it onto the back of some scrapbook paper. Cut out the paper version of your design as well.
3. Next, apply a layer of Mod Podge to the front of your canvas.
Then, lay down your scrapbook paper cut-out and smooth it down with your fingers. Apply another layer of Mod Podge over top of the paper. Allow everything to dry completely before moving on to the next step.
4. Now it’s time to start painting! Begin by painting the background color (or colors) that will be behind your main design element . Once the background is complete, add in any other details using different colors of paint .
When everything is finished , allow the paint to dry completely before adding a final layer of Mod Podge over top .
5 And that’s it! Your new piece of personalized wall art is ready to hang up and enjoy !
Credit: www.youtube.com
Read to know: Can You Use Wood Studs With Metal Track?
Can Mod Podge Be Used As a Sealer on Wood?
Yes, Mod Podge can be used as a sealer on wood. It is a decoupage medium that can be used to glue and seal paper or fabric to wood. It can also be used to seal painted surfaces.
How Do You Modge Podge on Wood?
Modge Podge is an easy to use sealant, glue and finish all in one. You can use it on wood to create a variety of different looks. Here are some tips on how to Modge Podge on wood.
To start, you will need to gather your supplies. You will need a piece of wood, Modge Podge, a foam brush and whatever else you want to decorate your wood with (paint, paper, etc.). Once you have everything you need, start by painting your piece of wood with a base coat of paint.
This will help the Modge Podge adhere better and also give you a chance to add another layer of color if desired.
Next, apply a layer of Modge Podge to your wood using the foam brush. Be sure to cover the entire surface evenly.
Then, begin adding your decorations. If you are using paper or fabric, cut them into small pieces or strips and then apply them to the wet Modge Podge. Once you have added all of your decorations, allow the piece to dry completely before adding another layer of Modge Podge over top (this is called sealing).
Sealing will protect your work and make it last longer.
That’s it! Now you know how to Modge podge on wood.
Have fun creating unique pieces for your home or as gifts for friends and family!
Important: Best Blade for Cutting Aluminum
Can You Use Mod Podge on Painted Wood?
Yes, you can use Mod Podge on painted wood. You will need to make sure that the paint is completely dry before applying the Mod Podge, otherwise it may not adhere properly. Once the Mod Podge is applied, it can be used like any other decoupage medium – you can apply paper or fabric to it and then seal it with another layer of Mod Podge.
Does Mod Podge Dry Clear on Wood?
Yes, Mod Podge does dry clear on wood. You can use it to decoupage pictures, fabric, and other materials onto wood surfaces. It dries quickly and creates a smooth, glossy finish.
Conclusion
Yes, Mod Podge can be used on wood. You can use it to decoupage pictures or fabric onto wood, and it will create a nice seal. Make sure you sand the wood first and then apply a thin layer of Mod Podge.
Once the Mod Podge is dry, you can then add another layer of picture or fabric.