Wood Burning Shading Tip
If you’re looking to add a little bit of shading to your wood burning projects, here’s a quick tip! By lightly burning the edges of your project, you can create a subtle shading effect that can really make your work pop. The key is to not overdo it – too much burning will ruin the piece.
Just give the edges a light burn and then let the smoke do its work!
If you’re new to wood burning, one of the most important things to know is how to shade your work. Shading adds depth and dimension to your wood burned designs, and can make even the simplest projects look amazing.
One great way to get started with shading is by using a technique called hatching.
Hatching is simply drawing a series of close parallel lines, usually in different directions. This creates an illusion of depth and darkness, and is a great way to add some interest to your work.
Another tip for shading is cross-hatching, which is similar to hatching but with lines that intersect at angles.
This technique can create even more depth and darkness, but can also be a bit more challenging to master. But once you get the hang of it, it’s a great way to add some extra dimension to your wood burning projects.
Wood Burning Shading Large Areas
Wood burning shading is a great way to add some privacy to your home or garden. It can also be used to create a unique look for your outdoor space. There are a few things to keep in mind when choosing the right wood for your project.
The first thing to consider is the type of wood you want to use. There are many different types of wood that can be used for this purpose, so it is important to select the one that best suits your needs. If you are looking for a natural look, then using cedar or redwood may be the best option.
If you want something more unique, then you could use bamboo or teak.
Once you have selected the type of wood, the next step is to determine how large of an area you need to shade. This will help you determine how many pieces of wood you will need and what size they should be cut into.
It is important to make sure that all of the pieces fit together snugly so that there are no gaps between them.
Finally, it is time to start assembling your wood burning shading structure. Begin by attaching the longest pieces of wood along the top edge of the area you wish to shade.
Then, work your way down each side, attaching shorter pieces as you go.
Wood Burning Tips And Their Uses
Wood burning tips are small, pointed tools that can be used to create both thin and thick lines when wood burning. The size and shape of the tip will affect the line it creates. There are many different types of wood burning tips available on the market, so it is important to choose one that is best suited for the project you are working on.
One of the most important things to remember when using a wood burning tip is to keep the tool moving. If you stop in one spot for too long, you run the risk of burns or even fire. Practice makes perfect when it comes to using a wood burning tip, so take your time and don’t be afraid to experiment with different techniques.
There are endless possibilities when it comes to what you can create with a wood burning tip. Try using different strokes and pressure levels to create unique effects. You can also use woodburning tips to add texture or dimension to your work by carving into the surface of the wood.
No matter what your skill level is, there is a wood burning tip out there that is perfect for you. With a little practice, you’ll be ableto produce beautiful works of art in no time!
Pyrography Shading Nibs
There are a few different types of pyrography shading nibs that you can use to create different effects on your wood burning projects. The type of nib that you use will depend on the look that you are going for and the level of detail that you want to achieve.
The first type of nib is the round shader.
This nib is great for creating soft, subtle shading and shadows. It’s also perfect for adding depth and dimension to your work. To use this nib, simply hold it at a slight angle and move it across the surface of your wood in small, circular motions.
The second type of nib is the chisel tip shader. This nib is ideal for creating more defined lines and shapes. It’s also great for adding texture to your work.
To use this nib, hold it perpendicular to the surface of your wood and make short, quick strokes in the direction that you want your lines to go.
The third type of nib is the flat tip shader. This Nib is perfect for creating wide areas of color or shadow.
It can also be used for blending colors together or creating gradient effects.
Best Wood Burning Tip for Shading
If you’re like most people, you probably think that the best way to get a nice, even shading on your wood burning projects is to just keep the flame at a consistent level. However, this isn’t always the case! Sometimes, it can actually be helpful to deliberately fluctuate the level of the flame in order to create different shades and depths of color.
Here’s how it works: if you want a lighter shade of color, simply increase the level of the flame for a few seconds. Conversely, if you want a darker shade, decrease the level of the flame. By playing around with these two variables, you can create all sorts of interesting effects!
Just remember to practice on some scrap wood first so that you don’t ruin your project.
How to Shade Wood
Shading wood can be a great way to add dimension and interest to your project. There are a few different ways that you can shade wood, and the best method will depend on the look you are going for and the type of wood you are working with. Here are a few tips on how to shade wood:
– Use a darker stain or paint color on one side of the wood grain to create a shading effect. This is best used on softer woods such as pine or cedar.
– For a more dramatic shading effect, use a power sander with medium-grit sandpaper to distress one side of the woodgrain.
This technique works well on harder woods such as oak or maple.
– Adding metal hardware or other accents can also create an interesting shading effect on your project. Attach metal brackets, nails, or handles in different colors for an added pop of contrast.
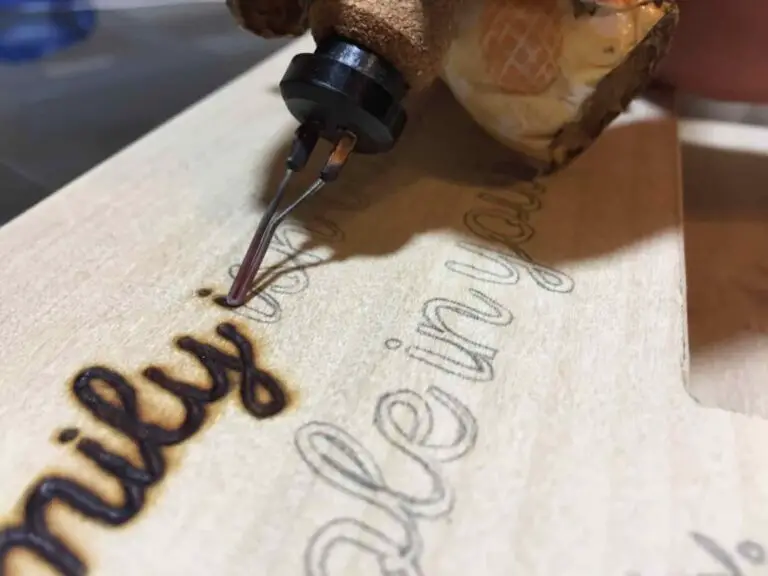
Credit: www.burnsavvy.com
What Tip is Best for Shading in Wood Burning?
When it comes to wood burning, there are a few things you can do to get the perfect shading. The first thing you need to do is find a piece of wood that has a good grain. You want to make sure that the wood is dry so that it doesn’t burn too quickly.
Once you have your piece of wood, you will need to decide on the right tip for your project.
The most common tip for shading in wood burning is the chisel tip. This tip allows you to create different shades by changing the angle at which you hold the tool.
The key to using this tip is to practice on scrap pieces of wood before you start your project. This will help you get a feel for how the tool works and how much pressure you need to apply.
Another great tip for shading in wood burning is the pencil tip.
Thistip gives you more control over the darkness of your shading. To use this tip, simply hold the pencil at an angle and shade in the area that you want to be darker. You can also use this tip to create highlights by holding the pencil parallel to the surface of the wood and lightly dragging it across .
What Does Each Wood Burning Tip Do?
One of the most important parts of wood burning is choosing the right tip. Tips come in a variety of shapes and sizes, each designed for a specific purpose. The following is a guide to help you choose the right tip for your project:
The first thing to consider when choosing a wood burning tip is the type of wood you will be working with. Soft woods like pine and cedar are best burned with round tips, while harder woods like oak and maple require sharper, pointed tips.
Next, think about the size of your project.
If you’re only doing small details, you’ll need a smaller tip than if you’re covering a large area. The most common sizes are 1/16″, 3/32″ and 1/8″.
Finally, consider what effect you want to create.
Different tips produce different results – from fine lines to wide strokes. Experiment with different tips until you find one that gives you the look you want.
How Do You Add Color to Pyrography?
Adding color to pyrography is a great way to add some pizzazz to your wood burning projects! Here are a few tips on how to get started:
1. Choose the right pencils or markers.
Some brands of colored pencils and markers are specifically designed for use on wood, so these are ideal for adding color to pyrography. Alternatively, you can also use regular coloring pencils or markers, but test them out on scrap wood first to make sure the color goes on smoothly and doesn’t bleed.
2. Experiment with techniques.
There are lots of different ways you can add color to pyrography, so don’t be afraid to experiment until you find a technique that works best for you. One popular method is using a shading technique called “burnishing,” which involves lightly applying pressure with a colored pencil or marker while moving it back and forth over the area you want to shade. This creates a smooth, even layer of color that can really bring your pyrography designs to life!
3. Use multiple colors. Adding more than one color to your pyrography designs can really make them pop! If you’re just getting started, though, stick with one or two colors until you get the hang of things.
Once you’re comfortable with adding color, start experimenting with different combinations of hues and shades to create unique looks.
How Do I Make My Wood Burner Darker?
If you want to make your wood burner darker, there are a few things you can do. One is to add more fuel to the fire. This will make the flames higher and therefore create a darker effect.
Another way is to use less oxygen. This can be done by closing the vents on the stove or fireplace. Doing this will cause the fire to burn slower and produce more smoke, making it appear darker.
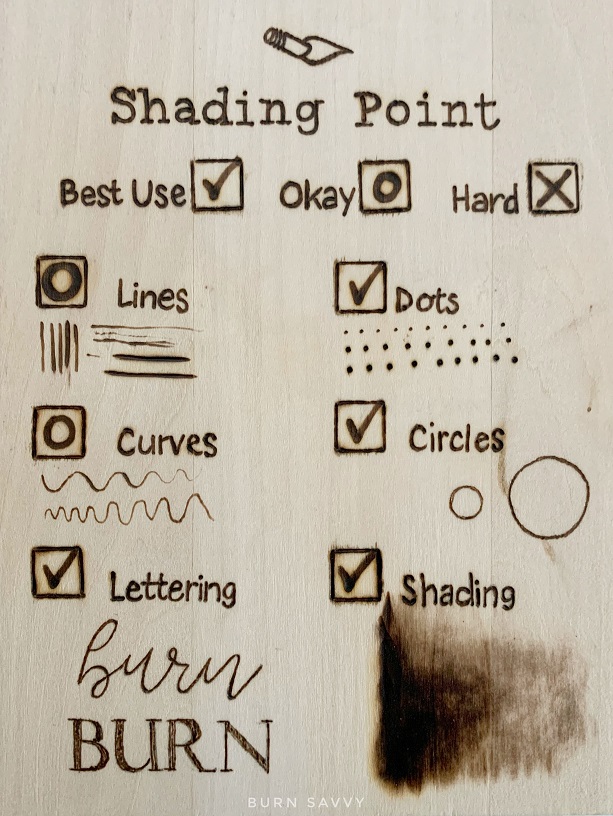
5: Woodburning Tips and Their Uses – Shading Tip
Conclusion
If you’re looking for a way to add some extra shading to your wood burning projects, here’s a tip: try using carbon paper! Carbon paper is usually used for tracing images, but it can also be used to create subtle shading effects on wood. Simply place the carbon paper under your project and burn over it with your wood burner.
The heat from the burner will cause the carbon paper to darken, creating a shaded effect. You can control the amount of shading by how long you burn over the carbon paper – so experiment until you get the look you want!