How to Make Wood Wick Candles
Wood wick candles are a type of candle that uses a wooden wick instead of a traditional cotton wick. These candles are said to burn cleaner and produce less soot than their counterparts. Wood wicks also create a crackling sound when they burn, which many people find relaxing.
Making your own wood wick candles is a relatively simple process that only requires a few supplies.
- Start by drilling a hole in the center of your wooden wick candle
- Next, insert the wick into the hole and secure it with hot glue
- Then, fill your candle jar with wax, leaving enough space at the top for the wick to stick out
- Finally, light your candle and enjoy!
How To Make A Wooden Wick Candle | Luxury Candle Making
What Kind of Wood is Used for Candle Wicks?
Candle wicks are made from a variety of materials, the most common being cotton and linen. More recently, wicks made from paper or wood have become popular. The type of wick you use will depend on the type of candle you are making.
For example, tea lights generally use a metal core wick, while votives and pillar candles use a braided wick.
The material you choose for your wick will also affect how your candle burns. Cotton and linen wicks tend to produce a steady flame, while paper or wood wicks can create a more flickering effect.
Ultimately, it is up to you to decide what look you are going for with your candle. Experiment with different types of wicks to see which one gives you the desired result.
Do You Need to Soak Wood Wicks for Candles?
If you’re using wood wicks in your candles, you might be wondering if you need to soak them before use. The answer is no, you don’t need to soak wood wicks before using them in candles. Wood wicks are made from natural materials and are therefore environmentally friendly and safe to use.
Can I Make My Own Wood Wick Candle?
Yes, you can make your own wood wick candle! Here’s what you’ll need:
-Wooden wicks (you can find these online or at some craft stores)
-Candle wax (choose a type that is meant for wood wicks – soy wax works well)
-A double boiler or makeshift equivalent (a heat-safe bowl set over a pot of simmering water)
-Pouring pitcher
-Thermometer
-Fragrance oil (optional)
-Colorant (optional)
Instructions:
1. Cut your wooden wicks to the desired length. They should be long enough to extend just past the edge of your candle jar when they are inserted.
2. Set up your double boiler and melt the wax in it. If you are using fragrance oil and/or colorant, add those in now and stir until combined.
3. Use the thermometer to keep track of the temperature of the wax – it should not exceed 185 degrees Fahrenheit.
4. When the wax is melted, carefully pour it into your prepared candle jars, leaving enough space at the top for the wooden wick to stick out slightly.
5. Allow the candles to cool completely before trimming the wicks and lighting them. Enjoy!
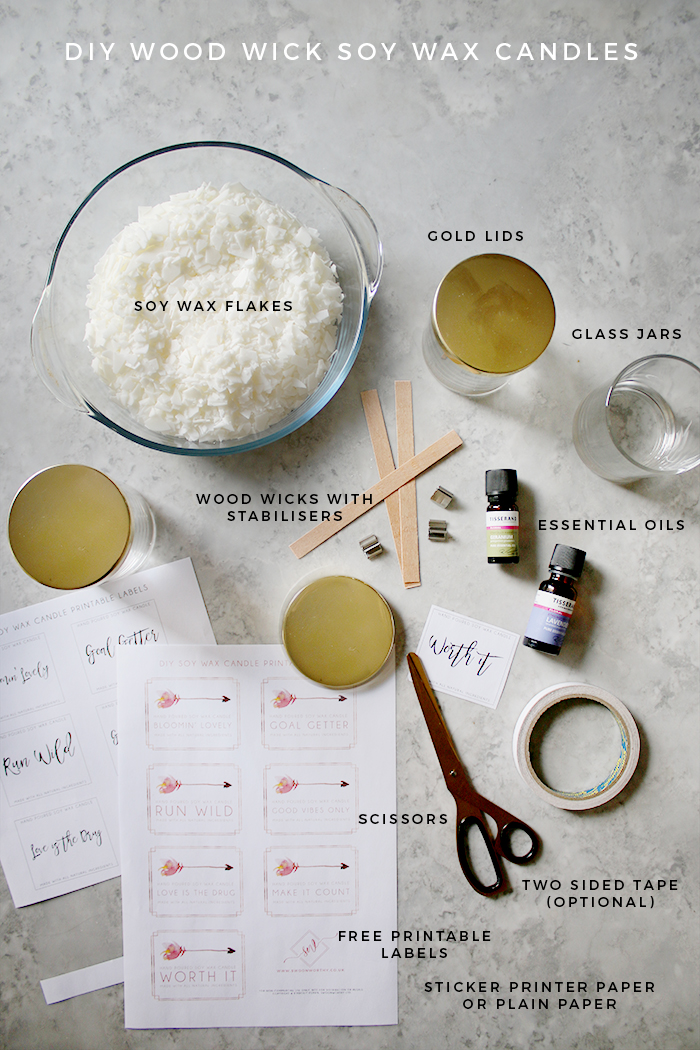
What Do You Need to Make Woodwick Candles?
WoodWick candles are a type of scented candle that uses a wick made of wood instead of the more common cotton wicks. The wood wicks give the candles a softer, warmer light and a slower, more even burn than traditional candles. WoodWick candles are made with natural, eco-friendly materials and are safe for both indoor and outdoor use.
To make your own WoodWick candles, you will need:
-1 pound of beeswax (or other natural wax)
-1/2 cup of wood shavings (or other natural material for the wick)
-A double boiler or melting pot
-A mold or container for the candle
-Essential oils or fragrance (optional)
-A candy thermometer (optional)
Instructions:
1. Melt the beeswax in the double boiler or melting pot over low heat.
If using a candy thermometer, melt the wax until it reaches between 140-160 degrees Fahrenheit. 2. While the wax is melting, prepare your mold or container by coating it with a thin layer of oil. This will help release the candle from the mold when it is finished cooling.
3. Once the wax has melted, remove it from heat and stir in your essential oils or fragrance if desired. 4. Add in the wood shavings and stir well to combine. 5. Pour the mixture into your prepared mold or container and allow it to cool completely before trimming the wick and using your new candle!
Credit: www.swoonworthy.co.uk
How to Make Wood Wicks Crackle
If you’re looking for a fun and unique way to make your wood wicks crackle, look no further! Here’s how to do it:
1. Start by soaking your wood wicks in water for at least 30 minutes.
This will help them absorb more of the liquid wax when they’re burned.
2. Next, melt some wax in a double boiler or in a glass bowl set over a pot of boiling water. Once the wax is melted, carefully dip your wood wicks into the wax so that they’re completely coated.
Allow them to cool and harden before using them in your candles.
3. When you’re ready to light your candle, use a long match or lighter to hold the flame directly on the wood wick for about 10 seconds before lighting the rest of the candle as usual. This will help create a small “crackling” effect as the wax on the wood wick begins to heat up and expand.
Enjoy!
Crackling Wood Wicks for Candle Making
If you are looking for an alternative to lead wicks in your candles, you may want to consider using crackling wood wicks. These wicks create a unique sound when they are burned, and they can also help to create a more even burn. Here is some more information about these types of wicks:
Crackling wood wicks are made from natural materials, so they are a great choice if you are looking for a more environmentally friendly option.
These wicks can help to create a better burn pool, which means that your candle will burn evenly and last longer.
The crackling sound that these wicks make can be soothing, and it also adds a bit of ambiance to any room.
If you are interested in trying out crackling wood wicks in your candles, there are a few things you should keep in mind. First, make sure that the wick is the right size for the candle jar. Second, use a lower temperature when melting the wax so that the wood does not catch fire.
Finally, trim the wick regularly to prevent it from getting too long and causing problems with the burning process.
Diy Wood Wick Tabs
If you’re looking for a way to add a little bit of extra flair to your candles, wood wick tabs are a great option! They can be used to create unique patterns and designs on the surface of your candles, and they’re easy to make at home with just a few supplies.
Here’s what you’ll need to make your own wood wick tabs:
-Wooden skewers or chopsticks (you’ll need one for each tab)
-A hot glue gun
-Wax paper
-Scissors
-Candle wax (any kind will do!)
Start by cutting your wax paper into small squares.
Then, use the hot glue gun to attach a square of wax paper to the end of each skewer or chopstick. Make sure that the wax paper is glued on securely so that it doesn’t come off when you’re working with it.
Next, dip the end of each skewer or chopstick into your candle wax.
You want to coat the entire surface of the wax paper in wax, but don’t go overboard – too much wax will make it difficult to work with. Once all of your skewers are coated in wax, set them aside to cool and harden.
Conclusion
Wood wick candles are an excellent way to add a touch of ambiance to any room. They come in many different sizes and styles, so you can find the perfect one for your home. Making your own wood wick candles is easy and only requires a few supplies.
Start by gathering the following items: beeswax, wood wicks, candle containers, a double boiler, and a thermometer. Cut the beeswax into small pieces and place it in the top of the double boiler. Fill the bottom of the double boiler with water and heat it over medium heat until the beeswax has melted.
Use the thermometer to check the temperature of the wax; it should be between 160-180 degrees Fahrenheit before you add the wood wicks.
Soak each wood wick in the melted wax for several minutes before carefully removing them and letting them cool on a piece of parchment paper. Once they are cooled, trim each wick to about ¼ inch above where it was soaked in wax.
Center each wick inside its candle container and secure it with hot glue or tape if necessary. Pour melted wax into each container, being careful not to pour too much at once (you don’t want to drown your wicks!). Allow your candles to cool completely before lighting them – enjoy!