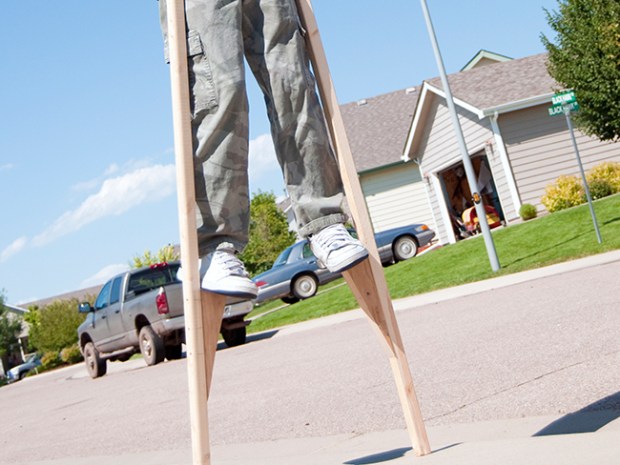
How to Make Wood Stilts
Wood stilts are a fun way to add height and interest to any room. They are also relatively easy to make, and only require a few materials.
To make wood stilts, start by cutting two pieces of 2×4 lumber into 18-inch lengths.
Next, use a drill to create two pilot holes in each piece of lumber, about 1 inch from each end. Once the pilot holes are drilled, insert 3/8-inch carriage bolts into each one and tighten with washers and nuts.
Now it’s time to add the foot supports.
Cut four more pieces of 2×4 lumber into 12-inch lengths and attach them perpendicular to the 18-inch pieces using 3/8-inch lag screws. Be sure to predrill pilot holes for the lag screws to avoid splitting the wood.
Finally, add rubber or felt pads to the bottom of each foot support so your wood stilts won’t slip on hard floors.
And that’s it! Your wood stilts are now ready for use.
- first, you will need to find a piece of wood that is long and thin enough to serve as your stilt
- If you can’t find a pre-cut piece of wood that meets these specifications, you may need to cut one yourself
- Once you have your piece of wood, the next step is to sand it down so that it’s smooth
- This will help prevent splinters and make it more comfortable to walk on
- Next, you’ll need to drill holes into the top and bottom of the wood so that you can insert the metal rods that will serve as your stilts’ legs
- Make sure the holes are big enough for the rod to fit snugly but not so large that the rod can move around too much
- Insert the metal rods into the holes and then secure them in place with nuts and bolts
- You may want to use washers as well for added stability
- Finally, try out your new stilts! Start by walking around in a safe area where you won’t be able to fall and hurt yourself if you lose your balance
How To Build Wood Stilts – DIY Walking Stilts
What Wood is Used for Stilts?
There are many different woods that can be used for stilts, but some of the most common include pine, fir, and cedar. Each of these woods has its own benefits and drawbacks, so it’s important to choose the right one for your needs.
Pine is a softwood that is easy to work with and relatively inexpensive.
However, it is not as durable as some other options and may not hold up as well to heavy use. Fir is a bit more expensive than pine but is also more durable. It’s a good choice for those who plan to use their stilts frequently or for long periods of time.
Cedar is one of the most expensive options but it is also very strong and rot-resistant. This makes it a good choice for people who live in damp or humid climates.
How Do You Make Stilts from 2X4?
There are a few different ways that you can make stilts from 2x4s. One way is to cut the 2x4s into four equal pieces. Two of these pieces will be used for the legs of the stilts and the other two pieces will be used for the crosspieces.
You will need to drill holes in each end of the leg pieces and insert dowels into these holes. The crosspieces will then be attached to the legs using screws or nails.
Another way to make stilts from 2x4s is to cut them into two unequal pieces.
One piece should be about twice as long as the other piece. These two pieces will again be used for the legs of the stilts, with the longer piece being used for the front leg and the shorter piece being used for the back leg. As before, you will need to drill holes in each end of both leg pieces and insert dowels into these holes.
The crosspieces will then be attached to the legs using screws or nails, with one crosspiece being attached near the top of each leg and another crosspiece being attached near the bottom of each leg.
Whichever method you use, it is important that you make sure that all of your joints are securely fastened so that your stilts are strong and safe to use.
How Can I Make Stilts?
Stilts are fun for kids and adults alike. They can be used for walking, running, or even dancing. But how do you make your own stilts?
It’s actually not as difficult as you might think. With a few supplies and some instructions, you can make your own stilts in no time!
The first thing you’ll need is some wood.
You can use any type of wood that you like, but we recommend using something lightweight like balsa wood. Cut two pieces of wood that are the same length and width – these will be the legs of your stilts. Next, cut two more pieces of wood that are slightly shorter than the first two pieces.
These will be the crosspieces that connect the legs together.
Now it’s time to start assembling your stilts! Place the crosspieces on top of the legs, making sure that they’re centered.
Then, use screws or nails to attach them together. Once both crosspieces are in place, put your feet on the stilts and see how they feel. If they’re too wobbly, add another layer of crosspieces (or Legs) until they’re sturdy enough for you to walk on without falling over.
That’s it! Now you know how to make your own stilts. Have fun walking around on them and showing them off to all of your friends!
How Tall Should Stilts Be?
Stilts come in a variety of sizes, but the most common size is about 4 to 5 feet tall. The height of the stilt depends on the height of the person using them. taller people will need taller stilts, and shorter people will need shorter stilts.
There are also adjustable stilts that can be adjusted to fit different heights.
Credit: scoutlife.org
Diy Hands Free Stilts
Hands free stilts are a great way to add height and mobility to your Halloween costume this year. They are easy and inexpensive to make, and they will really help you stand out in a crowd. Here is everything you need to know about making your own hands free stilts.
Materials:
-2 pieces of PVC pipe (1 inch diameter, 3 feet long)
-4 elbows (1 inch diameter)
-4 T-connectors (1 inch diameter)
+PVC glue or duct tape
-12 drywall screws (1 inch long) drill with 1/8 bit size) or 4 zip ties + scissors for cutting them off) -utility knife – saw for cutting the PVC pipe if necessary -ruler or measuring tape -pencil or marker -sanding paper -paint or spray paint (optional) Instructions:
1. Cut the PVC pipe into four equal lengths using a saw. If you’re using zip ties instead of screws, then you’ll only need two pieces of PVC pipe that are each 3 feet long. 2. Connect the four pieces of PVC pipe together using the elbow joints so that they form a rectangle when viewed from the top.
3. Next, connect the T-connectors at each corner on the inside of the rectangle so that all four corners are connected by a cross piece of PVC pipe. 4. Once all four corners are connected, turn the structure over so that it is resting on its crosspieces. This is what your stilts will look like when they are finished.
How to Make Stilts for Cosplay
If you’re looking to add a little extra height to your cosplay, stilts are the way to go! They may look daunting, but with a little bit of time and effort they can be easily made at home. Here’s how:
You’ll need:
– 2 pieces of wood, cut to about knee-height
– 4 pieces of wood, cut to about ankle-height
– 8 screws
– 8 washers
– 4 L brackets
– 1 piece of foam or padding (optional)
Instructions:
1. Start by screwing the four ankle-height pieces of wood onto the two knee-high pieces of wood, using two screws per joint.
Make sure that the screws are long enough to go through both pieces of wood and come out the other side. You may want to pre-drill your holes to avoid splitting the wood.
2. Once all four ankles are attached, it’s time to add the L brackets.
Place them on each outside corner, flush with the top edge of the stilts. Use two screws per bracket to attach them securely.
3. At this point you should have a basic framework for your stilts!
If you’re planning on wearing them for extended periods of time, you may want to add some foam or padding around the edges where your legs will rest. This will help prevent bruising and discomfort.
4. Once your stilts are complete, practice walking in them before taking them out in public. It takes a little bit of getting used to, but soon you’ll be strutting your stuff like a pro!
How to Make Stilts Out of Pvc
Making your own stilts is a great way to save money and have some fun. Plus, it’s a super easy project that anyone can do. Here’s how to make stilts out of PVC:
First, you’ll need to gather your supplies. You’ll need two pieces of PVC pipe, four elbow joints, four T-joints, eight end caps, and some strong glue or tape. You’ll also need something to use as handles – we recommend dowel rods or old broom handles.
Next, cut your PVC pipe into four equal lengths. These will be the legs of your stilts. Then, assemble the elbows and T-joints as shown in the diagram below.
Make sure everything is snug and secure before moving on.
Conclusion
In order to make wood stilts, one will need the following materials: two pieces of 2″ x 4″ lumber, four finishing nails, and sandpaper. The first step is to cut the lumber into two 18″ pieces and two 24″ pieces. Next, take the 18″ pieces and nail them together at a 90 degree angle using two finishing nails. Repeat this process with the remaining 24″ pieces of lumber.
Once both sets of stilts are assembled, use sandpaper to smooth any rough edges. Finally, try out your new stilts by walking around your backyard or neighborhood!