How to Make Wood Slat Wall
A wood slat wall is a type of wall covering made up of thin, evenly spaced strips of wood. Slat walls can be used to create accent walls, backsplashes, headboards, and other decorative features in your home.
To make a wood slat wall, you will need:
-Thin strips of wood (1/4″ thick or less)
-Construction adhesive or nails/screws
-Measuring tape
-Level
-Pencil or chalk line
-Saw (miter saw, hand saw, or circular saw)
1. Decide on the dimensions of your slat wall and cut the strips of wood to size. If you’re using construction adhesive, you’ll also need to cut strips of cardboard to use as spacers between the boards.
2. Apply construction adhesive to the back of each board and then adhere them to the wall, spacing them evenly apart with cardboard spacers if needed.
For a more permanent installation, nail or screw each board into place.
3. Use a level to draw horizontal lines across the wall at intervals that match up with the width of your boards. This will help ensure that your slatwall is level and evenly spaced.
4. Starting at the top of the wall, align one board with a pencil line and nail or screw it into place along the line.
- Choose the wood slats you want to use for your wall
- You can find these at most home improvement stores
- Cut the wood slats to the desired length using a saw
- Nail or screw the wood slats into place on the wall, starting at the top and working your way down
- Finish off by trimming any excess material from the bottom of the wall with a saw or utility knife
How to Build a Wood Slat Wall – Step by Step | The Lake House Project Ep 20
How Do You Make a Wooden Slat Wall?
If you’re looking to add a touch of rustic charm to your home, a slat wall is a great way to do it. Slat walls are simply walls made of wooden slats, spaced evenly apart. They can be used as decorative elements or functional storage solutions.
Here’s how to make your own slat wall:
1. Decide on the size and location of your slat wall. This will depend on the space you have available and the look you’re going for.
2. Measure and mark out the area where your slat wall will go. Use a level to make sure everything is straight.
3. Cut your wood slats to size using a saw (a hand saw or power saw will work).
Make sure all of the cuts are clean and precise.
4. Install furring strips along the top and bottom of your marked out area (this will provide support for the weight of the wood slats). Attach them with screws or nails, making sure they’re level with each other.
5 . Start attaching your wood slats to the furring strips, working from one end to the other. Use screws or nails to secure them in place (pre-drilling holes first will make this step easier).
Space the slats evenly apart as you go along.
+6 .
What Wood is Used for Slat Walls?
There are many different types of wood that can be used for slat walls, but the most popular type is cedar. Cedar is a durable and rot-resistant wood that has a natural resistance to bugs and pests. It’s also a beautiful wood with a rich grain pattern, making it an ideal choice for creating an eye-catching slat wall in your home or office.
Other popular choices for slat walls include pine, fir, and spruce.
Can You Make Your Own Slatwall?
Slatwall is a type of wall paneling that is typically used in retail settings to provide a versatile and easily customizable display surface. While you can purchase slatwall panels ready-made from many different retailers, you can also create your own slatwall panels using some basic materials and tools.
To make your own slatwall, you will need:
-Plywood (4′ x 8′ sheets)
-Melamine (optional)
-Slatwall inserts
-Table saw or power saw
-High density foam tape
-Construction adhesive
-Cordless drill
first, cut the plywood into strips that are 4 feet wide and 8 feet long. If you want a smoother finish on your slatwall, you can cover the plywood with melamine before proceeding to the next step.
Next, use a table saw or power saw to cut slots into the plywood at regular intervals – these slots will eventually house the slatwall inserts. For a standard 4′ x 8′ sheet of plywood, we recommend cutting slots every 16 inches. Once all of the slots have been cut, it’s time to install the high density foam tape along the edges of the plywood strips.
This tape will act as a buffer between the hard edges of the plywood and any items that are hung on the slatwall. Finally, use construction adhesive to attach the Plywood strips to your chosen wall surface. Make sure that each strip is level before moving on to the next one.
Once all strips are in place, let the adhesive dry overnight before hanging anything on your new DIY slatwall!
What Do You Need for a Slat Wall?
A slat wall is a type of wall paneling that consists of horizontal slats, usually made of wood, plastic, or metal. They are often used in retail stores as a way to display merchandise, but can also be used in homes and offices for organization and decoration.
Slat walls are typically installed using brackets or tracks that are screwed into the studs of the wall.
The panels themselves can be purchased from most home improvement stores or online retailers. When choosing a slat wall system for your home or office, it is important to consider the weight of the items you will be hanging on the wall, as well as the amount of space you have available.
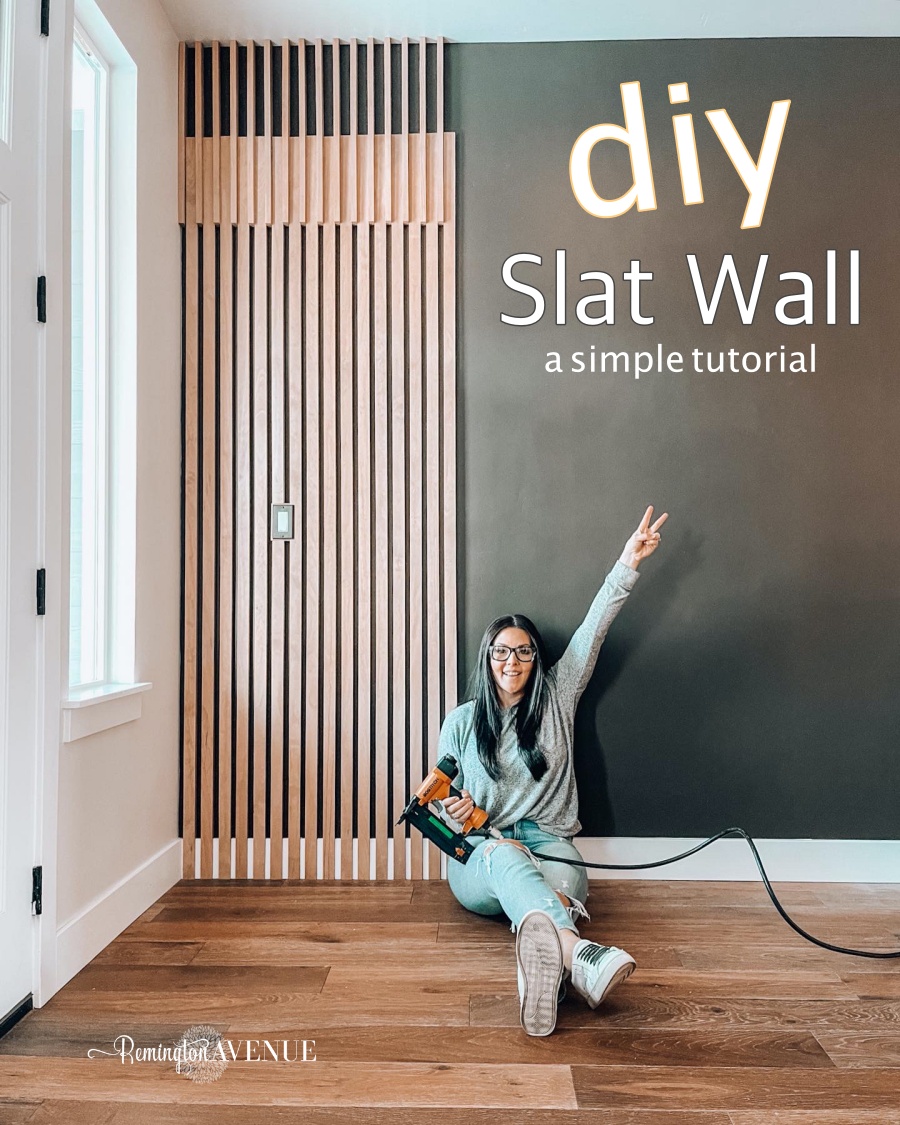
Credit: remingtonavenue.com
Vertical Wood Slat Wall Diy
Vertical wood slat walls are a popular design trend that can add interest and texture to any room. They’re also relatively easy to DIY, which makes them a great weekend project. Here’s everything you need to know about vertical wood slat walls, including how to build your own.
What are vertical wood slat walls?
Vertical wood slat walls are simply panels made up of wooden slats arranged in a vertical orientation. They can be used as accent walls or full-blown wall treatments, and they come in a variety of styles ranging from rustic to modern.
Why use vertical wood slats?
There are lots of reasons why you might want to use vertical wood slats in your home décor. For one, they add visual interest and texture to any space.
They also help break up large expanses of blank wall space, which can make a room feel more open and inviting. Additionally, vertical wood slat walls can be used to conceal unsightly features like electrical outlets or HVAC vents. And if you opt for real hardwood slats, they can also help improve the acoustics in a room by absorbing sound waves.
Diy Slat Wall Garage
A slat wall garage is a great way to organize your space and get your car off the ground. Slat walls are easy to install and can be done in a weekend. Here’s how to build a slat wall garage:
1. Measure the space where you want to install the slat wall. Cut the lumber to size with a saw.
2. Attach the furring strips (horizontal pieces of wood) to the studs in your wall with screws.
Space them evenly apart so that the panels can slide into place later on.
3. Slide the panels into place between the furring strips and screw them into place at the top and bottom. Be sure to use screws that are long enough to go through both layers of wood (the panel and furring strip).
Otherwise, they won’t be secure.
4 . Hang hooks, baskets, or other storage solutions from the slats using screw-in hooks or adhesive hangers designed for this purpose.
Organize your gear however you like!
How to Build a Horizontal Wood Slat Wall
Building a horizontal wood slat wall is a great way to add interest and texture to your walls. This type of wall treatment is also relatively easy to DIY, which makes it a great weekend project. Here’s how you can build your own horizontal wood slat wall:
1. Start by measuring the area where you want to install your wood slat wall. Then, Cut your lumber into individual slats that are all the same length. If you want, you can sand down the edges of each slat for a smoother finish.
2. Next, mark out where each slat will be installed on the wall using a level and pencil. You can space the slats evenly apart or create a more random pattern – it’s up to you! Just make sure that each subsequent row of slats is offset from the previous row so that the joints don’t line up perfectly.
3. Once you have all of your markings made, it’s time to start installing your wood slats! Begin at the bottom of the wall and work your way up, nailing each slat into place with finishing nails or brad nails and construction adhesive . Make sure to use plenty of adhesive so that each slat is securely attached to the wall.
4.. Depending on the look you’re going for, you may want to stain or paint your wood slat wall once everything is installed. Or, you could leave it as-is for a more natural look – either way looks great!
Conclusion
This post covers how to make a wood slat wall. The author first cuts the wood into strips using a miter saw. Next, he or she sands the strips down and then stains them.
After that, the author nails the strips to the wall in a horizontal pattern. Finally, he or she caulks any gaps between the slats and paints over them.