How to Make Wood Pens
Wood pens are easy to make and only require a few supplies. You will need a piece of wood that is at least 6 inches long and 3/4 of an inch wide. A lathe is also necessary to shape the wood into a cylinder.
Once the wood is shaped, you can sand it down and apply a finish. To make the pen, you will need a drill bit that is slightly smaller than the brass tubing you will use for the body of the pen. Insert the tubing into one end of the wood cylinder and glue it in place.
Repeat this process for the other end of the cylinder. Finally, add your desired hardware such as a clip or cap and enjoy your new wood pen!
- Cut the wood to size
- Shape the wood with a lathe
- Drill a hole for the ink cartridge
- Attach the ink cartridge to the pen body
- Add any decorative details or finishes to the pen body
How to Make a Wooden Pen
How Do You Make a Wooden Pen at Home?
Assuming you would like a tutorial on how to make a wooden pen at home:
Tools needed: Drill, 7mm drill bit, saw (chop or hand saw), sander, T-bar clamp, wood glue, CA glue, small brush, pen mandrel (7mm), pen blank (wooden block that will be turned into the pen body), lathe. If you do not have access to a lathe, you can still make the pen using a Dremel tool with a sanding attachment.
1) Cut your wood blank to size. It should be about 5” long and square in shape. If it is not square, use the sander to even out the sides until they are flush.
2) Center the wood blank in the T-bar clamp and tighten until snug. Make sure that the area where you will be drilling is facing up and easily accessible.
3) Using the drill and 7mm drill bit, create a hole through the center of your wood blank for the mandrel.
The hole does not need to be perfectly straight since it will be drilled out later anyway. Try to keep your drill as perpendicular to the surface of the wood as possible to avoid splintering.
4) Once you have created the initial hole, insert the mandrel through it and line up one end of the mandrel with where you want your clip (the metal part that holds onto paper) to start.
This end will become the top of your pen when finished so keep that in mind when choosing its placement! Securely clamp down on both ends ofthe mandrel using two separate clamps so it does not move during this next step.
5) Using either a chop or hand saw, cut along both sides ofthe mandrel starting from where you placed your first clamp all them way down to where your second clamp is positioned.
Now would also be a good time touse sandpaperto smooth out any rough spots or pieces sticking up before movingon toturningthepen bodyonlathe .
6) To turnthepen bodyonlathe ,first secure oneendofwoodblankinjawsofchuckandtighten .Startlatheandbringtospeedrecommendedforhardnessoftimberbeingturned(usuallyaround2400rpmforashortpieceofwoodlikethis).
What Do You Need to Make Wooden Pens?
Wooden pens are a beautiful and unique way to write. But what do you need to make them? Here’s a list of everything you’ll need:
-Pen blanks (pieces of wood that will be turned into pens)
-Woodturning tools (a lathe, chisels, gouges, etc.)
-Sandpaper
-Finishing supplies (varnish, shellac, etc.)
First, you’ll need to gather your materials. You can find pen blanks at most craft stores or online.
Once you have your blanks, it’s time to get started!
If you’re new to woodturning, start by practicing on some scrap pieces of wood first. That way you can get a feel for the tools and how they work before moving on to your pen blanks.
When you’re ready, use a lathe to shape the wood into the basic pen shape. Then use chisels and gouges to add any details or designs you want.
Once the shaping is complete, it’s time to sand the wood smooth.
Start with a coarse grit sandpaper and move up to finer grits until the surface is completely smooth. Then finish up by applying your chosen finishing supplies. Varnish or shellac will help protect the wood and keep it looking good for years to come!
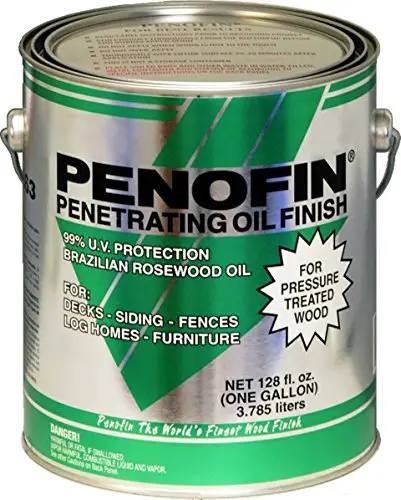
What is the Best Finish for Wood Pens?
If you’re looking for the best finish for wood pens, there are a few things to keep in mind. First, the type of wood you’re using will dictate what kind of finish will work best. For example, if you’re using a softer wood like cedar, you’ll want to use a protective finish like lacquer or polyurethane.
Harder woods like oak or maple can handle more robust finishes like varnish or shellac.
When it comes to actually applying the finish, there are a few different options. You can brush it on, wipe it on with a rag, or spray it on.
Each method has its own advantages and disadvantages, so it’s important to choose the one that will work best for your project.
Brushing is the most common method for applying finishes to wood pens. It’s relatively easy to do and gives you good control over how much finish is applied.
The downside is that it can be time-consuming, and if you’re not careful, you can end up with streaks or brush marks in the finish.
Wiping on finishes is a bit quicker than brushing and doesn’t require as much precision. The downside is that it’s easy to accidentally apply too much finish, which can result in a sticky mess.
Spraying is the quickest and easiest way to apply a finish to wood pens. It gives you even coverage and eliminates brush marks or streaks. However, spraying requires special equipment and some experience to do correctly without making a mess.
No matter which method you choose, make sure you test the finish on a scrap piece of wood before applying it to your pen. This will give you an opportunity to see how the finish looks and feels before committing to it.
How Do You Make a Homemade Pen Press?
Pen presses are a great way to add a personal touch to your writing tools. They also make wonderful gifts for the pen aficionado in your life. Here is a simple tutorial on how to make a homemade pen press.
You will need:
-A block of wood (I used cherry, but any hardwood will do)
-A hand drill or power drill with small bits
-A coping saw or other fine-toothed saw
-Sandpaper (100, 150, and 220 grits)
-Tape measure or ruler
-Pen blanks (I used 3/4″ x 3/4″ squares of exotic woods)
-CA glue
-Toothpicks
Optional: Drill press, wood burning tool, wood stains
First, use the tape measure or ruler to mark out where you want to drill the holes for your pen blanks. I spaced mine about 1″ apart.
If you are using a hand drill, be very careful not to split the wood as you drill the pilot holes. A power drill with smaller bits will make this step much easier.
Next, cut out the rectangular piece that will serve as the base of your press using the coping saw or other fine-toothed saw.
Again, be very careful not to split the wood as you make your cuts.
Now it’s time to start shaping your pen press! Using sandpaper in progressively finer grits (100, 150, 220), sand down all of the edges and surfaces until they are nice and smooth. You can use either a hand held sander or sandpaper wrapped around a block of wood . I prefer using my hands because it gives me more control over how much pressure I’m applying and where I’m sanding. However, if you’re working with larger pieces of wood ,a handheld sander may be necessary .
Once all of the edges and surfaces have been smoothed ,it’s time to add some optional details like burnt lines or stains . If you decide to go this route ,work carefully and follow all manufacturer’s instructions for best results . After adding anyoptional details ,give your pen press one final going over with 220 grit sandpaper justto make sure everything is nice and smooth before proceeding tothe next step .
Now it’s time toput everything together !
Credit: www.rockler.com
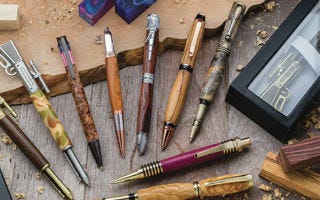
Handmade Wooden Pens
Whether you’re looking for a unique gift or a stylish way to jot down your thoughts, handmade wooden pens are a beautiful and functional option. These one-of-a-kind writing instruments are made from high-quality materials and can be customized to suit your preferences. Here’s what you need to know about handmade wooden pens.
The Benefits of Handmade Wooden Pens
There are many reasons why people love handmade wooden pens. For starters, each pen is unique because it’s made by hand from start to finish.
You can also choose the wood type, finish, and other features to create a pen that’s perfect for you. In addition, these pens are built to last – with proper care, they can be passed down for generations. And because they’re not mass-produced, you can feel good knowing that you’re supporting artisanal craftsmanship when you purchase a handmade wooden pen.
How to Choose the Right Pen for You
When shopping for a handmade wooden pen, there are several factors to consider in order to find the right one for you. First, think about the type of wood you want – different woods have different grain patterns and colors that will give your pen its own unique look and feel.
Next, decide on the right size and weight – do you want a large or small pen? A heavy or light one? It’s important to hold the pen in your hand before making your final decision so that you can get a sense of how it feels.
Lastly, think about any special features or engravings that you might want – these add an extra level of personalization and make your pen even more special.
Where to Find Handmade Wooden Pens
If you’re interested in purchasing a handmade wooden pen, there are several great places to shop online or in person at artisan markets and craft fairs.
Do some research ahead of time so that you can compare prices and find the perfect pen for your needs!
Pen Making Supplies
Pens are one of the most commonly used office supplies, and there are a variety of pens available to suit different needs. But have you ever wondered what goes into making a pen? In this blog post, we’ll take a look at some of the supplies that are necessary for pen making.
One of the most important components of a pen is the nib. Nibs come in a variety of sizes and shapes, and they’re usually made from steel or gold. The size and shape of the nib will affect how the pen writes, so it’s important to choose the right nib for your needs.
Ink is another essential component of pens, and there are many different types available on the market. Some inks are formulated specifically for use in fountain pens, while others can be used in any type of pen. When choosing an ink, it’s important to consider things like drying time, color selection, and flow rate.
Pens also require a barrel and cap assembly. The barrel is the main body of the pen, while the cap protects the nib when not in use. Barrels and caps can be made from a variety of materials, including plastic, metal, wood, or even glass.
Finally, all pens need some sort of filling system to hold the ink inside. The most common type is cartridge-based systems where an ink cartridge is inserted into the barrel of the pen. Other options include converter-based systems (where an empty converter is filled with ink) or piston-filled systems (where a piston draws ink up from an internal reservoir).
So next time you reach for a pen, remember all of the different parts that go into making it!
How to Make Wooden Pens on a Lathe
Assuming you have some basic woodworking knowledge and access to a lathe, making a wooden pen is a relatively simple process. Here’s a quick overview of what you’ll need to do:
1. Select your wood.
For pens, you’ll want to use a hardwood that’s easy to work with. Popular choices include maple, cherry, and walnut.
2. Cut the blanks for your pens.
You’ll need two blanks for each pen, each about 6 inches long and 1 inch in diameter.
3. Mount the blanks on the lathe. Make sure they’re securely attached before starting to turn them into pens.
4. Turn the blanks into pens. This step will involve shaping the wood with various lathe tools until it resembles a traditional pen shape. You can find detailed instructions online or in woodworking books/videos if needed.
5. Finish the pens as desired . This final step will protect your pens from wear and tear (and make them look even more beautiful). Popular finishes include lacquer, shellac, and wax .
Simply apply your finish of choice according to manufacturer’s directions and allow adequate drying time before using or gifting your new wooden pens!
Conclusion
This blog post outlines the supplies and steps needed to make a wood pen. The author begins by discussing the different types of wood that can be used for this project, and then provides a list of tools that will be needed. Next, the blog post walks readers through each step of the process, from choosing the wood to shaping it and adding the finishing touches.
Throughout, the author includes helpful tips and photos to illustrate each step. In addition, the blog post includes links to where readers can find more information or purchase supplies.