How to Make a Mini Pyrography Tool at Home
Making a mini pyrography tool at home is easy and only requires a few materials. You will need a soldering iron, some fine sandpaper, and some thin copper wire. The first step is to sand the tip of the soldering iron until it is shiny.
This will help the wire to grip better. Next, take the copper wire and wrap it around the tip of the soldering iron tightly. Make sure that there are no gaps between the turns of wire.
Finally, use pliers to twist the end of the wire so that it stays in place. Your mini pyrography tool is now ready to use!
- Gather the supplies you will need: a sharp knife, a dowel or small piece of wood, sandpaper, and some wire
- Cut a small notch in the end of the dowel or wood using the knife
- This will be where you insert the wire to create your design
- Sand down any rough edges on the notch and around it so that it is smooth
- Wrap one end of the wire around the base of the tool, leaving about an inch of exposed wire at the tip
- This will be used to draw your design onto whatever material you are pyrography-ing
- Heat up the exposed tip of the wire with a lighter or other heat source until it is glowing red hot
- You can now start drawing your design onto your material!
Diy Wood Burning Without Tool
If you’re looking for a way to add a personal touch to your home décor, consider DIY wood burning! This popular craft involves using a tool to burn designs into wood surfaces, and it’s easier than you might think. Plus, it’s a great way to upcycle old furniture or wooden décor items that you no longer use.
To get started, all you need is a wood burning tool and some practice. Once you’ve mastered the basics, there are endless possibilities for what you can create. Check out these tips for getting started with DIY wood burning:
1. Choose the right wood burning tool. There are many different types of tools available on the market, so do some research to find the one that’s right for you. Consider factors like budget, ease of use, and the type of design you want to create.
2. Practice on scrap pieces of wood before starting your project. This will help you get a feel for how the tool works and how much pressure to apply whenBurning designs into your chosen surface.
3. When working on your project piece, start with simple designs and work your way up to more complex ones.
This will help build your confidence as you go along!
4. Use stencils or templates if needed to help guide your design work . You can find these online or in crafting stores .
Or , get creative and make your own ! Just be sure trace around them lightly with pencil first so you don’t accidentally Burn through them while working . 5 Lastly , have fun with it !
Don’t be afraid experiment – that’s half the fun of DIY projects !
Read: How to Preserve Wood Slices
How to Make a Pyrography Machine
Welding is a process of joining two pieces of metal together by heating the metals until they melt and then cooling them so that they solidify as one piece. Pyrography is the art of burning images or designs into wood using a heated tool. You can create beautiful works of art with a pyrography machine, and the best part is that it’s not difficult to make your own machine.
Here’s how:
First, you’ll need to gather some supplies. For the body of your machine, you can use an old toaster oven, coffee can, or anything else that has an electric heating element.
You’ll also need some wire, solder, a switch, and a plug. For the tip of your machine, you can use a soldering iron tip, nail file, or any other metal object that can be heated up and will conduct heat well.
Next, you’ll need to assemble your machine.
If you’re using an old toaster oven, simply remove the heating element from inside and attach it to the outside with wires. If you’re using a coffee can or other container, drill a hole in the bottom for the wires to come through. Then attach the heating element to the inside of your container with solder.
Finally, add the switch and plug so you can turn your machine on and off easily.
Now it’s time to start burning! Place your wood onto an insulated surface like a ceramic tile or sheet of aluminum foil.
Then hold your hot tip against the wood and start moving it around in whatever design you like. The key is to move slowly so that you don’t overheat any one area and cause damage to the wood fibers. Keep practicing until you get comfortable with using your new pyrography machine!
Diy Wood Burning Projects
Looking for some fun and unique wood burning projects? Check out these ideas!
1. Wood burned signs – Add a personal touch to your home décor with a custom wood burned sign.
You can use any quote, saying, or design that you like – the sky’s the limit!
2. Wooden spoons – These make great gifts (especially for foodies!) and are really easy to make. Just grab some wooden spoons from your local craft store and get creative with your wood burning designs.
3. Recipe boxes – This is a great project for anyone who loves to cook. Decorate a basic recipe box with a wood burned design and fill it with your favorite recipes. Your friends and family will love it!
4. Picture frames – Another great gift idea! Dress up plain picture frames with intricate wood burning designs for a personal touch.
5. Jewelry dishes – These are so pretty and easy to make!
Just find some small ceramic dishes (or even use Altoid tins) and add whatever design you like. They’re perfect for holding jewelry or other small items.
Read to know: Can You Burn Rotting Wood
Diy Pyrography Power Supply
A pyrography power supply is a tool that supplies power to a pyrography pen. It is used to control the temperature of the pen and can be set to any desired temperature. A power supply typically has two settings: low and high.
Some models also have a dial that allows for more precise temperature control.
Pyrography pens are available in different sizes, shapes, and styles. The most common type of pen is the wire-nose pencil, which has a fine tip that is ideal for detailed work.
Other popular types include the soldering iron, hot knife, and wood-burning stove. Each type of pen has its own advantages and disadvantages, so it’s important to choose the right one for your project.
The wire-nose pencil is the most popular type of pyrography pen because it’s easy to use and produces great results.
However, this type of pen can be difficult to control if you’re not careful. The hot knife is another popular choice among pyrographers because it gives you more control over your burns; however, it can be dangerous if not used properly.
When choosing a power supply for your pyrography project, there are a few things you should keep in mind:
-The wattage rating: This dictates how much power the unit can deliver. Choose a unit with at least 30 watts of power if you plan on doing any serious pyrography work. If you’re just starting out, however, a lower-wattage unit will suffice.
Just keep in mind that you may need to upgrade to a higher-wattage unit as your skills improve.
-The voltage rating: This tells you how much voltage the unit can handle safely without damaging itself or causing an electrical fire hazard . Most units are rated for 120 volts; however , some models are available that can accommodate 220 volts .
If you’re unsure which voltage rating you need , check with your local electrician orpyrography retailer before making your purchase .
-The price: Power supplies range in price from around $30 to $200 , depending on their features and wattage rating . If you’re just starting out , it’s best to choose an affordable model ; however , if you plan on doing alotofpyrograph y work , investing in a higher – quality model will pay off in the long run .
Pyrography Pen Price
In the world of wood burning, there are many different types of pyrography pens available on the market. The prices for these pens can range from around $10 to over $200. It all depends on the brand, quality, and features that you’re looking for in a pen.
If you’re just starting out in wood burning, then it’s probably best to go with a less expensive pen so that you can get a feel for the process and decide if it’s something that you’d like to pursue further. There are also some very high-end pyrography pens that have all the bells and whistles, but they come at a price tag to match. Ultimately, it’s up to you to decide how much you’re willing to spend on a pyrography pen.
Credit: www.instructables.com
How Do You Burn Wood Without a Wood Burning Tool?
You can’t actually burn wood without a wood burning tool – you need some kind of heat source to ignite the wood in order to get it to burn. However, there are some ways that you can make a makeshift wood burning tool if you’re in a pinch and don’t have access to one. For example, you could use a metal rod or pipe that’s been heated up in a fire – this will help transfer the heat to the wood and get it started burning.
You could also use something like a magnifying glass or lens to concentrate the sun’s rays onto the Wood and start a small fire that way. If you have any other kind of flammable liquid like alcohol or gasoline, you can use that to soaked the wood and then light it on fire as well. In general, though, you’ll need some kind of heat source to get wood burning – there’s no way around it!
Can You Make Your Own Pyrography Tips?
Yes, you can make your own pyrography tips! You’ll need some basic supplies and tools, including a soldering iron, wire cutters, and pliers. Once you have everything you need, follow these steps to create your own custom tips.
1. Cut a piece of brass or copper wire to the length you want your tip to be. Use wire cutters or pliers to make sure the ends of the wire are clean and even.
2. File down any sharp edges on the wire so they’re not too pointy or jagged.
You don’t want them to be too sharp because they could damage your woodworking project.
3. Use a soldering iron to heat up one end of the wire until it’s glowing red hot. Touch the other end of the wire to the heated end and hold it there for a few seconds until they’re joined together.
Let the solder cool completely before moving on to the next step.
4. Use a file or sandpaper to smooth down the seam where you soldered the two pieces of wire together. You want it to be as seamless as possible so that it doesn’t snag on anything while you’re working with it.
5a) For a pointed tip: Carefully bend the heated end of the wire into a point using needle-nose pliers while it’s still hot (but not too hot!) from being soldered . Be careful not to touch anything else with this hot tip! Or…
b) For a flat tip: Allow solder joint to cool completely then use needle nose pliers grip just below seam and twist off desired amount for flat edge – about 1/16” is good place start (test by touching metal against wood – if smoke appears that means edge is too thin and needs more twisting). If needed repeat heating process then re-twisting off metal until correct width is achieved.)
5b) Repeat steps 2 – 4 until desired shape is achieved then test by touching metal against wood – if smoke appears that means edge is too thin and needs more work.. When satisfied move on 6 OR… 6a) Grip entire Pyrography Tip near base with needle nose pliers then dip entire tip in black enamel paint (this will help prevent rusting). Let dry thoroughly before using.
Can You Use a Dremel for Pyrography?
Pyrography, also known as wood burning, is the art of drawing or writing with a heated object on a surface. The most common tool used for pyrography is a Dremel.
Dremels are small, handheld rotary tools that come with a variety of attachments and accessories.
They’re very versatile and can be used for all kinds of different projects – including pyrography!
To use a Dremel for pyrography, simply attach the appropriate tip to your tool and start drawing or writing on your chosen surface. The heat from the Dremel will darken the wood, creating beautiful results.
If you’re new to pyrography, we recommend starting with some simple patterns or shapes before moving on to more complex designs. Practice makes perfect! With a little bit of practice, you’ll be able to create stunning works of art using your Dremel and pyrography skills.
Read to know: How Do You Carve Wood With a Chisel?
What is the Difference between Pyrography And Wood Burning?
Pyrography, also known as wood burning, is the art of decorating wood with burned designs. It’s a popular technique for creating unique and personalized gifts, as well as for adding a rustic touch to home decor.
The main difference between pyrography and wood burning is the tools that are used.
Pyrography uses a pen-like tool to apply heat to the wood, while wood burning uses a small, handheld torch. Both techniques require careful control to avoid scorching or damaging the wood.
Pyrography is often used to create detailed designs, while wood burning is more suited for larger areas or basic shapes.
Pyrography can be done on any type of wood, but softer woods like pine are easier to work with than hardwoods like oak.
No matter what technique you use, practice on scrap pieces of wood before attempting your final project. And always use caution when working with hot tools!
Important: Can a Cricut Machine Burn Wood?
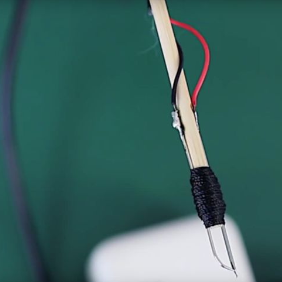
How to make a Mini Pyrography Tool
Conclusion
If you’re interested in pyrography but don’t want to invest in a fancy tool, never fear! You can easily make your own mini pyrography tool at home with just a few supplies. All you need is a nail, some wire, and a power source.
To start, file the tip of the nail into a point. Then, use pliers to wrap about 6 inches of wire around the base of the nail. The other end of the wire will be attached to your power source – either a battery or an AC adapter.
Once everything is hooked up, turn on your power source and start burning away!
With this simple setup, you can create all sorts of designs on wood, leather, and paper. Just be sure to practice on some scrap material first so that you get a feel for how hot the tool gets and how long it takes to produce different effects.